RBFS Subscriber Management Configuration
This chapter provides information about the following:
-
PPPoE Subscriber Management Configuration
-
IPoE Subscriber Management Configuration
-
QoS Configuration for PPPoE and IPoE Subscribers
PPPoE Subscriber Management Configuration
PPPoE (Point-to-Point Protocol over Ethernet) is a network protocol that provides connectivity across Ethernet networks. The protocol enables communication between network endpoints and service providers implement PPPoE to connect many hosts on a single Ethernet LAN to the core network through a common device. In RBFS, the PPPoE daemon (pppoed) manages PPPoE and PPP sessions.
To enable PPPoE Subscriber Management, the following configurations are mandatory:
-
Access Interface Configuration
-
Access Profile Configuration
-
AAA (Authentication, Authorization and Accounting) Profile Configuration. Based on the authentication requirement, configure any one of the following:
-
Local Authentication
-
Pool Configuration
-
User Profile Configuration
-
-
RADIUS Authentication
-
RADIUS Profile Configuration
-
RADIUS Server Configuration
-
-
This solution section discusses RADIUS authentication.
NOTES:
-
Access interfaces can be configured without VLAN tags (untagged) and with one (single tagged) or two (double tagged) VLAN tags.
-
There can be more than one interface configured for subscriber management and each interface can reference the same profile.
Configuring PPPoE Subscriber Management
For detailed information about the subscriber configuration options, see the Subscriber Management Configuration Guide.
-
Configure the access profile
pppoe.
set access access-profile pppoe
set access access-profile pppoe protocol pppoe enable true
set access access-profile pppoe protocol ppp lcp authentication-protocol PAP
set access access-profile pppoe protocol ppp lcp echo-interval 30
set access access-profile pppoe protocol ppp lcp echo-enable true
set access access-profile pppoe protocol ppp ipcp enable true
set access access-profile pppoe protocol ppp ipcp source-ifl lo-0/0/1/0
set access access-profile pppoe protocol ppp ip6cp enable true
set access access-profile pppoe protocol ra enable true
set access access-profile pppoe protocol ra interval 30
set access access-profile pppoe protocol dhcpv6 enable true
set access access-profile pppoe protocol dhcpv6 lifetime 14400
set access access-profile pppoe protocol dhcpv6 preferred-lifetime 1800
set access access-profile pppoe address-family ipv4 enable true
set access access-profile pppoe address-family ipv4 pool-name poolv4
set access access-profile pppoe address-family ipv4 primary-dns 203.0.113.200
set access access-profile pppoe address-family ipv4 secondary-dns 203.0.113.201
set access access-profile pppoe address-family ipv4 instance default
set access access-profile pppoe address-family ipv6 enable true
set access access-profile pppoe address-family ipv6 pool-name poolv6
set access access-profile pppoe address-family ipv6 prefix-delegation-pool-name poolv6pd
set access access-profile pppoe address-family ipv6 primary-dns 2001:db8:0:20::1
set access access-profile pppoe address-family ipv6 secondary-dns 2001:db8:0:20::1
set access access-profile pppoe address-family ipv6 instance default
commit
The access profile configuration is shown below.
supervisor@rtbrick>multiservice-edge.rtbrick.net: cfg> show config access access-profile
{
  "rtbrick-config:access-profile": [
    {
      "profile-name": "pppoe",
      "protocol": {
        "pppoe": {
          "enable": "true"
        },
        "ppp": {
          "lcp": {
            "authentication-protocol": "PAP",
            "echo-interval": 30,
            "echo-enable": "true"
          },
          "ipcp": {
            "enable": "true",
            "source-ifl": "lo-0/0/1/0"
          },
          "ip6cp": {
            "enable": "true"
          }
        },
        "ra": {
          "enable": "true",
          "interval": 30
        },
        "dhcpv6": {
          "enable": "true",
          "lifetime": 14400,
          "preferred-lifetime": 1800
        }
      },
      "address-family": {
        "ipv4": {
          "enable": "true",
          "pool-name": "poolv4",
          "primary-dns": "203.0.113.200",
          "secondary-dns": "203.0.113.201",
          "instance": "default"
        },
        "ipv6": {
          "enable": "true",
          "pool-name": "poolv6",
          "prefix-delegation-pool-name": "poolv6pd",
          "primary-dns": "2001:db8:0:20::1",
          "secondary-dns": "2001:db8:0:20::1",
          "instance": "default"
        }
      }
    }
  ]
}
-
Configure the Authentication and Accounting (AAA) profile for
aaa-profile.
set access aaa-profile aaa-profile
set access aaa-profile aaa-profile session-timeout 0
set access aaa-profile aaa-profile idle-timeout 0
set access aaa-profile aaa-profile aaa-radius-profile radius-profile
set access aaa-profile aaa-profile authentication order RADIUS
set access aaa-profile aaa-profile accounting order RADIUS
set access aaa-profile aaa-profile accounting interim-interval 86400
set access aaa-profile aaa-profile accounting ingress accounting-source POLICER
set access aaa-profile aaa-profile accounting egress accounting-source CLASS
commit
The access AAA configuration is shown below.
supervisor@rtbrick>multiservice-edge.rtbrick.net: cfg> show config access aaa-profile
{
  "rtbrick-config:aaa-profile": [
    {
      "profile-name": "aaa-profile",
      "session-timeout": 0,
      "idle-timeout": 0,
      "aaa-radius-profile": "radius-profile",
      "authentication": {
        "order": "RADIUS"
      },
      "accounting": {
        "order": "RADIUS",
        "interim-interval": 86400,
        "ingress": {
          "accounting-source": "POLICER"
        },
        "egress": {
          "accounting-source": "CLASS"
        }
      }
    }
  ]
}
-
Configure the access interface. Double-tagged interface is configured in this case as the access interface (
ifp-0/1/3). The interface configuration assigns the access type, access profile, AAA profile, and further optional attributes like service-profile to the specified access interface.
Commands for PPPoE:
set access interface double-tagged ifp-0/1/40 4020 4020 1001 2000
set access interface double-tagged ifp-0/1/40 4020 4020 1001 2000 access-type PPPoE
set access interface double-tagged ifp-0/1/40 4020 4020 1001 2000 access-profile-name pppoe
set access interface double-tagged ifp-0/1/40 4020 4020 1001 2000 service-profile-name subs_service
set access interface double-tagged ifp-0/1/40 4020 4020 1001 2000 aaa-profile-name aaa-profile
set access interface double-tagged ifp-0/1/42 4020 4020 1001 2000
set access interface double-tagged ifp-0/1/42 4020 4020 1001 2000 access-type PPPoE
set access interface double-tagged ifp-0/1/42 4020 4020 1001 2000 access-profile-name pppoe
set access interface double-tagged ifp-0/1/42 4020 4020 1001 2000 service-profile-name subs_service
set access interface double-tagged ifp-0/1/42 4020 4020 1001 2000 aaa-profile-name aaa-profile
commit
The double-tagged access interface configuration (for PPPoE) is shown below.
supervisor@rtbrick>ufi08.q2c.u23.r4.nbg.rtbrick.net: cfg> show config access interface double-tagged
{
  "rtbrick-config:double-tagged": [
    {
      "interface-name": "ifp-0/1/40",
      "outer-vlan-min": 4020,
      "outer-vlan-max": 4020,
      "inner-vlan-min": 1001,
      "inner-vlan-max": 2000,
      "access-type": "PPPoE",
      "access-profile-name": "pppoe",
      "service-profile-name": "subs_service",
      "aaa-profile-name": "aaa-profile"
    },
    {
      "interface-name": "ifp-0/1/42",
      "outer-vlan-min": 4020,
      "outer-vlan-max": 4020,
      "inner-vlan-min": 1001,
      "inner-vlan-max": 2000,
      "access-type": "PPPoE",
      "access-profile-name": "pppoe",
      "service-profile-name": "subs_service",
      "aaa-profile-name": "aaa-profile"
    }
  ]
}
Commands for IPoE:
set access interface single-tagged ifp-0/1/40 10 4010
set access interface single-tagged ifp-0/1/40 10 4010 access-type IPoE
set access interface single-tagged ifp-0/1/40 10 4010 access-profile-name ipoe
set access interface single-tagged ifp-0/1/40 10 4010 service-profile-name subs_service
set access interface single-tagged ifp-0/1/40 10 4010 aaa-profile-name aaa-profile
set access interface single-tagged ifp-0/1/40 10 4010 gateway-ifl lo-0/0/1/0
set access interface single-tagged ifp-0/1/42 10 4010
set access interface single-tagged ifp-0/1/42 10 4010 access-type IPoE
set access interface single-tagged ifp-0/1/42 10 4010 access-profile-name ipoe
set access interface single-tagged ifp-0/1/42 10 4010 service-profile-name subs_service
set access interface single-tagged ifp-0/1/42 10 4010 aaa-profile-name aaa-profile
set access interface single-tagged ifp-0/1/42 10 4010 gateway-ifl lo-0/0/1/0
commit
The single-tagged access interface configuration (for IPoE) is shown below.
supervisor@rtbrick>ufi08.q2c.u23.r4.nbg.rtbrick.net: cfg> show config access interface single-tagged
{
  "rtbrick-config:single-tagged": [
    {
      "interface-name": "ifp-0/1/40",
      "outer-vlan-min": 10,
      "outer-vlan-max": 4010,
      "access-type": "IPoE",
      "access-profile-name": "ipoe",
      "service-profile-name": "subs_service",
      "aaa-profile-name": "aaa-profile",
      "gateway-ifl": "lo-0/0/1/0"
    },
    {
      "interface-name": "ifp-0/1/42",
      "outer-vlan-min": 10,
      "outer-vlan-max": 4010,
      "access-type": "IPoE",
      "access-profile-name": "ipoe",
      "service-profile-name": "subs_service",
      "aaa-profile-name": "aaa-profile",
      "gateway-ifl": "lo-0/0/1/0"
    }
  ]
}
-
In this solution, we configure AAA authentication and accounting with RADIUS. To use RADIUS authentication and accounting both the RADIUS profile and RADIUS server configurations (see below) must be configured.
-
Configure RADIUS profile
radius-profile.
set access radius-profile radius-profile
set access radius-profile radius-profile nas-ip-address 192.0.2.74
set access radius-profile radius-profile nas-port-format DEFAULT
set access radius-profile radius-profile nas-port-type Ethernet
set access radius-profile radius-profile authentication radius-server-profile-name radius
set access radius-profile radius-profile accounting radius-server-profile-name radius
commit
The RADIUS profile configuration is shown below.
supervisor@rtbrick>multiservice-edge.rtbrick.net: cfg> show config access radius-profile radius-profile
{
  "rtbrick-config:radius-profile": [
    {
      "profile-name": "radius-profile",
      "nas-ip-address": "192.0.2.74",
      "nas-port-format": "DEFAULT",
      "nas-port-type": "Ethernet",
      "authentication": {
        "radius-server-profile-name": [
          "radius"
          ]
      },
      "accounting": {
        "radius-server-profile-name": [
          "radius"
          ]
      }
    }
  ]
}
-
Configure the RADIUS server
radius.
set access radius-server radius
set access radius-server radius address 192.0.2.34
set access radius-server radius source-address 192.0.2.74
set access radius-server radius secret-encrypted-text $2b2feb12f730107454b1be6a0f8242b0f
set access radius-server radius routing-instance default
set access radius-server radius rate 300
set access radius-server radius authentication enable true
set access radius-server radius authentication retry 3
set access radius-server radius authentication timeout 5
set access radius-server radius accounting enable true
set access radius-server radius accounting timeout 30
set access radius-server radius coa enable true
commit
The attribute secret-plain-text is converted to secret-encrypted-text in the show command output and the value is hashed.
|
The RADIUS server configuration is shown below.
supervisor@rtbrick>multiservice-edge.rtbrick.net: cfg> show config access radius-server radius
{
  "rtbrick-config:radius-server": [
    {
      "server-name": "radius",
      "address": "192.0.2.34",
      "source-address": "192.0.2.74",
      "secret-encrypted-text": "$2b2feb12f730107454b1be6a0f8242b0f",
      "routing-instance": "default",
      "rate": 300,
      "authentication": {
        "enable": "true",
        "retry": 3,
        "timeout": 5
      },
      "accounting": {
        "enable": "true",
        "timeout": 30
      },
      "coa": {
        "enable": "true"
      }
    }
  ]
}
-
Configure the IPv4 and IPv6 access pools.
set access pool poolv4
set access pool poolv4 ipv4-address low 203.0.113.1
set access pool poolv4 ipv4-address high 203.0.113.64
set access pool poolv6
set access pool poolv6 ipv6-prefix low 2001:db8:0:1::/64
set access pool poolv6 ipv6-prefix high 2001:db8:0:2::/64
set access pool poolv6pd
set access pool poolv6pd ipv6-prefix low 2001:db8:0:3::/56
set access pool poolv6pd ipv6-prefix high 2001:db8:0:4::/56
commit
The access pool configuration is shown below.
supervisor@rtbrick>multiservice-edge.rtbrick.net: cfg> show config access pool
{
  "rtbrick-config:pool": [
    {
      "pool-name": "poolv4",
      "ipv4-address": {
        "low": "203.0.113.1",
        "high": "203.0.113.64"
      }
    },
    {
      "pool-name": "poolv6",
      "ipv6-prefix": {
        "low": "2001:db8:0:1::/64",
        "high": "2001:db8:0:2::/64"
      }
    },
    {
      "pool-name": "poolv6pd",
      "ipv6-prefix": {
        "low": "2001:db8:0:3::/56",
        "high": "2001:db8:0:4::/56"
      }
    }
  ]
}
IPoE Subscriber Management Configuration
IP-over-Ethernet (IPoE) is an access technology that uses DHCP for IPv4 and DHCPv6 for IPv6 where both protocols are handled in the IPoE daemon (ipoed). IPoE subscribers are identified by IFP, VLANs and client MAC addresses.
The dynamic creation of IPoE subscribers is triggered by DHCPv4 discover or DHCPv6 solicit request from the subscriber. Response is postponed until the subscriber is successfully authenticated using the known authentication methods such as local or RADIUS, however authentication is not mandatory. After the authentication phase, IPv4/IPv6/IPv6-PD address is allocated to the subscriber either from the local pool or from RADIUS.
To enable IPoE Subscriber Management, the following configurations are mandatory:
-
Access Interface Configuration
-
Access Profile Configuration
-
AAA (Authentication, Authorization and Accounting) Profile Configuration. Based on the authentication requirement, configure any one of the following:
-
Local Authentication
-
Pool Configuration
-
User Profile Configuration
-
-
RADIUS Authentication
-
RADIUS Profile Configuration
-
RADIUS Server Configuration
-
-
This solution section discusses RADIUS authentication.
NOTES:
-
Access interfaces can be configured without VLAN tags (untagged) and with one (single tagged) or two (double tagged) VLAN tags.
-
There can be more than one interface configured for subscriber management and each interface can reference the same profile.
Configuring IPoE Subscriber Management
For detailed information about the subscriber configuration options, see the Subscriber Management Configuration Guide.
-
Configure the access profile
ipoe.
set access access-profile ipoe
set access access-profile ipoe protocol dhcp enable true
set access access-profile ipoe protocol dhcp lease-time 60
set access access-profile ipoe protocol dhcpv6 enable true
set access access-profile ipoe protocol dhcpv6 lifetime 60
set access access-profile ipoe address-family ipv4 enable true
set access access-profile ipoe address-family ipv4 pool-name poolv4
set access access-profile ipoe address-family ipv4 instance default
set access access-profile ipoe address-family ipv4 dad-enable true
set access access-profile ipoe address-family ipv6 enable true
set access access-profile ipoe address-family ipv6 pool-name poolv6
set access access-profile ipoe address-family ipv6 prefix-delegation-pool-name poolv6pd
set access access-profile ipoe address-family ipv6 instance default
set access access-profile ipoe address-family ipv6 dad-enable true
commit
The access profile configuration is shown below.
supervisor@rtbrick>multiservice-edge.rtbrick.net: op> show config access access-profile
{
  "rtbrick-config:access-profile": [
    {
      "profile-name": "ipoe",
      "protocol": {
        "dhcp": {
          "enable": "true",
          "lease-time": 60
        },
        "dhcpv6": {
          "enable": "true",
          "lifetime": 60
        }
      },
      "address-family": {
        "ipv4": {
          "enable": "true",
          "pool-name": "poolv4",
          "instance": "default",
          "dad-enable": "true"
        },
        "ipv6": {
          "enable": "true",
          "pool-name": "poolv6",
          "prefix-delegation-pool-name": "poolv6pd",
          "instance": "default",
          "dad-enable": "true"
        }
      }
    }
  ]
}
-
Configure the Authentication and Accounting (AAA) profile for
aaa-profile.
set access aaa-profile aaa-profile
set access aaa-profile aaa-profile session-timeout 0
set access aaa-profile aaa-profile idle-timeout 0
set access aaa-profile aaa-profile aaa-radius-profile radius-profile
set access aaa-profile aaa-profile authentication order RADIUS
set access aaa-profile aaa-profile accounting order RADIUS
set access aaa-profile aaa-profile accounting interim-interval 86400
set access aaa-profile aaa-profile accounting ingress accounting-source POLICER
set access aaa-profile aaa-profile accounting egress accounting-source CLASS
commit
The access AAA configuration is shown below.
supervisor@rtbrick>multiservice-edge.rtbrick.net: op> show config access aaa-profile
{
  "rtbrick-config:aaa-profile": [
    {
      "profile-name": "aaa-profile",
      "session-timeout": 0,
      "idle-timeout": 0,
      "aaa-radius-profile": "radius-profile",
      "authentication": {
        "order": "RADIUS"
      },
      "accounting": {
        "order": "RADIUS",
        "interim-interval": 86400,
        "ingress": {
          "accounting-source": "POLICER"        },
        "egress": {
          "accounting-source": "CLASS"
        }
      }
    }
  ]
}
supervisor@rtbrick>multiservice-edge.rtbrick.net: op>
-
Configure the access interface. Double-tagged interface is configured in this case as the access interface (
ifp-0/1/5). The interface configuration assigns the access type, access profile, AAA profile, and further optional attributes like service-profile to the specified access interface.
set access interface double-tagged ifp-0/1/5 1001 1100 1001 1100
set access interface double-tagged ifp-0/1/5 1001 1100 1001 1100 access-type IPoE
set access interface double-tagged ifp-0/1/5 1001 1100 1001 1100 access-profile-name ipoe
set access interface double-tagged ifp-0/1/5 1001 1100 1001 1100 service-profile-name subs_service
set access interface double-tagged ifp-0/1/5 1001 1100 1001 1100 aaa-profile-name aaa-profile
set access interface double-tagged ifp-0/1/5 1001 1100 1001 1100 gateway-ifl lo-0/0/1/0
commit
The double-tagged access interface configuration is shown below.
supervisor@rtbrick>multiservice-edge.rtbrick.net: op> show config access interface
{
  "rtbrick-config:interface": {
    "double-tagged": [
      {
        "interface-name": "ifp-0/1/5",
        "outer-vlan-min": 1001,
        "outer-vlan-max": 1100,
        "inner-vlan-min": 1001,
        "inner-vlan-max": 1100,
        "access-type": "IPoE",
        "access-profile-name": "ipoe",
        "service-profile-name": "subs_service",
        "aaa-profile-name": "aaa-profile",
        "gateway-ifl": "lo-0/0/1/0"
      }
    ]
  }
}
-
In this solution, we configure AAA authentication and accounting with RADIUS. To use RADIUS authentication and accounting both the RADIUS profile and RADIUS server configurations (see below) must be configured.
-
Configure RADIUS profile
radius-profile.
set access radius-profile radius-profile
set access radius-profile radius-profile nas-ip-address 192.0.2.74
set access radius-profile radius-profile nas-port-format DEFAULT
set access radius-profile radius-profile nas-port-type Ethernet
set access radius-profile radius-profile authentication radius-server-profile-name radius
set access radius-profile radius-profile accounting radius-server-profile-name radius
commit
The RADIUS profile configuration is shown below.
supervisor@rtbrick>multiservice-edge.rtbrick.net: op> show config access radius-profile radius-profile
{
  "rtbrick-config:radius-profile": [
    {
      "profile-name": "radius-profile",
      "nas-ip-address": "192.0.2.74",
      "nas-port-format": "DEFAULT",
      "nas-port-type": "Ethernet",
      "authentication": {
        "radius-server-profile-name": [
          "radius"
          ]
      },
      "accounting": {
        "radius-server-profile-name": [
          "radius"
          ]
      }
    }
  ]
}
-
Configure the RADIUS server
radius.
set access radius-server radius
set access radius-server radius address 192.0.2.34
set access radius-server radius source-address 192.0.2.74
set access radius-server radius secret-plain-text testing123
set access radius-server radius routing-instance default
set access radius-server radius rate 300
set access radius-server radius authentication enable true
set access radius-server radius authentication retry 3
set access radius-server radius authentication timeout 5
set access radius-server radius accounting enable true
set access radius-server radius accounting timeout 30
set access radius-server radius coa enable true
commit
The attribute` secret-plain-text` will be converted to secret-encrypted-text in the show command output and value will be hashed.
|
The RADIUS server configuration is shown below.
supervisor@rtbrick>multiservice-edge.rtbrick.net: cfg> show config access radius-server radius
{
  "rtbrick-config:radius-server": [
    {
      "server-name": "radius",
      "address": "192.0.2.34",
      "source-address": "192.0.2.74",
      "secret-encrypted-text": "$2b2feb12f730107454b1be6a0f8242b0f",
      "routing-instance": "default",
      "rate": 300,
      "authentication": {
        "enable": "true",
        "retry": 3,
        "timeout": 5
      },
      "accounting": {
        "enable": "true",
        "timeout": 30
      },
      "coa": {
        "enable": "true"
      }
    }
  ]
}
-
Configure the IPv4 and IPv6 access pools.
set access pool poolv4
set access pool poolv4 ipv4-address low 203.0.113.1
set access pool poolv4 ipv4-address high 203.0.113.64
set access pool poolv6
set access pool poolv6 ipv6-prefix low 2001:db8:0:1::/64
set access pool poolv6 ipv6-prefix high 2001:db8:0:40::/64
set access pool poolv6pd
set access pool poolv6pd ipv6-prefix low 2001:db8:0:100::/56
set access pool poolv6pd ipv6-prefix high 2001:db8:0:4000::/56
commit
The access pool configuration is shown below.
supervisor@rtbrick>multiservice-edge.rtbrick.net: cfg> show config access pool
{
  "rtbrick-config:pool": [
    {
      "pool-name": "poolv4",
      "ipv4-address": {
        "low": "203.0.113.1",
        "high": "203.0.113.64"
      }
    },
    {
      "pool-name": "poolv6",
      "ipv6-prefix": {
        "low": "2001:db8:0:1::/64",
        "high": "2001:db8:0:40::/64"
      }
    },
    {
      "pool-name": "poolv6pd",
      "ipv6-prefix": {
        "low": "2001:db8:0:100::/56",
        "high": "2001:db8:0:4000::/56"
      }
    }
  ]
}
Quality of Service (QoS) Configuration
Following are the steps involved in configuring and verifying IPoE and PPPoE QoS:
-
Enabling System Platform Profile for Single Queue Subscribers
-
Configuring service profile to enable QoS on subscriber
-
Configuring downstream QoS
-
Configuring upstream QoS
-
Configuring PPPoE and IPoE subscriber accounting for upstream and downstream traffic
-
Configuring PPPoE and IPoE subscriber QoS on BNG Blaster
-
Validating PPPoE and IPoE QoS on BNG Blaster
The figure below shows how QoS is configured for ingress and egress traffic.
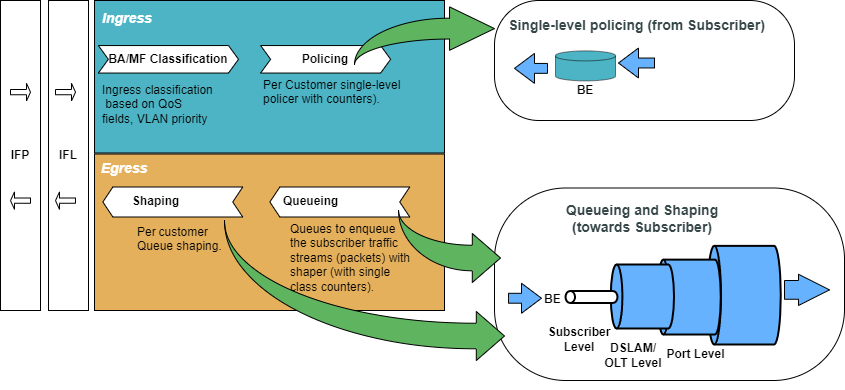
For detailed information about the QoS configuration options, see HQoS Configuration Guide.
Enabling System Platform Profile for Single Q Subscribers
| System reboot is required after enabling the system platform profile. |
-
Enable system platform profile for single queue subscribers
set system platform profile nat_1q
commit
The configuration of the system platform profile named nat_1q is shown below.
supervisor@rtbrick>ec24.q2c.u9.r2.nbg.rtbrick.net: cfg> show config system platform profile
{
  "rtbrick-config:profile": "nat_1q"
}
Configure Service Profile
Service profile configuration in subscriber management allows to assign QoS configurations to a subscriber.
-
Configure the service profile to enable QoS. The service profile defined to enable Quality of Service with the profile name is
residential.
set access service-profile subs_service qos profile residential
commit
The configuration of the service profile named residential is shown below.
supervisor@rtbrick>multiservice-edge.rtbrick.net: cfg> show config access service-profile subs_service
{
  "rtbrick-config:service-profile": [
    {
      "profile-name": "subs_service",
      "qos": {
        "profile": "residential"
      }
    }
  ]
}
-
Enable QoS on the PPPoE and IPoE subscriber access interface (
ifp-0/1/3andifp-0/1/5respectively) to enable QoS for the subscriber.
set access interface double-tagged ifp-0/1/3 1001 1100 1001 1100 serviceprofile-name subs_service
set access interface double-tagged ifp-0/1/5 1001 1100 1001 1100 serviceprofile-name subs_service
commit
Below is the double-tagged access interface on which the service profile subs_service is configured for access type PPPoE:
supervisor@rtbrick>multiservice-edge.rtbrick.net: cfg> show config access interface double-tagged ifp-0/1/3
{
  "rtbrick-config:double-tagged": [
    {
      "interface-name": "ifp-0/1/3",
      "outer-vlan-min": 1001,
      "outer-vlan-max": 1100,
      "inner-vlan-min": 1001,
      "inner-vlan-max": 1100,
      "access-type": "PPPoE",
      "service-profile-name": "subs_service",
      "aaa-profile-name": "aaa-profile",
      "gateway-ifl": "lo-0/0/1/0"
    }
  ]
}
Below is the double-tagged access interface on which the service profile subs_service is configured for access type IPoE:
supervisor@rtbrick>multiservice-edge.rtbrick.net: cfg> show config access interface double-tagged ifp-0/1/5
{
  "rtbrick-config:double-tagged": [
    {
      "interface-name": "ifp-0/1/5",
      "outer-vlan-min": 1001,
      "outer-vlan-max": 1100,
      "inner-vlan-min": 1001,
      "inner-vlan-max": 1100,
      "access-type": "IPoE",
      "service-profile-name": "subs_service",
      "aaa-profile-name": "aaa-profile",
      "gateway-ifl": "lo-0/0/1/0"
    }
  ]
}
-
Configure QoS profile to enable on subscriber.
set forwarding-options class-of-service profile residential
set forwarding-options class-of-service profile residential classifier-name subs-pbit-class
set forwarding-options class-of-service profile residential class-queue-map-name subs-1queue
set forwarding-options class-of-service profile residential class-policer-map-name policer-map-single
set forwarding-options class-of-service profile residential policer-name policer-single
set forwarding-options class-of-service profile residential scheduler-map-name subs-1queue-single-play
commit
The QoS Profile with all the primitives needed to enable traffic profiles on subscribers are as follows:
supervisor@rtbrick>ufi16.q2c.u13.r5.nbg.rtbrick.net: cfg> show config forwarding-options class-of-service profile residential
{
  "rtbrick-config:profile": [
    {
      "profile-name": "residential",
      "classifier-name": "subs-pbit-class",
      "class-queue-map-name": "subs-1queue",
      "class-policer-map-name": "policer-map-single",
      "policer-name": "policer-single",
      "scheduler-map-name": "subs-1queue-single-play"
    }
  ]
}
Configure Downstream QoS
Downstream Quality of Service (QoS) is used to prioritize network traffic from the Internet to subscribers.
-
Enable global classification for downstream traffic.
set forwarding-options class-of-service multifield-classifier acl l3v4 rule global_mfc
set forwarding-options class-of-service multifield-classifier acl l3v4 rule global_mfc ordinal 1001
set forwarding-options class-of-service multifield-classifier acl l3v4 rule global_mfc ordinal 1001 match source-ipv4-prefix 192.0.2.2/32
set forwarding-options class-of-service multifield-classifier acl l3v4 rule global_mfc ordinal 1001 action forward-class class-0
commit
Below is the multi-field-classifier (MFC) based classifier for global enabling of downstream traffic classification.
supervisor@rtbrick>ufi16.q2c.u13.r5.nbg.rtbrick.net: cfg> show config forwarding-options class-of-service multifield-classifier
{
  "rtbrick-config:multifield-classifier": {
    "acl": {
      "l3v4": {
        "rule": [
          {
            "rule-name": "global_mfc",
            "ordinal": [
              {
                "ordinal-value": 1001,
                "match": {
                  "source-ipv4-prefix": "192.0.2.2/32"
                },
                "action": {
                  "forward-class": "class-0"
                }
              }
            ]
          }
        ]
      }
    }
  }
}
-
Configure the MFC-based classifier with qualifiers and actions.
set forwarding-options class-of-service multifield-classifier acl l3v4 rule global_mfc
set forwarding-options class-of-service multifield-classifier acl l3v4 rule global_mfc ordinal 1001
set forwarding-options class-of-service multifield-classifier acl l3v4 rule global_mfc ordinal 1001 match ipv4-tos 128
set forwarding-options class-of-service multifield-classifier acl l3v4 rule global_mfc ordinal 1001 match source-ipv4-prefix 192.0.2.2/32
set forwarding-options class-of-service multifield-classifier acl l3v4 rule global_mfc ordinal 1001 action forward-class class-0
set forwarding-options class-of-service multifield-classifier acl l3v4 rule global_mfc ordinal 1002
set forwarding-options class-of-service multifield-classifier acl l3v4 rule global_mfc ordinal 1002 match ipv4-tos 160
set forwarding-options class-of-service multifield-classifier acl l3v4 rule global_mfc ordinal 1002 match source-ipv4-prefix 192.0.2.2/32
set forwarding-options class-of-service multifield-classifier acl l3v4 rule global_mfc ordinal 1002 action forward-class class-1
set forwarding-options class-of-service multifield-classifier acl l3v4 rule global_mfc ordinal 1003
set forwarding-options class-of-service multifield-classifier acl l3v4 rule global_mfc ordinal 1003 match ipv4-tos 192
set forwarding-options class-of-service multifield-classifier acl l3v4 rule global_mfc ordinal 1003 match source-ipv4-prefix 192.0.2.2/32
set forwarding-options class-of-service multifield-classifier acl l3v4 rule global_mfc ordinal 1003 action forward-class class-2
set forwarding-options class-of-service multifield-classifier acl l3v4 rule global_mfc ordinal 1004
set forwarding-options class-of-service multifield-classifier acl l3v4 rule global_mfc ordinal 1004 match ipv4-tos 224
set forwarding-options class-of-service multifield-classifier acl l3v4 rule global_mfc ordinal 1004 match source-ipv4-prefix 192.0.2.2/32
set forwarding-options class-of-service multifield-classifier acl l3v4 rule global_mfc ordinal 1004 action forward-class class-3
commit
The configuration of the QoS MFC-based Classifier for the classification of downstream traffic from the core towards Subscriber is shown below.
supervisor@rtbrick>multiservice-edge.rtbrick.net: cfg> show config forwarding-options class-of-service multifield-classifier acl l3v4 rule global_mfc
{
  "rtbrick-config:rule": [
    {
      "rule-name": "global_mfc",
      "ordinal": [
        {
          "ordinal-value": 1001,
          "match": {
            "ipv4-tos": 128,
            "source-ipv4-prefix": "192.0.2.2/32"
          },
          "action": {
            "forward-class": "class-0"
          }
        },
        {
          "ordinal-value": 1002,
          "match": {
            "ipv4-tos": 160,
            "source-ipv4-prefix": "192.0.2.2/32"
          },
          "action": {
            "forward-class": "class-1"
          }
        },
        {
          "ordinal-value": 1003,
          "match": {
            "ipv4-tos": 192,
            "source-ipv4-prefix": "192.0.2.2/32"
          },
          "action": {
            "forward-class": "class-2"
          }
        },
        {
          "ordinal-value": 1004,
          "match": {
            "ipv4-tos": 224,
            "source-ipv4-prefix": "192.0.2.2/32"
          },
          "action": {
            "forward-class": "class-3"
          }
        }
      ]
    }
  ]
}
-
Configure the queues needed for enqueuing and dequeuing traffic streams.
set forwarding-options class-of-service queue BE_SUBS1
set forwarding-options class-of-service queue BE_SUBS1 queue-size 375000
set forwarding-options class-of-service queue BE_SUBS1 shaper-name shaper_BE
set forwarding-options class-of-service queue BE_SUBS1 header-compensation bytes 22
set forwarding-options class-of-service queue BE_SUBS1 header-compensation decrement true
commit
The queue configuration is shown below.
supervisor@rtbrick>multiservice-edge.rtbrick.net: cfg> show config forwarding-options class-of-service queue
{
  "rtbrick-config:queue": [
    {
      "queue-name": "BE_SUBS1",
      "queue-size": 375000,
      "shaper-name": "shaper_BE",
      "header-compensation": {
        "bytes": 22,
        "decrement": "true"
      }
    }
  ]
}
-
Configure downstream traffic shaping for the queue.
| Queue Shaping is only on the BE_SUBS1 queue. |
set forwarding-options class-of-service shaper shaper_BE
set forwarding-options class-of-service shaper shaper_BE shaping-rate-high 2000
set forwarding-options class-of-service shaper shaper_BE shaping-rate-low 0
commit
The shaping Configuration is shown below.
supervisor@rtbrick>multiservice-edge.rtbrick.net: cfg> show config forwarding-options class-of-service shaper
{
  "rtbrick-config:shaper": [
    {
      "shaper-name": "shaper_BE",
      "shaping-rate-high": 2000,
      "shaping-rate-low": 0
    }
  ]
}
-
Enqueue classified traffic to a queue using class-to-queue mapping.
set forwarding-options class-of-service class-queue-map subs-1queue
set forwarding-options class-of-service class-queue-map subs-1queue class class-0
set forwarding-options class-of-service class-queue-map subs-1queue class class-0 queue-name BE_SUBS1
commit
Class-to-Queue mapping configuration is shown below:
supervisor@rtbrick>multiservice-edge.rtbrick.net: cfg> show config forwarding-options class-of-service class-queue-map subs-1queue
{
  "rtbrick-config:class-queue-map": [
    {
      "class-queue-map-name": "subs-1queue",
      "class": [
        {
          "class-type": "class-0",
          "queue-name": "BE_SUBS1"
        }
      ]
    }
  ]
}
Configure Upstream QoS
-
Configure the BA Classifier for the classification of multiple traffic streams targeted at PPPoE and IPoE subscribers:
set forwarding-options class-of-service classifier subs-pbit-class
set forwarding-options class-of-service classifier subs-pbit-class match-type ieee-802.1
set forwarding-options class-of-service classifier subs-pbit-class match-type ieee-802.1 codepoint 1
set forwarding-options class-of-service classifier subs-pbit-class match-type ieee-802.1 codepoint 1 class class-0
set forwarding-options class-of-service classifier subs-pbit-class match-type ieee-802.1 codepoint 2
set forwarding-options class-of-service classifier subs-pbit-class match-type ieee-802.1 codepoint 2 class class-0
set forwarding-options class-of-service classifier subs-pbit-class match-type ieee-802.1 codepoint 3
set forwarding-options class-of-service classifier subs-pbit-class match-type ieee-802.1 codepoint 3 class class-0
set forwarding-options class-of-service classifier subs-pbit-class match-type ieee-802.1 codepoint 4
set forwarding-options class-of-service classifier subs-pbit-class match-type ieee-802.1 codepoint 4 class class-0
commit
The configuration of the QoS BA-based Classifier for the classification of upstream traffic toward the PPPoE Subscriber is shown below.
supervisor@rtbrick>multiservice-edge.rtbrick.net: cfg> show config forwarding-options class-of-service classifier subs-pbit-class
{
  "rtbrick-config:classifier": [
    {
      "classifier-name": "subs-pbit-class",
      "match-type": [
        {
          "match-type": "ieee-802.1",
          "codepoint": [
            {
              "codepoint": 1,
              "class": "class-0"
            },
            {
              "codepoint": 2,
              "class": "class-0"
            },
            {
              "codepoint": 3,
              "class": "class-0"
            },
            {
              "codepoint": 4,
              "class": "class-0"
            }
          ]
        }
      ]
    }
  ]
}
-
Configure single-level policer to police Level1 traffic.
set forwarding-options class-of-service policer policer-single
set forwarding-options class-of-service policer policer-single level1-rates cir 2000
set forwarding-options class-of-service policer policer-single level1-rates cbs 1000
set forwarding-options class-of-service policer policer-single level1-rates pir 2500
set forwarding-options class-of-service policer policer-single level1-rates pbs 1000
set forwarding-options class-of-service policer policer-single mode single-level
commit
The single-level policer configuration is shown below:
supervisor@rtbrick>multiservice-edge.rtbrick.net:: cfg> show config forwarding-options class-of-service policer
{
  "rtbrick-config:policer": [
    {
      "policer-name": "policer-single",
      "level1-rates": {
        "cir": 2000,
        "cbs": 1000,
        "pir": 2500,
        "pbs": 1000
      },
      "mode": "single-level"
    }
  ]
}
s
-
Map the classified traffic streams to a single policer level using class-to-policer mapping:
set forwarding-options class-of-service class-policer-map policer-map-single
set forwarding-options class-of-service class-policer-map policer-map-single class class-0
set forwarding-options class-of-service class-policer-map policer-map-single class class-0 policer-level level-1
commit
The class-policer-map configuration is shown below:
supervisor@rtbrick>multiservice-edge.rtbrick.net: cfg> show config forwarding-options class-of-service class-policer-map
{
  "rtbrick-config:class-policer-map": [
    {
      "class-policer-map-name": "policer-map-single",
      "class": [
        {
          "class": "class-0",
          "policer-level": "level-1"
        }
      ]
    }
  ]
}
Configure FreeRADIUS Server
Installation of FreeRADIUS
FreeRADIUS server can be installed on any Linux OS distribution. For information about installing FreeRADIUS, see Installing the FreeRADIUS Server.
Remove the Unsupported Files
It is necessary to remove echo, ntlm_auth, eap, echo, and mschap files once FreeRadius has been installed, since they are not required by this reference design. To remove these files, enter the following commands:
rm -rf /etc/freeradius/3.0/mods-enabled/echo
rm -rf /etc/freeradius/3.0/mods-enabled/ntlm_auth
rm -rf /etc/freeradius/3.0/mods-enabled/eap
rm -rf /etc/freeradius/3.0/mods-enabled/echo
rm -rf /etc/freeradius/3.0/mods-enabled/mschap
FreeRADIUS User and Group Settings
Using the following commands, one can set the user or group as root.
sed -i 's/User=freerad/User=root/g' /lib/systemd/system/freeradius.service
sed -i 's/Group=freerad/Group=root/g' /lib/systemd/system/freeradius.service
Run the command for reloading 'systemd' after user or group settings:
systemctl daemon-reload
Configure the FreeRADIUS Files
It is necessary to configure the FreeRADIUS files once FreeRadius has been installed. The configuration files can be found under /etc/freeradius/3.0/.
authorize
Using the following command, one can view the authorize file in its default location.
~:/etc/freeradius/3.0 # cat mods-config/files/authorize
Replace the content of the authorize file with the following:
$INCLUDE /etc/freeradius/3.0/pppoe_users_file
| This file can also be downloaded from the appendix (Appendix C: RADIUS Server Configuration). |
pppoe_ipoe_file_16k
The IPoE and PPPoE users file (pppoe_ipoe_file_16k) mentioned in the above section includes subscriber profile parameters as shown below.
# users.py --temlate templates/user.j2 --user user{i}@rtbrick.com --count 25000 --bng BNG --ipv4 10.100.128.1 --ipv6 10:1:1::0 --ipv6pd 50:1:1::0 --dns-primary 10.0.0.3 --dns-secondary 10.0.0.4 --dns-ipv6-primary fc66:0::3 --dns-ipv6-secondary fc66:0::4
DEFAULT User-Name =~ '^[0-9a-f\:]+@ipoe$', Cleartext-Password := 'ipoe'
    Service-Type = Framed-User,
    Class = "IPOE",
    Reply-Message = "FOOBAR Internet",
    RtBrick-DNS-Primary = 10.0.0.3,
    RtBrick-DNS-Secondary = 10.0.0.4,
    RtBrick-DNS-Primary-IPv6  = fc66:0::3,
    RtBrick-DNS-Secondary-IPv6 = fc66:0::4,
    Acct-Interim-Interval = 60,
    RtBrick-QoS-Profile = "subs-triple-play"
"user1@rtbrick.com" Cleartext-Password := "test"
    Service-Type = Framed-User,
    Framed-Protocol = PPP,
    Class = "user1@rtbrick.com",
    Framed-IP-Address = 10.100.128.1,
    Framed-IP-Netmask = 255.255.255.255,
    RtBrick-DNS-Primary = 10.0.0.3,
    RtBrick-DNS-Secondary  = 10.0.0.4,
    Framed-IPv6-Prefix = 70:20:2::/64,
    Delegated-IPv6-Prefix = 70:2:2::/56,
    RtBrick-DNS-Primary-IPv6  = fc66:0::3,
    RtBrick-DNS-Secondary-IPv6 = fc66:0::4,
    Session-Timeout = 0,
    Idle-Timeout = 0,
    Acct-Interim-Interval = 60,
    RtBrick-QoS-Profile = "subs-triple-play"
"user2@rtbrick.com" Cleartext-Password := "test"
    Service-Type = Framed-User,
    Framed-Protocol = PPP,
    Class = "user2@rtbrick.com",
    Framed-IP-Address = 10.100.128.2,
    Framed-IP-Netmask = 255.255.255.255,
    RtBrick-DNS-Primary = 10.0.0.3,
    RtBrick-DNS-Secondary  = 10.0.0.4,
    Framed-IPv6-Prefix = fc75:1:1:1::/64,
    Delegated-IPv6-Prefix = fc76:1:1:100::/56,
    RtBrick-DNS-Primary-IPv6  = fc66:0::3,
    RtBrick-DNS-Secondary-IPv6 = fc66:0::4,
    Session-Timeout = 0,
    Idle-Timeout = 0,
    Acct-Interim-Interval = 60,
    RtBrick-QoS-Profile = "subs-triple-play"
"user3@rtbrick.com" Cleartext-Password := "test"
    Service-Type = Framed-User,
    Framed-Protocol = PPP,
    Class = "user3@rtbrick.com",
    Framed-IP-Address = 10.100.128.3,
    Framed-IP-Netmask = 255.255.255.255,
    RtBrick-DNS-Primary = 10.0.0.3,
    RtBrick-DNS-Secondary  = 10.0.0.4,
    Framed-IPv6-Prefix = fc75:1:1:2::/64,
    Delegated-IPv6-Prefix = fc76:1:1:200::/56,
    RtBrick-DNS-Primary-IPv6  = fc66:0::3,
    RtBrick-DNS-Secondary-IPv6 = fc66:0::4,
    Session-Timeout = 0,
    Idle-Timeout = 0,
    Acct-Interim-Interval = 60,
    RtBrick-QoS-Profile = "subs-triple-play"
"user4@rtbrick.com" Cleartext-Password := "test"
    Service-Type = Framed-User,
    Framed-Protocol = PPP,
    Class = "user4@rtbrick.com",
    Framed-IP-Address = 10.100.128.4,
    Framed-IP-Netmask = 255.255.255.255,
    RtBrick-DNS-Primary = 10.0.0.3,
    RtBrick-DNS-Secondary  = 10.0.0.4,
    Framed-IPv6-Prefix = fc75:1:1:3::/64,
    Delegated-IPv6-Prefix = fc76:1:1:300::/56,
    RtBrick-DNS-Primary-IPv6  = fc66:0::3,
    RtBrick-DNS-Secondary-IPv6 = fc66:0::4,
    Session-Timeout = 0,
    Idle-Timeout = 0,
    Acct-Interim-Interval = 60,
    RtBrick-QoS-Profile = "subs-triple-play"
    <...>
The pppoe_ipoe_file_16k can be created with the above content in the /etc/freeradius/3.0/ path. Alternatively, this file can be downloaded from the appendix section of this guide and placed at /etc/freeradius/3.0/.
clients.conf
Clients.conf file shall be configured with the expected RADIUS client IP address and secret.
~:/etc/freeradius/3.0 # cat clients.conf
client rtbrick {
        ipaddr          = 192.0.2.74
        secret          = testing123
        shortname       = rtbrick
        nas_type        = other
        require_message_authenticator = no
}
The clients.conf file (/etc/freeradius/3.0/clients.conf) used for this reference design can be downloaded from the appendix section of this guide.
radiusd.conf
The radiusd.conf file should be configured with the expected RADIUS authentication and accounting parameters.
prefix = /usr
exec_prefix = /usr
sysconfdir = /etc
localstatedir = /var
sbindir = ${exec_prefix}/sbin
logdir = /var/log/freeradius
raddbdir = /etc/freeradius
radacctdir = ${logdir}/radacct
name = freeradius
confdir = ${raddbdir}
modconfdir = ${confdir}/mods-config
run_dir = ${localstatedir}/run/${name}
db_dir = ${raddbdir}
libdir = /usr/lib/freeradius
pidfile = ${run_dir}/${name}.pid
correct_escapes = true
max_request_time = 5
cleanup_delay = 0
max_requests = 16384
hostname_lookups = no
log {
    destination = files
    file = ${logdir}/radius.log
    stripped_names = no
    auth = yes
}
checkrad = ${sbindir}/checkrad
security {
    # user = radius
    # group = radius
    allow_core_dumps = no
    max_attributes = 200
    reject_delay = 0
    status_server = no
@openssl_version_check_config@
}
proxy_requests  = no
$INCLUDE clients.conf
thread pool {
    start_servers = 32
    max_servers = 128
    min_spare_servers = 8
    max_spare_servers = 16
    max_queue_size = 16384
    max_requests_per_server = 0
    auto_limit_acct = no
}
modules {
    $INCLUDE mods-enabled/
}
instantiate {
    files
    linelog
}
server default {
    listen {
        type = auth
        ipaddr = *
        port = 1812
    }
    listen {
        type = acct
        ipaddr = *
        port = 1813
    }
    authorize {
        update request {
            FreeRADIUS-Client-Shortname = "%{&request:Client-Shortname}"
        }
        if (&request:Client-Shortname == "rtbrick-server") {
            rtbrick-server-log
        }
        files
        pap
    }
    authenticate {
        pap
    }
    post-auth {
        if (&request:Client-Shortname == "rtbrick-server") {
            rtbrick-server-log
        }
        Post-Auth-Type REJECT {
            update reply {
                Reply-Message := "Login Failed. Please check your username and password."
            }
            attr_filter.access_reject
        }
    }
    preacct {
        ok
    }
    accounting {
        if (&request:Client-Shortname == "rtbrick-server") {
            rtbrick-server-log
        }
    ok
    }
    session {
    }
}
Radiusd.conf should be configured to use UDP ports 1812 and 1813 for authentication and accounting, respectively. Additionally, rtbrick-server-log should be added to the parameters for authorise, authenticate, and accounting.
The radiusd.conf file (/etc/freeradius/3.0/radiusd.conf) used for this reference design can be downloaded from the appendix section (Appendix C) of this guide.
detail
The detail file shall be configured for the RADIUS accounting logs.
/etc/freeradius/3.0 # cat mods-enabled/detail
    permissions = 0666detail rtbrick-server-log {
    filename = ${radacctdir}/rtbrick-server-detail.log

    header = "%t;%{NAS-IP-Address};%I;%{Packet-Src-Port}"
    log_packet_header = no
}
Ensure that rtbrick-server-log is specified in the detail file.
The detail file (/etc/freeradius/3.0/mods-enabled/detail) used for this reference design can be downloaded from the appendix section (Appendix C) of this guide.
dictionary.rtbrick
Add the RtBrick RADIUS dictionary (dictionary.rtbrick) to /usr/share/freeradius/dictionary.rtbrick and include it in` /usr/share/freeradius/dictionary`.
The dictionary.rtbrick contains the RBFS attributes in FreeRADIUS format.
-
Click here to download the
radius_config.zip, which contains thedictionary.rtbrickfile.
Stopping and Starting the FreeRADIUS Server for any Changes
For any changes, stop and restart the FreeRADIUS server.
To stop the server, enter the following command:
sudo service freeradius stop
To start the server, enter the following command:
sudo service freeradius start
The FreeRadius server is now ready to provide AAA (Authentication, Accounting & Authorization) services to logging in subscribers.