Getting the Training Topology via VM Image (Simple)
Overview
RtBrick provides a Virtual Machine image for users who wish to download and run the virtual RBFS Tour in their local environment. This setup allows users to create the necessary topology to complete the exercises outlined in the RBFS Tour documentation.
| The intent of providing the "RBFS VM images" is to enable running the virtual RBFS tour on local hardware and not to spawn arbitrary topologies. |
The diagram below illustrates the process of requesting, downloading, and starting the RBFS Tour VM image.
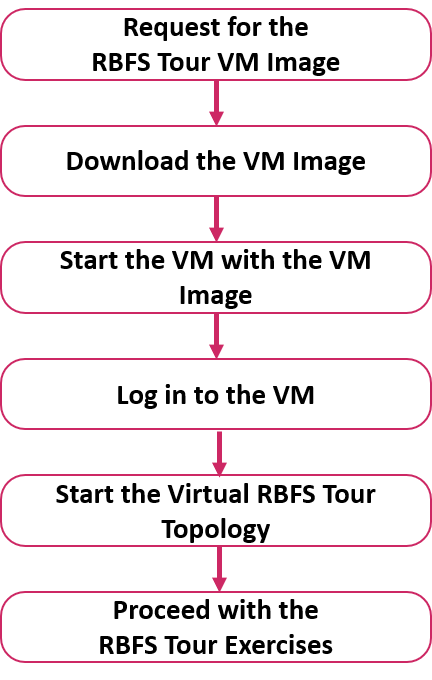
Requesting the RBFS Tour VM Image
To access the RBFS Tour, users must request a VM image compatible with either Proxmox or VirtualBox hypervisors, as RtBrick only provides VM images for these hypervisors. After submitting the request, RtBrick will send a download link via email.
Prerequisites:
-
A Hypervisor: Choose either Proxmox or VirtualBox, both of which are widely used open-source virtualization platforms.
-
Host Operating System: The selected hypervisor (Proxmox or VirtualBox) must support a compatible host operating system.
-
Proxmox: Must be installed as a bare-metal hypervisor directly on x86-64 hardware.
-
VirtualBox: Requires a host operating system of either Debian 13 (Trixie) or Microsoft Windows 11.
-
-
System Requirements: Recommended resource settings for the Virtual Machine:
-
CPU: 8 Cores
-
RAM: 16 GB
-
Disk: 20 GB
-
Network: 1 interface in the local network for SSH access to the VM
-
Downloading the VM Image
You can download the VM image directly to your computer using the link provided in the email from RtBrick.
If you are on a Linux (Debian 13) target machine, you can download the VM image by executing the following command:
wget <IMAGE_FILE_URL> -O <FILE_NAME>If you are downloading directly onto Proxmox, execute the following command:
wget "<IMAGE_FILE_URL>" -O <FILE_NAME>Replace <IMAGE_FILE_URL> with the download link of the VM image that was provided in the email.
Replace <FILE_NAME> with appropriate file name with extension.
-
Recommended Proxmox image file name:
vzdump-qemu-rbfs-tour-vm.vma.zst -
Recommended VirtualBox image file name:
rbfs-tour-vm.vdi.zst
Starting the VM
Starting the VM in Proxmox
| It is recommended to use Proxmox version 9.1, which operates directly on x86-64 hardware as a bare-metal hypervisor. |
To start the RBFS Tour VM in Proxmox, follow these steps:
-
If you have downloaded the image on another machine, you need to copy the downloaded VM image to the Proxmox local storage (/var/lib/vz/dump/).
-
Ensure the file name starts with the prefix “vzdump-qemu-”. Add the prefix if needed.
Use the following command to copy the file to the Proxmox server, replacing
<proxmox_host_ip>with the actual IP address of your Proxmox server.scp vzdump-qemu-rbfs-tour-vm.vma.zst root@<proxmox_host_ip>:/var/lib/vz/dump/Alternatively, you can directly download the VM image using
wgetas described in previous section.
-
Log in to the Proxmox web interface and navigate to the local storage where the VM image was copied.
The VM image file will be visible under the Backups section of the local storage. 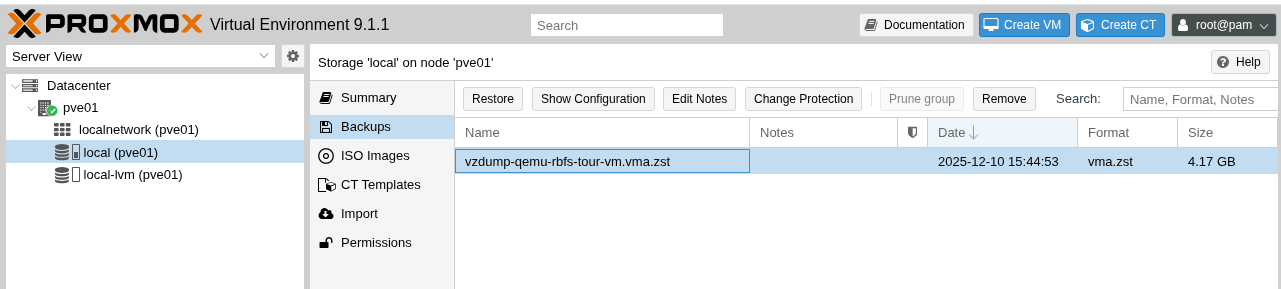 Figure 2. Backup Section of Proxmox Local Storage
 -
Select the VM image file and click the Restore button.
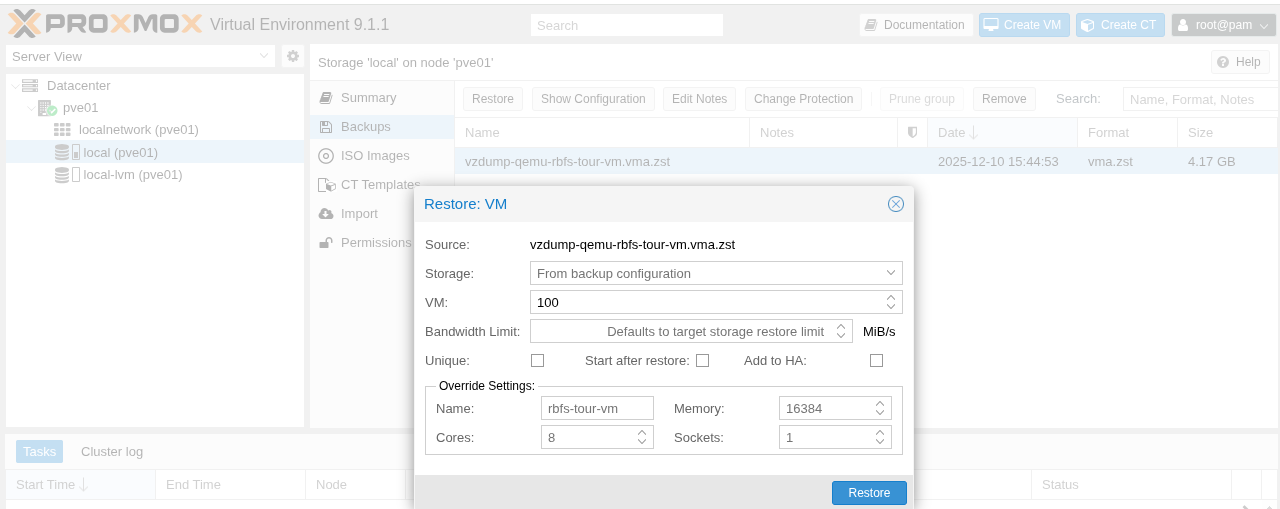 Figure 3. Restore VM Image in Proxmox
 -
Click Restore to confirm.
 Figure 4. Confirmation of VM Image Restore
 -
Start the VM by clicking the Start button.
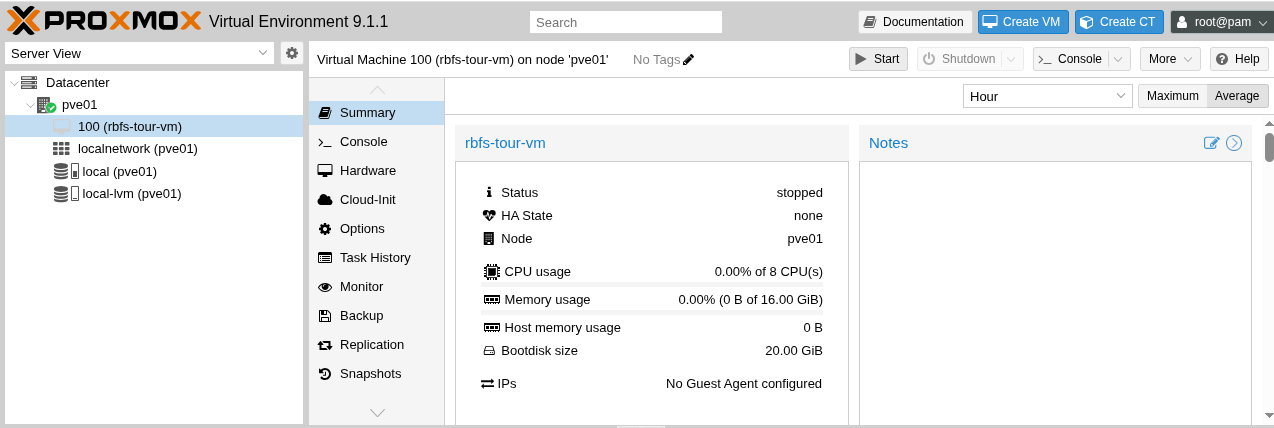 Figure 5. VM Summary in Proxmox
 -
After starting the VM, click the Console button.
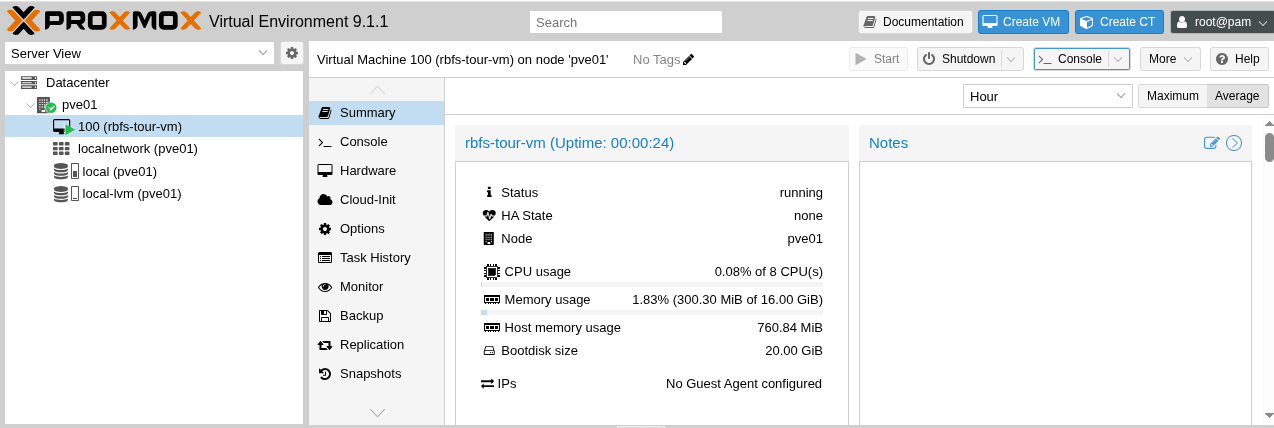 Figure 6. VM Console in Proxmox
 -
Log in to the VM via the console using the following credentials:
User: supervisor
Password: supervisor Figure 7. VM Login in Proxmox
-
Verify the network interface using the
ip addresscommand. If no IP address is assigned, executesudo dhclient <interface>to obtain an IP address from DHCP. -
Use the assigned IP address to log in to the VM via SSH, then start the RBFS Tour topology.
-
Starting the VM in VirtualBox
| It is recommended to use VirtualBox 7.2, which runs on either Debian 13 (Trixie) or Microsoft Windows 11 host operating system. |
To start a VM in VirtualBox, follow these steps:
-
Decompress the downloaded VM image file using the following command.
On Debian, use the following command:
unzstd rbfs-tour-vm.vdi.zstOn Microsoft Windows 11, right-click the file and select Extract Here.
-
Open VirtualBox and navigate to File > Preferences. Select the Expert tab and click OK.
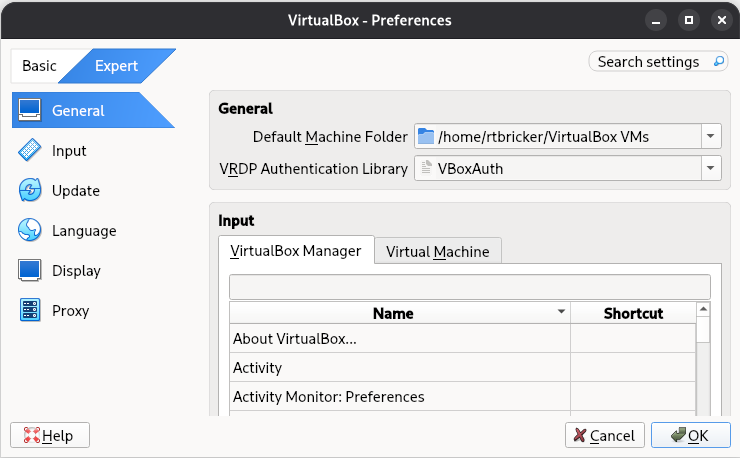 Figure 8. Preference Settings in VirtualBox
If the preference is already set to Expert, you can skip this step. -
Choose File > Tools > Media, then under Hard disks, click Add and select the decompressed image
rbfs-tour-vm.vdi.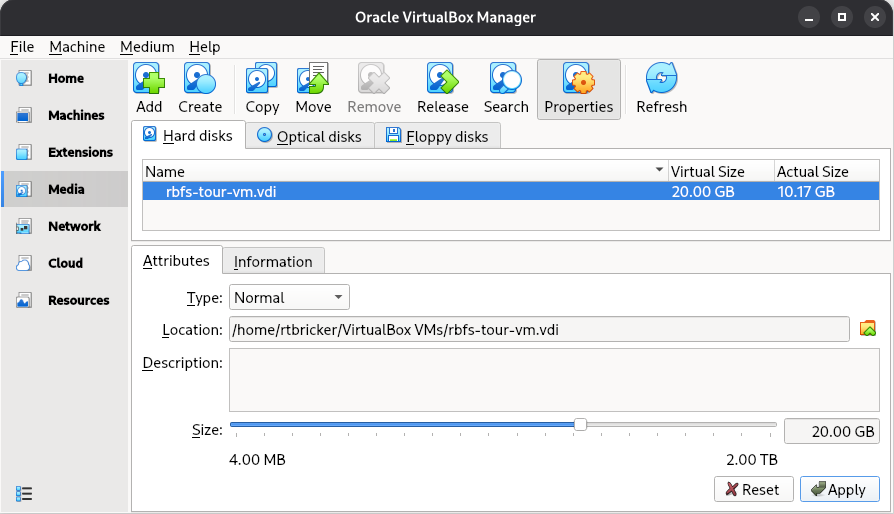 Figure 9. Media Manager in VirtualBox
 -
Create a Host-only Network by navigating to File > Tools > Network and clicking Create.
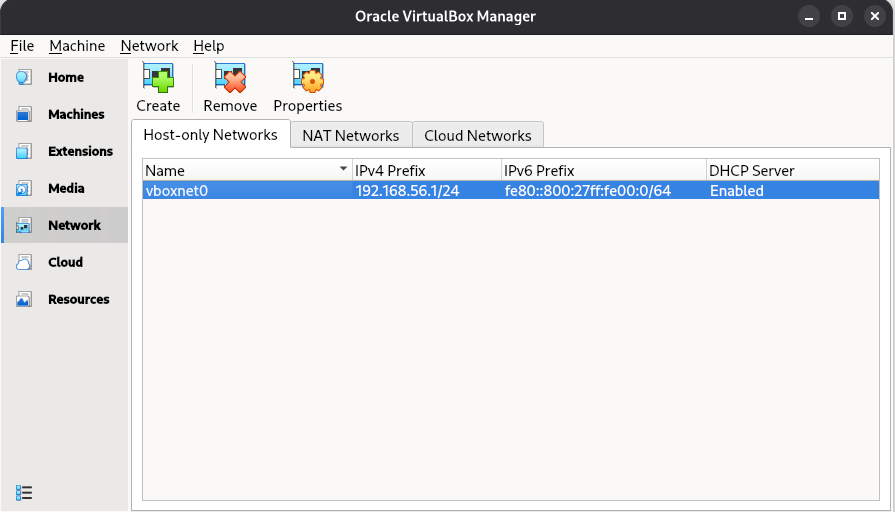 Figure 10. Host-only Network in VirtualBox
If the host-only network is already created, you can skip this step. -
Create a new virtual machine by clicking Machine > New, and follow the prompts to set up the VM with the following specifications:
-
VM Name: rbfs-tour-vm
-
OS: Linux
-
OS Distribution: Debian
-
OS Version: Debian (64-bit)
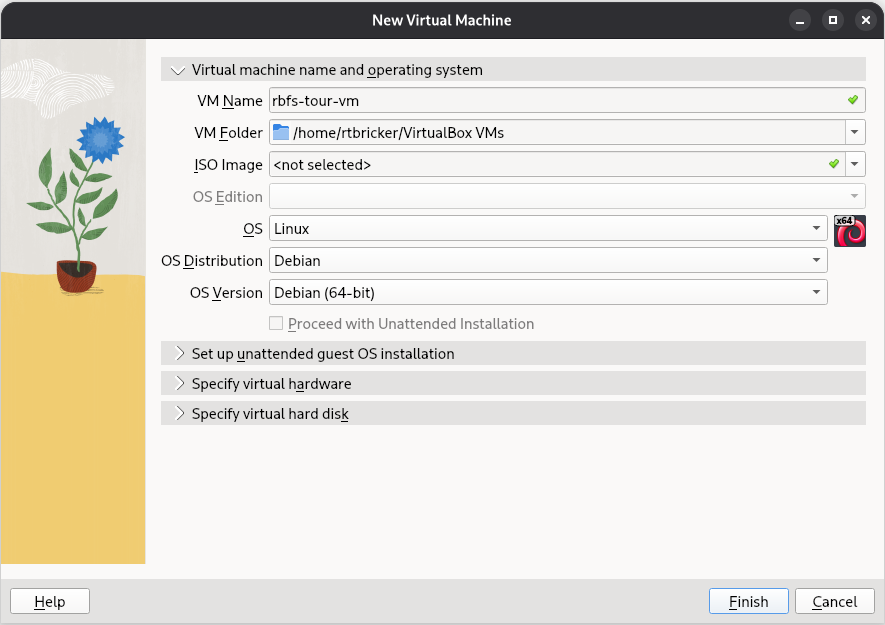 Figure 11. New Virtual Machine in VirtualBox
-
-
Under Specify virtual hardware, Assign the recommended resources to the VM:
-
Base Memory: Approx. 16 GB
-
Number of CPUs: 8 CPUs
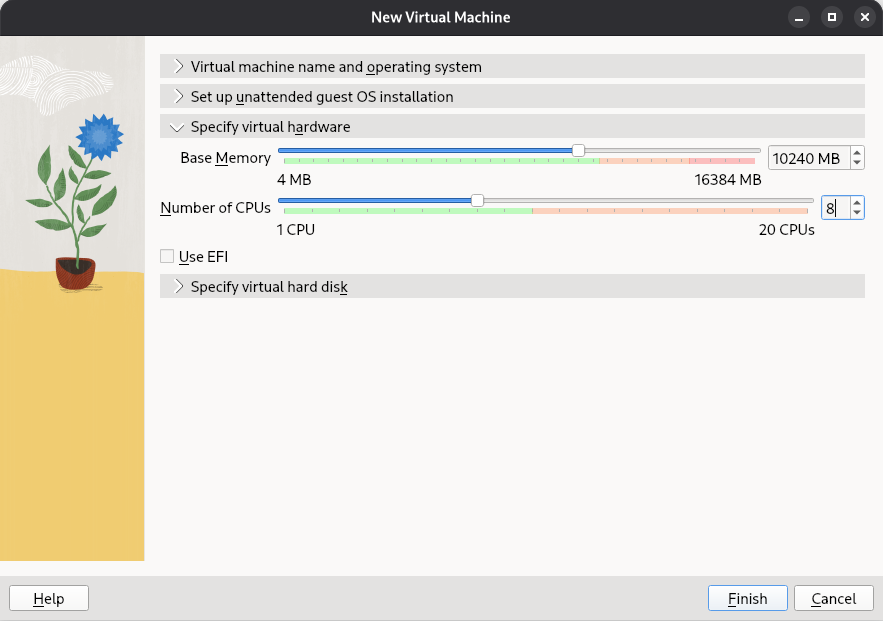 Figure 12. Virtual Machine Resources in VirtualBox
-
-
Under Specify virtual hard disk, select Use an Existing Virtual Hard Disk File, and choose
rbfs-tour-vm.vdi, and click Finish. Figure 13. Virtual Machine Storage in VirtualBox
 -
Under Machines, select the VM, click Settings.
 Figure 14. Virtual Machine Settings in VirtualBox
 -
In the Network section of the Settings window, select Host-only Adapter, then click OK.
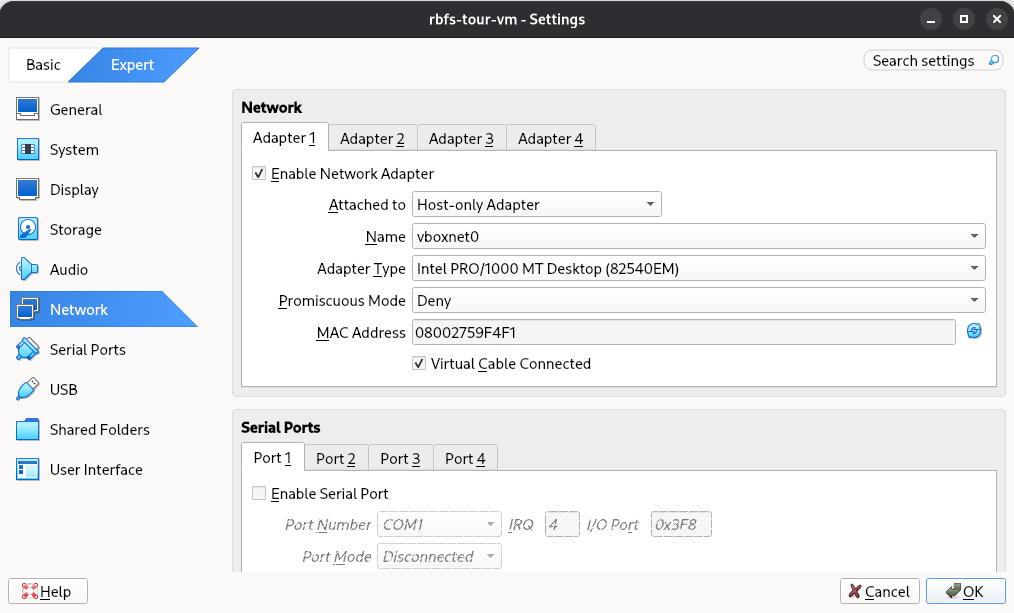 Figure 15. Network Settings in VirtualBox
 -
On Debian, open a terminal and run the following commands (replace
rbfs-tour-vmwith your actual VM name):VBoxManage setextradata rbfs-tour-vm "VBoxInternal/Devices/pcbios/0/Config/DmiExposeProcInf" "1" VBoxManage setextradata rbfs-tour-vm "VBoxInternal/Devices/pcbios/0/Config/DmiExposeMemoryTable" "1"On Microsoft Windows 11, open Command Prompt and run the same commands after navigating to the VirtualBox installation directory, assuming that VirtualBox is installed in the default directory.
cd "C:\Program Files\Oracle\VirtualBox"
VBoxManage setextradata rbfs-tour-vm "VBoxInternal/Devices/pcbios/0/Config/DmiExposeProcInf" "1"
VBoxManage setextradata rbfs-tour-vm "VBoxInternal/Devices/pcbios/0/Config/DmiExposeMemoryTable" "1"
This step configures VirtualBox to expose Process and Memory information to the VM, which is necessary for the RtBrick resmond process to function correctly. -
Start the VM by selecting it and clicking Start.
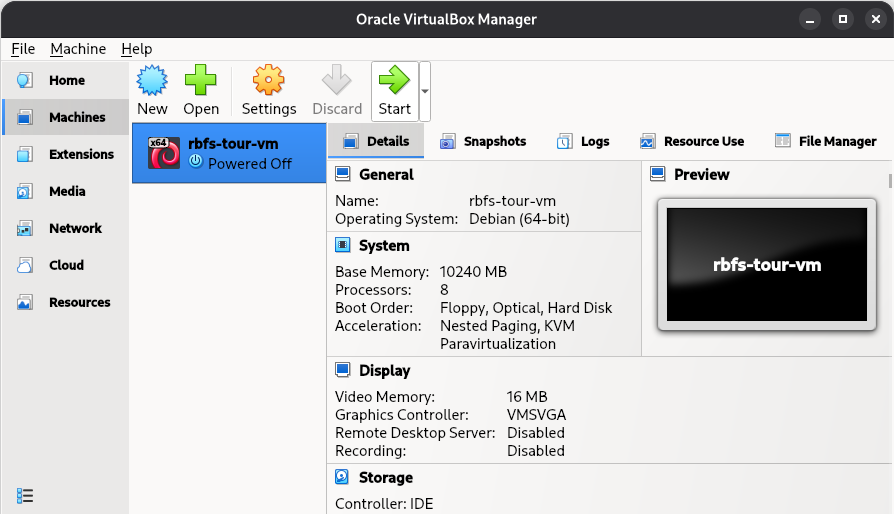 Figure 16. Starting the VM in VirtualBox
 -
Log in to the VM via the console using the following credentials:
User: supervisor
Password: supervisor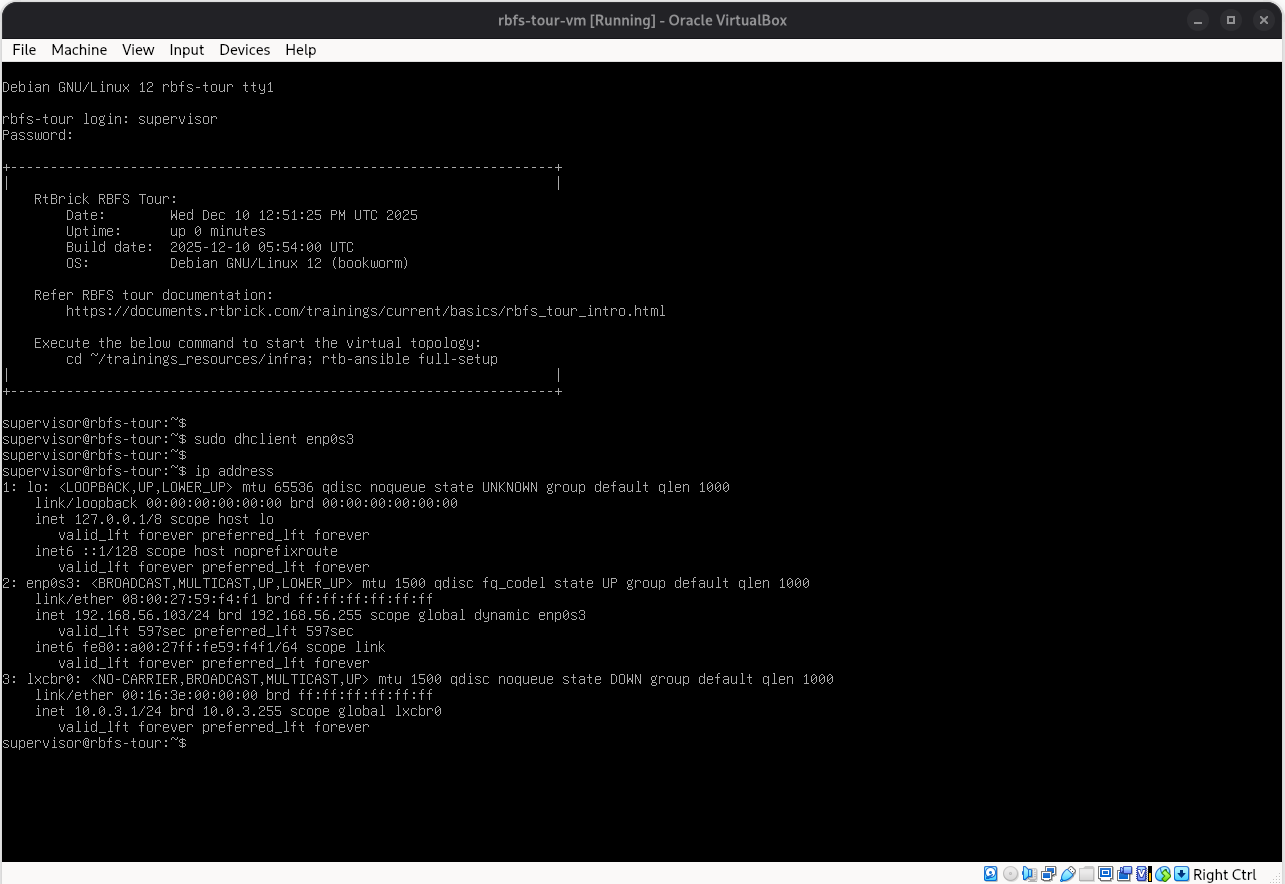 Figure 17. VM Login in VirtualBox
-
Verify the network interface using the
ip addresscommand. If no IP address is assigned, executesudo dhclient <interface>to obtain an IP address from DHCP. -
Use the assigned IP address to log in to the VM via SSH, then start the RBFS Tour topology.
-
Logging into the VM via SSH
Use the following credentials to log in to the VM via SSH:
-
User: supervisor
-
Password: supervisor
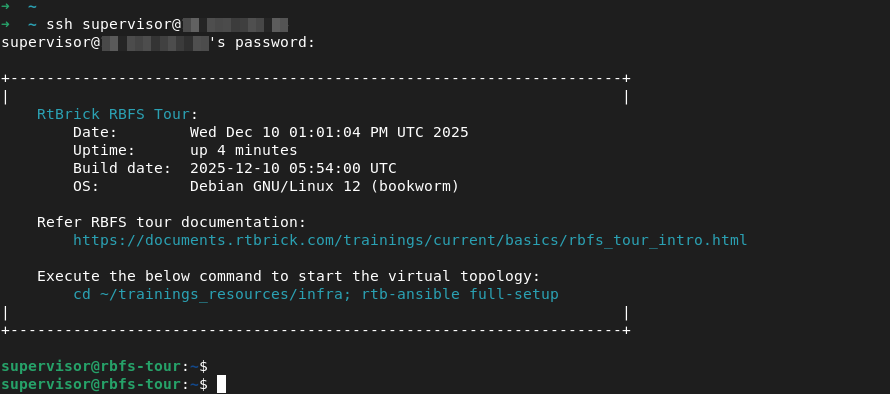
Starting the RBFS Tour Topology
To start the virtual topology, run the following commands in the VM. This process might take a few minutes to complete.
$ cd ~/trainings_resources/infra
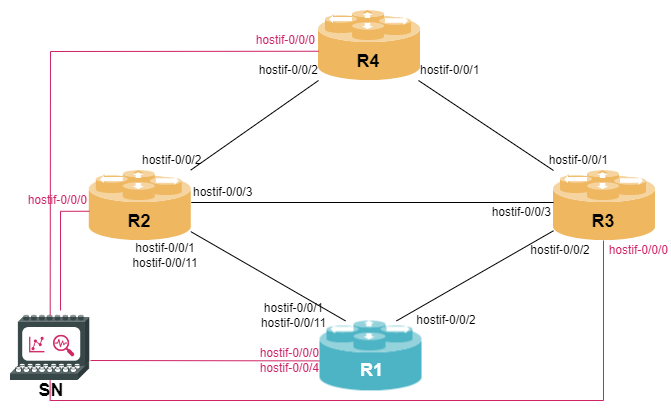
$ rtb-ansible full-setupThe following topology with 4 Multiservice Edge Routing containers and 1 Service Node container will be ready once the script execution is completed.
Running the Exercises
Each module comes along with two robot files: a setup file and a check file. Before you start a module, you should execute the corresponding setup file to prepare your lab environment, e.g., for the first BGP module.
~/trainings_resources/robot$ robot bgp_ebgp/bgp_ebgp_setup.robotFor more information about Robot Framework, see the Robot Framework documentation.
The nodes R2, R3, and R4 are loaded with the full configuration at the beginning of each module, while node R1, which is your device under test (DUT), is loaded with some initial configuration in order to avoid configuring all steps that have already been done in previous modules.
You can login to R1 to perform your configuration exercises using either ssh or rtb-ssh:
~/trainings_resources$ rtb-ssh R1After you have completed the module, you can execute the check file to see if everything was done correctly, e.g., for the first BGP module
~/trainings_resources/robot$ robot bgp_ebgp/bgp_ebgp_verify.robotGetting Started with the Exercises
With the RBFS Tour Virtual topology now running, you are ready to begin the configuration exercises. Start with the Command Line Interface section, then work through the remaining modules.
These lab exercises help you learn the RBFS CLI and apply your knowledge through hands-on practice in a virtual lab environment.
The lab exercises allow you to perform the following types of checks:
-
Basic Setup Checks: The setup script, xxx_setup.robot, performs some basic checks as it applies the initial configuration, ensuring an error-free starting environment.
-
Verification of Configuration: The most important test for a learner is running the xxx_verify.robot script after completing an exercise. This script checks whether all configuration steps have been carried out correctly.