Label Distribution Protocol (LDP)
Module Introduction
Before you start the hands-on part of this module, you should load the appropriate configuration and verify that the testbed is up and running by executing the corresponding robot file:
student@tour:~/trainings_resources/robot$ robot mpls_ldp/mpls_ldp_setup.robot|
We use IS-IS as IGP for the examples and exercises in this module. The choice of IGP is not important for understanding and configuration of LDP. However, if you prefer to run OSPF instead, you can alternatively load the setup using the |
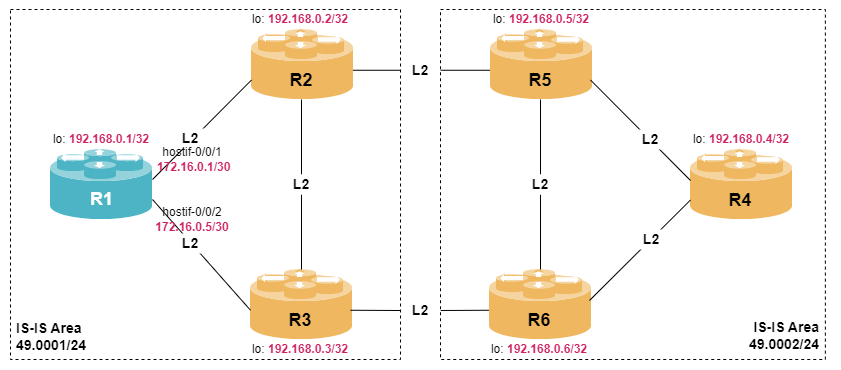
In order to get a better understanding, the lab setup is shown in the picture below.
LDP Overview
The MPLS architecture does not mandate a single control plane protocol, allowing network operators the flexibility to choose one that best fits their needs.
Label Distribution Protocol (LDP), defined in RFC 5036, is the most widely used protocol for label distribution in MPLS networks. LDP is a simple signaling protocol used by Label Switching Routers to automatically establish Label Switched Paths across a network.
As its name suggests, LDP is focused solely on distributing label bindings and does not make routing decisions. Instead, it relies on an underlying IGP such as OSPF or IS-IS for routing information. Consequently, LDP-signaled LSPs always follow the IGP-determined shortest path and are constrained to a single autonomous system.
A router will only install a label binding from a peer if that peer is the next hop on the shortest IGP path to the destination. This tight coupling with the IGP means that during IGP reconvergence, traffic may be briefly blackholed or looped.
RBFS supports dual-stack operation, allowing LDP to exchange label bindings over both IPv4 and IPv6 networks.
LDP exchanges information using a common packet structure. The LDP header includes the LDP Identifier. An LDP packet can contain one or more LDP messages, each defined by a message type. Within each message, a type-length-value encoding scheme is used.
There are four categories of LDP messages:
-
Discovery messages (Hello messages) are used to announce and maintain the presence of an LSR in a network.
-
Session messages are used to establish, maintain, and terminate sessions between LDP peers. There are two main session messages, the Initialization and the Keepalive message.
-
Advertisement messages are used to create, change, and delete label mappings for FECs. This group includes the Label Mapping, Label Request, and Label Withdraw message.
-
Error Handling messages (or Notification messages) are used to provide advisory information and to signal error information.
LDP Peers
Two LSRs that use LDP to exchange label bindings are called LDP peers. An LDP peer is identified by an LDP identifier, which is a 6-octet value composed of a 4-octet router ID and a 2-octet label space ID. The label space refers to a range of labels used by the local LSR. There are two types of label spaces:
-
Per-interface label space: Used for interfaces that require interface-specific resources for label allocation, such as ATM VCIs.
-
Per-platform label space: Used when interfaces can share the same label space across the entire platform (e.g., Ethernet interfaces). The per-platform label space always sets the last octet of the LDP identifier to zero, e.g., 192.168.0.1:0.
LDP uses a discovery mechanism to find potential LDP peers. In the basic discovery mechanism, an LSR periodically sends Hello messages as UDP packets to the well-known LDP port 646, using the all routers on this subnet multicast address (224.0.0.2). The LDP Hello message includes the LDP identifier of the label space and the transport address to be used for the LDP session.
Once an LDP neighbor is discovered, an LDP session is established over TCP port 646. This involves exchanging Initialization messages to negotiate session parameters.
|
There is always one LDP session between two label spaces. If per-platform label space is used, there is only one LDP session between two LSRs independent of the number of links between them. However, for each link there might be a LDP Hello adjacencies. |
Configure LDP in instance default. Activate LDP on all three interfaces (hostif-0/0/1/0, hostif-0/0/2/0, and lo-0/0/0/0) and add the appropriate address-families to the instance. Are there any LDP neighbors and LDP sessions?
Click to reveal the answer
cfg> set instance default protocol ldp router-id 192.168.0.1
cfg> set instance default protocol ldp interface hostif-0/0/1/0
cfg> set instance default protocol ldp interface hostif-0/0/2/0
cfg> set instance default protocol ldp interface lo-0/0/0/0
cfg> set instance default address-family ipv4 labeled-unicast
cfg> set instance default address-family mpls unicast
cfg> commit
After configuring the LDP interfaces, we can see that there are two LDP neighbors. The exchange of Hello messages have revealed the LSP ID and the transport IP address of both neighbors:
cfg> show ldp neighbor
Instance: default
  Interface/Peer      LDP ID              Transport IP      Up Since                  Expires
  hostif-0/0/1/0      192.168.0.2:0       192.168.0.2       Tue Apr 25 11:40:25       in 12s
  hostif-0/0/2/0      192.168.0.3:0       192.168.0.3       Tue Apr 25 11:40:25       in 12s
The transport IP address is used to setup the LDP session via TCP:
cfg> show ldp session
Instance: default
  LDP ID            Peer IP               State             Up/Down           FECRcvd   FECSent
  192.168.0.2:0     192.168.0.2           Non-Existent      Never             -         -
  192.168.0.3:0     192.168.0.3           Non-Existent      Never             -         -
Although the LDP discovery process was successful in finding LDP neighbors, the LDP session establishment failed due to missing TCP authentication which is an optional feature.
Configure for both LDP neighbors TCP session authentication with type MD5, key-id 11 and password rtbrick.
Click to reveal the answer
cfg> set instance default tcp authentication LDP
cfg> set instance default tcp authentication LDP type MD5
cfg> set instance default tcp authentication LDP key1-id 11
cfg> set instance default tcp authentication LDP key1-encrypted-text $21e4946e31b406de98b3077aef03ed5a7
cfg> set instance default protocol ldp session ipv4 192.168.0.2 authentication-id LDP
cfg> set instance default protocol ldp session ipv4 192.168.0.3 authentication-id LDP
cfg> commit
cfg> show ldp session
Instance: default
  LDP ID            Peer IP                   State             Up/Down           FECRcvd   FECSent
  192.168.0.2:0     192.168.0.2               Operational       0d:00h:00m:51s          6         7
  192.168.0.3:0     192.168.0.3               Operational       0d:00h:00m:51s          6         7
In addition to the basic discovery mechanism, LDP also supports an extended discovery mechanism that enables LDP sessions between non-directly connected LSRs. In this mechanism, an LSR periodically sends LDP Targeted Hello messages to a specific unicast IP address. These Targeted Hellos are sent as UDP packets addressed to the well-known LDP discovery port.
Configure a targeted LDP session to peer 192.168.0.4 using the targeted-neighbor keyword. Set the source address to the loopback address of R1 and re-use the authentication parameters configured in the last exercise.
Click to reveal the answer
cfg> set instance default protocol ldp targeted-neighbor ipv4 192.168.0.4 192.168.0.1
cfg> set instance default protocol ldp session ipv4 192.168.0.4 authentication-id LDP
cfg> commit
cfg> show ldp neighbor
Instance: default
  Interface/Peer      LDP ID              Transport IP              Up Since                  Expires
  192.168.0.4         192.168.0.4:0       192.168.0.4               Mon Jun 15 09:40:14       in 37s
  hostif-0/0/1/0      192.168.0.2:0       192.168.0.2               Mon Jun 15 09:35:45       in 14s
  hostif-0/0/2/0      192.168.0.3:0       192.168.0.3               Mon Jun 15 09:35:46       in 10s
cfg> show ldp session
Instance: default
  LDP ID            Peer IP                   State             Up/Down           FECRcvd   FECSent
  192.168.0.2:0     192.168.0.2               Operational       0d:00h:02m:33s          6         7
  192.168.0.3:0     192.168.0.3               Operational       0d:00h:02m:33s          6         7
  192.168.0.4:0     192.168.0.4               Operational       0d:00h:00m:34s          6         7
LDP Label Exchange
LDP uses a Type Length Value (TLV) format to encode information which is carried in LDP messages, e.g., the Address List TLV that contains a list of all addresses of the LSR. These addresses are compared with the next hop addresses in the unicast routing table to select the correct LSR for packet forwarding.
cfg> show ldp address instance default ipv4
Instance: default, LDP Identifier: 192.168.0.2:0, AFI: ipv4
172.16.0.2
192.168.0.2
172.16.0.13
172.16.0.25
Instance: default, LDP Identifier: 192.168.0.3:0, AFI: ipv4
192.168.0.3
172.16.0.6
172.16.0.14
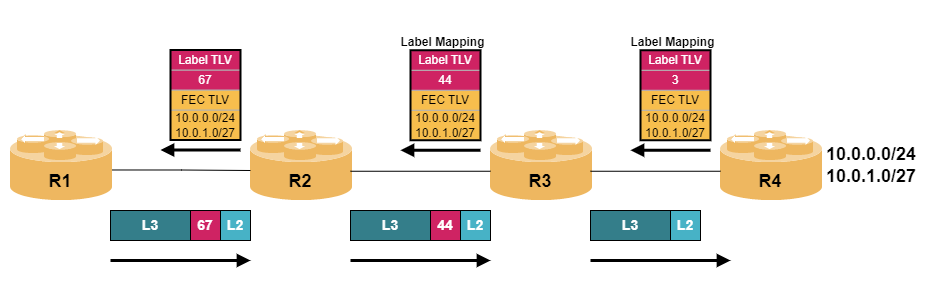
172.16.0.29The LDP label mapping messages contain at least two TLVs, the FEC TLV and the Label TLV which result in a database that contains label bindings, i.e., a mapping between FECs and labels.
cfg> show ldp binding
Instance: default, AFI: ipv4, SAFI: labeled-unicast
  Prefix                                        In Label           Out Label          LDP ID             Status
  192.168.0.1/32                                -                  3                  -                  Best
                                                519942             -                  192.168.0.3:0      Non-best
                                                519943             -                  192.168.0.2:0      Non-best
                                                519941             -                  192.168.0.4:0      Non-best
  192.168.0.2/32                                3                  519939             192.168.0.2:0      Best
                                                519940             -                  192.168.0.4:0      Non-best
                                                519937             -                  192.168.0.3:0      Non-best
  192.168.0.3/32                                3                  519936             192.168.0.3:0      Best
                                                519937             -                  192.168.0.2:0      Non-best
                                                519938             -                  192.168.0.4:0      Non-best
  192.168.0.4/32                                519938             519941             192.168.0.2:0      Best
                                                519938             519938             192.168.0.3:0      Best
                                                3                  -                  192.168.0.4:0      Non-best
  192.168.0.5/32                                519936             519940             192.168.0.2:0      Best
                                                519937             -                  192.168.0.4:0      Non-best
                                                519944             -                  192.168.0.3:0      Non-best
  192.168.0.6/32                                519939             519937             192.168.0.3:0      Best
                                                519942             -                  192.168.0.2:0      Non-best
                                                519936             -                  192.168.0.4:0      Non-best
Instance: default, AFI: ipv6, SAFI: labeled-unicast
  Prefix                                        In Label           Out Label          LDP ID             Status
  fc00:c0a8::192:168:0:1/128                    -                  3                  -                  Best
The show ldp binding command offers useful options such as sent or received to view only the label bindings that were advertised to other LDP peers or learned from LDP peers. In addition, the output can be restricted to a particular LDP peer using the `ldp
|
RBFS supports IPv4/IPv6 dual-stack operation, which is disabled by default but can be enabled if desired. |
By default RBFS advertises label bindings for loopback addresses only. If you want to advertise bindings for directly connected interfaces, you can redistribute interface routes into LDP.
Configure LDP to redistribute all directly connected interfaces. Redistribution is done on a per-address family basis.
Click to reveal the answer
cfg> set instance default protocol ldp address-family ipv4 labeled-unicast redistribute direct
cfg> commit
cfg> show ldp binding
Instance: default, AFI: ipv4, SAFI: labeled-unicast
  Prefix                     In Label           Out Label          LDP ID             Status
  172.16.0.0/30               -                  3                  -                  Best
  172.16.0.1/32               -                  3                  -                  Best
                              519946             -                  192.168.0.3:0      Non-best
                              519943             -                  192.168.0.2:0      Non-best
                              519943             -                  192.168.0.4:0      Non-best

  <...>
The LDP label bindings are combined with the result of the IGP SPF calculation to create the best path to each destination:
cfg> show ldp route
Instance: default, AFI: ipv4, SAFI: labeled-unicast
  Prefix               Out Label               Next Hop                                   Interface           Metric
  192.168.0.2/32       -                       172.16.0.2                                 -                   100
  192.168.0.3/32       -                       172.16.0.6                                 -                   100
  192.168.0.4/32       519938                  172.16.0.6                                 -                   300
                       519938                  172.16.0.2                                 -
  192.168.0.5/32       519936                  172.16.0.2                                 -                   200
  192.168.0.6/32       519939                  172.16.0.6                                 -                   200
Instance: default, AFI: ipv6, SAFI: labeled-unicast
  Prefix                                       Out Label               Next Hop                                   Interface           Metric
  fc00:c0a8::192:168:0:1/128                   -                       -                                          -                   0
Instance: default, AFI: mpls, SAFI: unicast
  Label                Out Label               Next Hop                                   Interface           Metric
  519936               -                       172.16.0.6                                 -                   -
  519936,bos:1         -                       172.16.0.6                                 -                   -
  519937               519939                  172.16.0.6                                 -                   -
  519937,bos:1         519939                  172.16.0.6                                 -                   -
  519939               -                       172.16.0.2                                 -                   -
  519939,bos:1         -                       172.16.0.2                                 -                   -
  519940               519936                  172.16.0.2                                 -                   -
  519940,bos:1         519936                  172.16.0.2                                 -                   -
  519941               519938                  172.16.0.6                                 -                   -
                       519938                  172.16.0.2                                 -
  519941,bos:1         519938                  172.16.0.6                                 -                   -
The resulting routes are either of type ipv4/ipv6 labeled-unicast or mpls unicast. If the device is an ingress LER, then the labeled-unicast routes are used, i.e., an IPv4 or IPV6 FEC is associated with a LDP-established LSP. In this case the label referred to as Received label is used, because this is the one learned from the downstream neighbor. The labels shown in column Advertised label are the labels allocated by the local router and advertised to its neighbors and are for information only and not relevant during ipv4/ipv6 labeled-unicast route lookup.
If the device is a transit LSR, then the mpls unicast routes are used, i.e., the incoming label (see column Prefix/Label) is swapped with the corresponding label from column Received label.
The resulting entries are used to populate the routing table:
cfg> show route ipv4 labeled-unicast source ldp
Flags: & - Imported
Instance: default, AFI: ipv4, SAFI: labeled-unicast
Flags  Prefix/Label                                Source               Pref  Next Hop                       Label        Outgoing Interface
       192.168.0.2/32                              ldp                     9  172.16.0.2                     -            hostif-0/0/1/0
       192.168.0.3/32                              ldp                   190  172.16.0.6                     -            hostif-0/0/2/0
       192.168.0.4/32                              ldp                   190  172.16.0.2                     519938       hostif-0/0/1/0
                                                                              172.16.0.6                     519938       hostif-0/0/2/0
       192.168.0.5/32                              ldp                     9  172.16.0.2                     519936       hostif-0/0/1/0
       192.168.0.6/32                              ldp                   190  172.16.0.6                     519939       hostif-0/0/2/0
To see how labels allocated by LDP are installed into the MPLS label switching table, you can first check which labels LDP allocated to reach an IPv4 destination, for example the loopback address of R2:
cfg> show ldp binding ipv4 prefix 192.168.0.2/32
Instance: default, AFI: ipv4, SAFI: labeled-unicast
  Prefix                                        In Label           Out Label          LDP ID             Status
Instance: default, AFI: ipv4, SAFI: labeled-unicast
  Prefix                                        In Label           Out Label          LDP ID             Status
  192.168.0.2/32                                3                  519939             192.168.0.2:0      Best
                                                519940             -                  192.168.0.4:0      Non-best
                                                519937             -                  192.168.0.3:0      Non-best
In this example, checking the Out Label column shows the label to be 519939 (your label might vary); this is the MPLS label allocated by R1 for the IPv4 address of the loopback of R2.
You can then use the show route mpls command to see how this label is actually installed into the local MPLS label information table:
cfg> show route mpls label 519939 detail
Instance: default, AFI: mpls, SAFI: unicast
  Label: 519939
    Source: ldp, Preference: 9
      Next Hop: 172.16.0.2
        Covering prefix: 172.16.0.2/32
        Next Hop type: mpls php, Next Hop action: mpls label pop - next protocol ipv4
        Resolved in: default-ipv4-labeled-unicast(Primary)
        Outgoing Interface: hostif-0/0/1/0, NextHop MAC: 7a:78:e5:c0:00:01
...
To perform a data plane test, a traditional ping command that sends an ICMP echo message is insufficient. By default, RBFS does not use the labeled-unicast routing table to forward locally sourced packets; it only uses this table to resolve BGP nexthops. By adding the SAFI labeled-unicast option to the ping command, you can force the transmission of a labeled packet. However, since the remote end will reply with an unicast packet, this does not guarantee that the MPLS data path is functioning end-to-end.
RBFS supports MPLS LSP ping, as defined in RFC 8029, which allows administrators to verify an LSP. The concept is to send an MPLS echo request that is answered by an MPLS echo reply, rather than a typical UDP-based echo reply. The MPLS echo request contains enough information to verify the correct operation of the data plane. Let’s check the MPLS data plane using the mpls ping <fec> command:
cfg> ping mpls 192.168.0.4/32 source-ip 192.168.0.1 count 3
Sending 3 MPLS echoes to ldp FEC 192.168.0.4/32
Success: Response from 172.16.0.18: Egress for the FEC: seq = 1 rtt = 59.41 ms
Success: Response from 172.16.0.18: Egress for the FEC: seq = 2 rtt = 1.11 ms
Success: Response from 172.16.0.18: Egress for the FEC: seq = 3 rtt = 2.15 ms
--- 192.168.0.4/32 mpls ping statistics ---
3 sent, 3 received, 0 errors, 0.00% loss, time 3103.49 ms
rtt min/avg/max = 1.11/20.89/59.41 ms
LDP Settings
Loop Detection
LDP provides an optional loop detection mechanism that can be configured to help prevent routing loops. This mechanism uses two additional TLVs: the Hop Count TLV and the Path Vector TLV. The Hop Count TLV contains the number of LSRs that the message has traversed, while the Path Vector TLV includes a list of these LSRs.
When an LSR receives a Label Mapping or Label Request message from its next hop that either contains a Hop Count TLV exceeding the configured maximum value, or a Path Vector TLV that includes its own LSR ID or exceeds the maximum allowable length, it detects a potential loop. In this case, the LSR considers the message looped and discards it.
Enable LDP loop detection using the set instance default protocol ldp loop-detection command hierarchy. Set the vector-length to 16 and the hop-count limit to 32.
Click to reveal the answer
cfg> set instance default protocol ldp loop-detection status enable
cfg> set instance default protocol ldp loop-detection vector-length 16
cfg> set instance default protocol ldp loop-detection hop-count 32
cfg> commit
cfg> show ldp summary
Instance: default
<...>
  Capabilities:
    IPv6 address family: -  , Graceful restart: False
    Loop detection: True
      Hop count: 32, Vector length: 16
<...>
After configuring LDP loop detection on all LSRs in the network, we can reset a LDP session and inspect the Label Mapping messages.
To do this, start a capture on the interface between R1 and R2 with this command:
capture interface hostif-0/0/1/0 direction out protocol ldp
Then, open another terminal session to R1 and clear the LDP session with the command:
clear ldp session all
You should be able to see the new TLVs as in the output below:
2026-06-15T10:31:42.849538+0000 7a:56:0c:c0:00:01 > 7a:78:e5:c0:00:01, ethertype IPv4 (0x0800), length 325: (tos 0xc0, ttl 255, id 36814, offset 0, flags [none], proto TCP (6), length 311)
    192.168.0.1.646 > 192.168.0.2.58383: Flags [P.], seq 4307725:4307976, ack 3427595, win 3014, options [nop,nop,md5 shared secret not supplied with -M, can't check - a654662143ec25b0082c0897c16323bd], length 251
	LDP, Label-Space-ID: 192.168.0.1:0, pdu-length: 247
...
	  Label Mapping Message (0x0400), length: 45, Message ID: 0x0000000d, Flags: [ignore if unknown]
	    FEC TLV (0x0100), length: 8, Flags: [ignore and don't forward if unknown]
	      Prefix FEC (0x02): IPv4 prefix 192.168.0.5/32
	    Generic Label TLV (0x0200), length: 4, Flags: [ignore and don't forward if unknown]
	      Label: 519937
	    Hop Count TLV (0x0103), length: 1, Flags: [ignore and don't forward if unknown]
	      Hop Count: 3                                                                      (1)
	    Path Vector TLV (0x0104), length: 12, Flags: [ignore and don't forward if unknown]
	      Path Vector: 192.168.0.5, 192.168.0.2, 192.168.0.1                                (2)

...| 1 | After activating the loop detection feature, the hop count TLV is added to the label binding indicating how many LSRs this binding has traversed. |
| 2 | The path vector TLV represents a list of all LSRs, that this label binding messages has traversed. |
IGP Synchronization
One problem with LDP-established label-switched paths is that, due to the dependency of LDP on a working IGP adjacency before a session can be established, an IGP adjacency may be established before the LDP protocol can successfully complete label exchange between peers.
When this happens, traffic can be blackholed, as remote routers send MPLS packets towards a router that still lacks complete label mappings.
To prevent this, IGPs (such as OSPF or IS-IS) can be configured to advertise links with a maximum metric until the corrisponding LDP session becomes fully operational. This process is known as LDP IGP synchronization.
Enable ldp-synchronization on both core interface on router R1 in the IGP configuration.
Click to reveal the answer
cfg> set instance default protocol isis interface hostif-0/0/1/0 ldp-synchronization enable
cfg> set instance default protocol isis interface hostif-0/0/2/0 ldp-synchronization enable
cfg> set instance default protocol ldp igp-synchronization hold-timer 5
cfg> commit
Now that we have activated LDP IGP synchronization, we can see it in action by clearing the LDP session and immediately checking what ISIS is advertising for that link in terms of metrics. With a bit of luck and some fast typing, we should be able to see the metric increasing to its maximum and then falling back to its normal value once the LDP session is up again.
cfg> show isis database level-2 lsp id 1921.6800.0001.00-00
<...>
    IS Reachability TLVs (22):
      IS neighbor: 1921.6800.0002.00              Metric:      100             (1)
      IS neighbor: 1921.6800.0003.00              Metric:      100
<...>

cfg> clear ldp session instance default peer ldp-id 192.168.0.2:0
LDP session cleared for peer 192.168.0.2
cfg> show isis database level-2 lsp id 1921.6800.0001.00-00
<...>
    IS Reachability TLVs (22):
      IS neighbor: 1921.6800.0002.00              Metric: 16777214             (2)
      IS neighbor: 1921.6800.0003.00              Metric:      100
<...>| 1 | Metric to reach IS-IS neighbor R2 is 100. |
| 2 | IS-IS metric is increased to maximum value during LDP session outage. |
After clearing the LDP session, the metric is adjusted in IS-IS as long as the LDP session is not fully operational.
LDP Timer
Hello messages and keepalive messages are sent periodically and it is possible to adjust the corresponding intervals. In general, the default values are suitable for most networks and are designed to ensure stability and interoperability. Adjustments may be justified in special cases, e.g., if faster convergence is required.
The Hello interval and hold-time used in LDP discovery are encoded in Hello messages, so peers can adapt. The Keepalive timer is not negotiated. It is local to each LSR, and affects how quickly each side considers the TCP session dead if no keepalive or other message is received. If keepalive timer values differ, a LSR might tear down the session sooner than the LDP peer expects, leading to unexpected session resets or flapping. Thus, it is very important to keep LDP timers consistent across peers unless there is a specific need to change them.
On R1, set the LDP hello interval to 10s and the hold-time to 30s using the set instance default protocol ldp timer command hierarchy. In addition, set the session keepalive interval to 15s and the timeout to 45s.
Click to reveal the answer
cfg> set instance default protocol ldp timer hello interval 10
cfg> set instance default protocol ldp timer hello hold-time 30
cfg> set instance default protocol ldp timer session keepalive-interval 15
cfg> set instance default protocol ldp timer session keepalive-timeout 45
cfg> commit
cfg> show ldp summary
<...>
  Timers:
    Adjacency:
      Hello: 10s, Holdtime: 30s
    Targeted adjacency:
      Hello: 15s, Holdtime: 45s
    Session:
      Keepalive: 15s, Holdtime: 45s
<...>
Summary
This module outlined the operation and configuration of Label Distribution Protocol (LDP). You should be able to understand how LDP sessions are established and how LDP bindings are exchanged.
If you have completed the exercise, you can check the results by executing
student@tour:~/trainings_resources/robot$ robot mpls_ldp/mpls_ldp_verify.robot