Routing Basics
Module Introduction
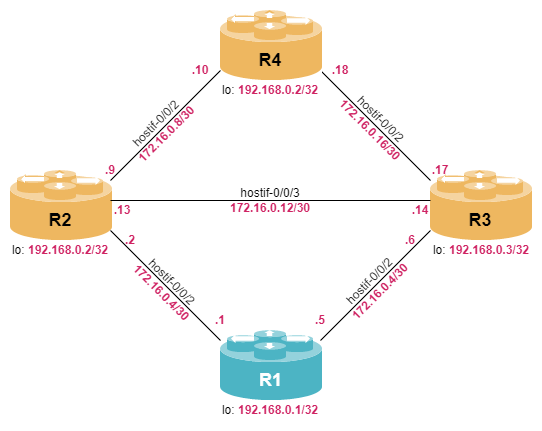
Before you start the hands-on part of this module, you should load the appropriate configuration and verify that the testbed is up and running by executing the corresponding robot file:
student@tour:~/trainings_resources/robot$ robot routing_basics/routing_setup.robotIn order to get a better understanding, the lab setup is shown in the picture below.
RBFS Routing Overview
Routing is the process of determining where to send IP packets destined for IP addresses outside of the local network. A router collects and maintains routing information to enable sending and receiving of such data packets. This process is called forwarding and usually done in purpose-built hardware.
There are a couple of different routing protocols. In this tour we will cover
-
direct routes (interfaces)
-
static routing
-
Interior Gateway Protocols (IGPs) like OSPF and IS-IS
-
Border Gateway Protocol (BGP)
We have already covered the interface routes in the previous module.
All routing protocols contribute to the routing table which provides the best entries for each IP destination. The most important command to view the routing table is the show route command. There are a lot of useful options to narrow down the output of the show route command:
-
address-family describes which address family identifier (AFI), e.g., ipv4 or ipv6, and which subaddress family identifier (SAFI), e.g., unicast, labeled-unicast, etc., should be displayed
-
source restricts the output to a certain routing protocol, e.g., static, direct, …
-
prefix is used to view only a certain IP prefix
Execute the show route ipv4 unicast prefix 172.16.0.0/27 command. Which information can you extract from the output (e.g., route source)?
Click to reveal the answer
cfg> show route ipv4 unicast prefix 172.16.0.0/27
Instance: default, AFI: ipv4, SAFI: unicast
Prefix/Label              Source            Pref    Next Hop         Interface
172.16.0.1/32             direct            0       172.16.0.1       hostif-0/0/1/0
172.16.0.0/30             direct            0       172.16.0.0       hostif-0/0/1/0
172.16.0.2/32             arp-nd            6       172.16.0.2       hostif-0/0/1/0
172.16.0.5/32             direct            0       172.16.0.5       hostif-0/0/2/0
172.16.0.4/30             direct            0       172.16.0.4       hostif-0/0/2/0
172.16.0.6/32             arp-nd            6       172.16.0.6       hostif-0/0/2/0
The most important information in this output is the nexthop address and the outgoing interface as this information is used for forwarding IP packets. As there is no routing protocol configured yet, there are mainly interface routes in the routing table which are referred to as direct. In addition, host routes for the ARP entries can be seen.
The show route prefix <prefix> command provides the hits in the routing table for the given prefix including all of its more specific prefixes.
|
The routing table contains an information called preference. The preference is used as a tiebreak if the same prefix is learned from different route sources. The lowest numerical route preference wins. As direct interface routes are the most reliable one, the default preference is 0.
Routing Instances
If you take a close look at the output of the show route command, you will find the instance name in the first line. A routing instance represents a set of interfaces, routing protocols and corresponding routing tables. You can think of a routing instance as a virtual router within RBFS.
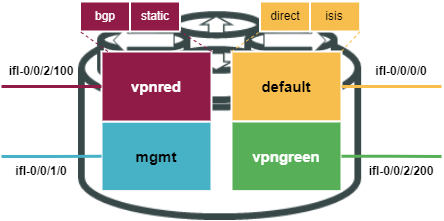
Each logical interface is associated uniquely with a routing instance. If no routing instance is explicitly configured, the default routing instance is used. The interface association can be seen with the show interface address command.
|
Routing instance are configured using the set instance <instance_name> syntax. When configuring a routing instance, you need to specify which address-families (AFI, SAF) the routing instance should support.
Configure a new routing instance called ABC which supports IPv4 and IPv6 unicast. Associate interface hostif-0/0/2/0 with the new routing instance. Verify that you can still reach R3 via hostif-0/0/2/0.
Click to reveal the answer
cfg> set instance ABC address-family ipv4 unicast
cfg> set instance ABC address-family ipv6 unicast
cfg> set interface hostif-0/0/2 unit 0 instance ABC
cfg> commit
cfg> ping 172.16.0.6 instance ABC count 3
68 bytes from 172.16.0.6: icmp_seq=1 ttl=64 time=1.6503 ms
68 bytes from 172.16.0.6: icmp_seq=2 ttl=64 time=4.3655 ms
68 bytes from 172.16.0.6: icmp_seq=3 ttl=64 time=4.2087 ms
Statistics: 3 sent, 3 received, 0% packet loss| Because the interface has been move to instance ABC, you need to specify the instance as an option in the ping command. |
Static Routing
With static routing, the router learns routes when an administrator manually configures the static route. The administrator must manually update this static route entry whenever an internetwork topology change requires an update. Static routes are user-defined routes that specify the path that packets take when moving between a source and a destination. These administrator-defined routes allow very precise control over the routing behavior of the IP internetwork.
Static routes are commonly used when you are routing from a network to a stub network. A stub network (sometimes called a leaf node) is a network accessed by a single route. Static routes can also be useful for specifying a "gateway of last resort" to which all packets with an unknown destination address will be sent.
| The static route is configured for connectivity to remote networks that are not directly connected to your router. For end-to-end connectivity, a static route must be configured in both directions. |
In general, a static route consists of two components:
-
route prefix which describes the destination to be reached
-
next-hop profile which indicates how a destination can be reached
| A static route must have exactly one nexthop profile assigned. However, the nexthop profile can be shared by multiple prefixes. |
Configuring Nexthop Profile
Configure the following three nexthop profiles in instance default:
-
nexthop profile pointing at IPv4 address 172.16.0.2 (R2)
-
nexthop profile pointing at IPv6 address fc00:c0a8:0:1:172:16:0:2 (R2)
-
nexthop profile pointing at the null0 interface
Click to reveal the answer
cfg> set instance default static nexthop-profile NH_R2_v4 nexthop 172.16.0.2
cfg> set instance default static nexthop-profile NH_R2_v6 nexthop fc00:c0a8:0:1:172:16:0:2
cfg> set instance default static nexthop-profile NULL exit-interface null0
cfg> commit
Configuring Static Routing
Configure the following three static routes in instance default and associate them with the three profiles you have configured in the last exercise:
-
172.16.100.0/24 with nexthop null0
-
192.168.0.2/32 with nexthop R2
-
fc00:c0a8::192:168:0:2/128 with nexthop R2
Verify that both destinations on R2 are reachable
Click to reveal the answer
cfg> set instance default static route ipv4 172.16.100.0/24 unicast NULL
cfg> set instance default static route ipv4 192.168.0.2/32 unicast NH_R2_v4
cfg> set instance default static route ipv6 fc00:c0a8::192:168:0:2/128 unicast NH_R2_v6
cfg> commit
cfg> show route source static
Instance: default, AFI: ipv4, SAFI: unicast
Prefix/Label                   Source       Pref    Next Hop                     Interface
172.16.100.0/24                static       2       -                            null0
192.168.0.2/32                 static       2       172.16.0.2                   hostif-0/0/1/0
Instance: default, AFI: ipv6, SAFI: unicast
Prefix/Label                   Source       Pref    Next Hop                     Interface
fc00:c0a8::192:168:0:2/128     static       2       fc00:c0a8:0:1:172:16:0:2     hostif-0/0/1/0
cfg> ping 192.168.0.2 count 3
68 bytes from 192.168.0.2: icmp_seq=1 ttl=64 time=1.5387 ms
68 bytes from 192.168.0.2: icmp_seq=2 ttl=64 time=2.3116 ms
68 bytes from 192.168.0.2: icmp_seq=3 ttl=64 time=3.4188 ms
Statistics: 3 sent, 3 received, 0% packet loss
cfg> ping fc00:c0a8::192:168:0:2 count 3
68 bytes from fc00:c0a8::192:168:0:2: icmp_seq=1 ttl=64 time=8.9818 ms
68 bytes from fc00:c0a8::192:168:0:2: icmp_seq=2 ttl=64 time=1.3651 ms
68 bytes from fc00:c0a8::192:168:0:2: icmp_seq=3 ttl=64 time=4.6354 ms
Statistics: 3 sent, 3 received, 0% packet loss