Interfaces Configuration
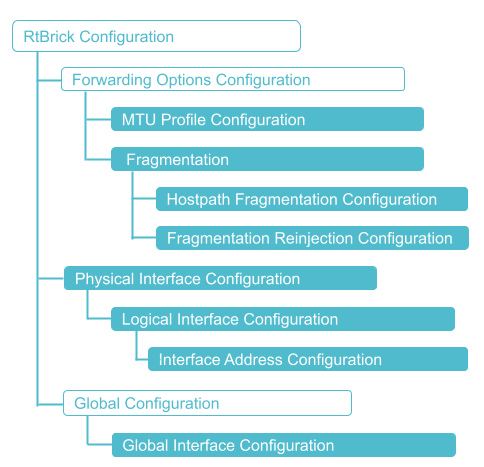
Configuration Hierarchy
The diagram illustrates the interface configuration hierarchy.
Configuration Syntax and Commands
The following sections describe the interface configuration syntax and commands.
MTU Profile Configuration
This section describes how to configure MTU profiles.
Syntax:
set forwarding-options mtu-profile <attribute> <value>
| Attribute | Description |
|---|---|
|
MTU profile name |
|
MTU size. Range: 64 to 9216 bytes |
|
Specify the MTU type:
|
action <mtu-action> |
Specify the MTU action. The following options are supported: |
Example 1: Configuration of the MTU Profile for the Physical Port
{
  "ietf-restconf:data": {
    "rtbrick-config:forwarding-options": {
      "mtu-profile": [
        {
          "mtu-profile-name": "portMtu",
          "size": 5000,
          "type": "physical",
          "action": "redirect-to-cpu"
        }
      ]
    }
  }
}
Example 2: MTU Profile Configuration of Type IPv4
{
  "ietf-restconf:data": {
    "rtbrick-config:forwarding-options": {
      "mtu-profile": [
        {
          "mtu-profile-name": "ipv4Mtu",
          "size": 1300,
          "type": "ipv4",
          "action": "redirect-to-cpu"
        }
      ]
    }
  }
}
Example 3: MTU Profile Configuration of Type IPv6
{
  "ietf-restconf:data": {
    "rtbrick-config:forwarding-options": {
      "mtu-profile": [
        {
          "mtu-profile-name": "ipv6Mtu",
          "size": 1400,
          "type": "ipv6",
          "action": "redirect-to-cpu"
        }
      ]
    }
  }
}
Example 4: Configuration of the MTU Profile for PPPoE
{
  "ietf-restconf:data": {
    "rtbrick-config:forwarding-options": {
      "mtu-profile": [
        {
          "mtu-profile-name": "pppoeMtu",
          "size": 1492,
          "type": "pppoe",
          "action": "redirect-to-cpu"
        }
      ]
    }
  }
}
 To access the RESTCONF API that corresponds to this CLI, click
here.
To access the RESTCONF API that corresponds to this CLI, click
here.
Enabling Hostpath Fragmentation
This section describes how to enable or disable fragmentation by CPU. It is necessary to configure MTU profile action "redirect-to-cpu" so that fragmentation takes place. By default, fragmentation is disabled.
Syntax:
| Attribute | Description |
|---|---|
|
Enables fragmentation of IPv4 packets. |
Example: Configuration of Hostpath Fragmentation
{
  "ietf-restconf:data": {
    "rtbrick-config:forwarding-options": {
      "fragmentation": {
        "ipv4": {
          "state": "cpu"
        }
      }
    }
  }
}
To access the RESTCONF API that corresponds to this CLI, click
here.
Configuring Policer Limits for Fragmented Traffic
RBFS optimizes performance for fragmented traffic by adjusting the default policer limits on the host path. Fragmentation packets received on the host path has a cap upto 150 Mbps, which enables higher throughput for fragmented traffic
Syntax:
The following policer configuration sets the RBFS host path to support 120 Mbps.
supervisor@rtbrick>SPINE01: cfg> set forwarding-options fragmentation ipv4 state cpu
supervisor@rtbrick>SPINE01: cfg> set forwarding-options fragmentation ipv4 policer policer_120MB
Example:
supervisor@rtbrick>: cfg> show config forwarding-options fragmentation
{
  "rtbrick-config:fragmentation": {
	"ipv4": {
  	"state": "cpu",
  	"policer": "policer_120MB"
	}
  }
}
|
Physical Interface Configuration
This section describes configuration options at the physical interface (IFP) level.
Syntax:
| Attribute | Description | ||
|---|---|---|---|
|
Name of the interface. Example: ifp-0/0/1. |
||
|
Administrative state of the interface. |
||
|
Enable auto-negotiation. To disable auto-negotiation, use the NOTE: Port speed configuration and auto-negotiation are mutually exclusive. |
||
|
Enable or disable the holddown timer feature. By default, the feature is enabled. |
||
|
Configure the down delay time in milliseconds (ms). |
||
|
Configure the down delay time in milliseconds (ms). |
||
|
Apply class-of-service profile name. |
||
|
Configure physical interface description. |
||
|
Configure a host interface. For example, if the container interface eth1 connects to the host interface vethXYZ123, use this command option to bound hostif-0/0/1 to eth1.
|
||
|
Configure Forward Error Correction (FEC) on the physical interface. FEC allows you to send the required information to correct errors through the link along with the payload data. A benefit of "forward" in FEC is that errors detected at the receiver do not need to be retransmitted. Currently, the supported FEC types are: base-r, rsfec, none. NOTE: |
||
|
Enable link training. To disable link training, use the |
||
|
Memif role, master or slave, applicable only to memif interface. One end needs to be configured as master, and the other one as slave. |
||
|
Configure memif ID, applicable only to memif interface. Needs to match on both ends. |
||
|
Attach MTU profile to a physical interface. This is a mandatory attribute. |
||
|
Maximum receive unit size on the physical interface. |
||
|
Configure speed mode for the interface. Port speed refers to the maximum amount of data transmitted. The speed value is specified in Gigabits per second (Gbps). Currently, RBFS supports 10G and 100G ports, and you can make the following changes:
|
Example 1: Physical Interface Configuration
{
    "rtbrick-config:interface": [
      {
        "name": "ifp-0/0/1",
        "description": "Link to leaf1",
        "speed": "10G",
        "mtu-profile": "portMtu",
        "mru": 5000
      }
    ]
}
Example 2: Memory Interface Configuration
A End:
{
    "rtbrick-config:interface": [
      {
        "name": "ifp-0/0/1",
        "description": "Master",
        "memif-id": 11,
        "master": "true",
      }
    ]
}
B End:
{
    "rtbrick-config:interface": [
      {
        "name": "ifp-0/0/1",
        "description": "Slave",
        "memif-id": 11,
        "master": "false",
      }
    ]
  }
Example 3: Host Interface Configuration
{
    "rtbrick-config:interface": [
        "name": "ifp-0/0/1",
        "description": "Represents eth1 as ifp-0/0/1 in RBFS",
        "host-if": "eth1",
    ]
}
Example 4: MRU Configuration for Physical Interface
{
    "rtbrick-config:interface": [
      {
        "name": "ifp-0/0/7",
        "mru": 5000
      }
    ]
  }
Example 5: FEC Configuration for Physical Interface
{
    "rtbrick-config:interface": [
      {
        "name": "ifp-0/0/40",
        "forward-error-correction": "base-r"
      }
    ]
  }
To access the RESTCONF API that corresponds to this CLI, click
here.
To access the Operational State API that corresponds to this CLI, click
here.
Logical Interface Configuration
This section describes configuration options at the logical interface (IFL) level.
Syntax:
| Attribute | Description |
|---|---|
|
Create a logical interface (also referred to as a sub-interface) under the physical interface. |
|
Configure IPv4 and IPv6 address for sub-interface. |
|
Configure NAT for logical interface. |
|
Administrative state of the logical interface. |
|
Apply class-of-service profile name. |
|
Description of the logical interface. |
|
Configure Ethernet Segment Identifier for L2 interface. |
|
Disables Gratuitous ARP (GARP). Default is GARP enabled. |
|
Inner VLAN ID. |
|
Configure input VLAN mapping |
|
Configure the inner VLAN for the VLAN operation specified |
|
VLAN encapsulation at ingress |
|
Configure the vlan for the vlan operation specified |
|
VLAN operation at ingress |
|
Assign the logical interface to an instance. |
|
Configure L2 interface type |
|
Attach IP MTU profile to an L3 interface. |
|
Enable or disable IPv4. |
|
Attach IPv4 MTU profile to an L3 interface. |
|
Enable or disable IPv6. |
|
Attach IPv6 MTU profile to an L3 interface. |
|
Attach IP MTU profile to an L3 interface. |
|
Enable or disable MPLS. |
|
MPLS maximum transmission unit size. |
|
Configure a static IPv4 or IPv6 neighbor. |
|
Configure Output VLAN mapping |
|
Specifies the VLAN operation at egress |
|
Specifies the VLAN priority operation, which allows users to configure the outer-VLAN-priority bits to remain transparent. |
|
Configure the inner VLAN for the VLAN operation specified |
|
VLAN encapsulation at egress |
|
Configure the VLAN for the VLAN operation specified |
|
VLAN operation at egress |
|
Configure an unnumbered interface. See the Unnumbered Interface Configuration example below. |
|
Disable the router advertisement functionality. |
|
Configure layer-2 service egress meta data value. |
|
Enable traffic statistics for the L2 logical interfaces (L2 IFLs). For L3 logical interfaces (L3 IFLs), traffic statistics are enabled by default. The value |
|
Specifies Outer VLAN ID. |
|
Specifies the outer VLAN tag. |
Example 1: Logical Interface Configuration with IPv4 MTU Profile
 {
   "rtbrick-config:interface": [
      {
        "name": "ifp-0/0/1",
        "unit": [
          {
            "unit-id": 1,
            "description": "VLAN 101",
            "instance": "default",
            "ipv4-mtu-profile": "ipv4Mtu"

          }
        ]
      }
   ]
 }
Example 2: Logical Interface Configuration with IPv6 MTU Profile
 {
   "rtbrick-config:interface": [
      {
        "name": "ifp-0/0/1",
        "unit": [
          {
            "unit-id": 1,
            "description": "VLAN 101",
            "instance": "default",
            "ipv6-mtu-profile": "ipv6Mtu"

          }
        ]
      }
   ]
}
Example 3: Logical Interface Configuration with IP MTU Profile
 {
   "rtbrick-config:interface": [
      {
        "name": "ifp-0/0/1",
        "unit": [
          {
            "unit-id": 1,
            "description": "VLAN 101",
            "instance": "default",
            "ip-mtu-profile": "ipMtu"

          }
        ]
      }
   ]
}
Example 4: Logical Interface Configuration with disabling router advertisement
{
  "ietf-restconf:data": {
    "rtbrick-config:interface": [
      {
        "name": "ifp-0/0/1",
        "ifp": "L1-4-S1"
      },
      {
        "name": "hostif-0/0/2",
        "ifp": "L1-5-SN",
        "unit": [
          {
            "unit-id": 10,
            "ra-disable": "true"
          }
        ]
      },
    ]
  }
}
Example 5: Unnumbered Interface Configuration
The following configuration sets up a loopback interface lo-0/0/0/0 with IP addresses, and creates two unnumbered interfaces that inherits or borrows the IP addresses from the loopback interface.
supervisor@rtbrick: cfg> set interface lo-0/0/0 unit 0 instance service
supervisor@rtbrick: cfg> set interface lo-0/0/0 unit 0 address ipv4 192.0.2.1/32
supervisor@rtbrick: cfg> set interface lo-0/0/0 unit 0 address ipv6 2001:db8::1/128

supervisor@rtbrick: cfg> set interface ifp-0/0/25 unit 0 unnumbered interface lo-0/0/0/0
supervisor@rtbrick: cfg> set interface ifp-0/0/25 unit 1 unnumbered interface lo-0/0/0/0
supervisor@rtbrick: cfg> commit
supervisor@rtbrick: cfg> #show config interface#
{
  "rtbrick-config:interface": [
    {
      "name": "ifp-0/0/25",
      "unit": [
        {
          "unit-id": 0,
          "instance": "service",
          "vlan": 20,
          "unnumbered": {
            "interface": "lo-0/0/0/0"
          }
        },
        {
          "unit-id": 1,
          "instance": "service",
          "vlan": 21,
          "unnumbered": {
            "interface": "lo-0/0/0/0"
          }
        }
      ]
    },
    {
      "name": "lo-0/0/0",
      "unit": [
        {
          "unit-id": 0,
          "instance": "service",
          "address": {
            "ipv4": [
              {
                "prefix4": "192.168.1.1/32"
              }
            ],
            "ipv6": [
              {
                "prefix6": "192:168:1::1/128"
              }
            ]
          }
        }
      ]
    }
  ]
}
Example 6: The following example configures the interface (ifp-0/1/10 unit 10) to ignore outer-VLAN-priority rewrite operations by setting the vlan-priority-operation to none within the output-vlan-map configuration.
supervisor@rtbrick>SPINE01: cfg> set interface ifp-0/1/10 unit 10 output-vlan-map
supervisor@rtbrick>SPINE01: cfg> set interface ifp-0/1/10 unit 10 output-vlan-map vlan-priority-operation none
 {
   "rtbrick-config:interface": [
      {
        "name": "ifp-0/0/1",
        "unit": [
          {
            "unit-id": 1,
            "description": "VLAN 101",
            "instance": "default",
            "output-vlan-map":
              "vlan-priority-operation": none
          }
        ]
      }
   ]
}
To access the RESTCONF API that corresponds to this CLI, click
here.
Interface Address Configuration
This section describes how to configure interface IP addresses.
Syntax:
| Attribute | Description |
|---|---|
|
Address family identifier (AFI). Supported values: ipv4 and ipv6 |
|
Assign IPv4 or IPv6 address to the interface unit. |
|
Configure list of communities associated with the address. |
|
Configure list of extended communities associated with the address. |
|
Configure label associated with the address. |
|
Enable a secondary IPv4 address. To disable the |
| Broadcast and network IP addresses cannot be configured on logical (IFL) interfaces. |
Example: Interface Address Configuration
{
    "rtbrick-config:interface": [
      {
        "name": "lo-0/0/1",
        "unit": [
          {
            "unit-id": 1,
            "address": {
              "ipv4": [
                {
                  "prefix4": "198.51.100.103/24",
                  "label": 12346
                }
              ]
            }
          }
        ]
      }
    ]
  }
To access the RESTCONF API that corresponds to this CLI, click
here.
Global Interface Configuration
This section describes a configuration option applied globally to all interfaces.
Syntax:
| Attribute | Description |
|---|---|
|
Configure state of the interface. |
|
Example: Enabling or Disabling all Interfaces
{
  "ietf-restconf:data": {
    "rtbrick-config:global": {
      "interface": {
        "all": {
          "admin-status": "down"
        }
      }
    }
  }
}
Interface Holddown Configuration
By default, the Interface Hold-down feature is enabled. You can disable the feature if you want. It is allowed to configure timer value for options such as 'holddown down delay' and 'holddown up delay'.
Syntax:
| Attribute | Description |
|---|---|
|
Name of the interface. Example: ifp-0/0/1. |
|
Enable or disable the holddown timer feature. By default, the feature is enabled. |
|
Configure the down delay time in milliseconds (ms). The allowed values include 0, 100, 200, 500, 1000, 2000, 5000, and 10000. It overrides the default delay of '0' milliseconds. |
|
Configure the up delay time milliseconds (ms). The allowed values include 0, 100, 200, 500, 1000, 2000, 5000, and 10000. |
IPv6 Link-Local Address Configuration
You can manually assign an IPv6 link-local address on an interface.
Syntax:
set interface <interface-name> unit <unit-id> address ipv6-link-local <IPv6 address>
| Attribute | Description |
|---|---|
|
Name of the interface. Example: ifp-0/0/1. |
|
Create a logical interface (also referred to as a sub-interface) under the physical interface. |
|
Specifies the IPv6 link-local address. |
Example for IPv6 link-local configuration
{
 "ietf-restconf:data": {
   "rtbrick-config:interface": [
     {
       "name": "hostif-0/0/0",
       "host-if": "B1-1-SN"
     },
     {
       "name": "hostif-0/0/2",
       "host-if": "B1-3-B2",
       "unit": [
         {
           "unit-id": 10,
           "address": {
             "ipv6-link-local": "fe80::1"
           }
         }
       ]
     },
     {
       "name": "hostif-0/0/3",
       "host-if": "B1-4-B2"
     }
   ]
 }
}
Disabling Gratuitous ARP on Interface
You can disable the sending of Gratuitous ARP (GARP) on an interface, which is enabled by default on all interfaces.
To enable GARP on an interface, you need to delete the garp-disable true configuration.
|
Syntax:
set interface <interface-name> unit <unit-id> garp-disable true
| Attribute | Description |
|---|---|
interface <interface-name> |
Name of the interface. Examples: ifp-0/0/1. |
garp-disable true |
Disables Gratuitous ARP (GARP). Default is GARP enabled. |
Example: Disabling Gratuitous ARP
supervisor@rtbrick.net: cfg> set interface ifp-0/0/0 unit 100 garp-disable true
Static ARP Entry Configuration on Logical Interfaces
This static ARP Entry on IFLs enables the RBFS devices to proactively resolve ARP and ND.
Syntax:
The following example shows how to configure an ARP entry on a logical interface.
set interface ifp-0/1/0 unit 6 neighbor ipv4 192.0.2.1 dynamic true
Example:
{
  "ietf-restconf:data": {
    "rtbrick-config:interface": [
      {
        "name": "ifp-0/1/0",
        "host-if": "S1-1-SN",
        "unit": [
          {
            "unit-id": 10,
            "neighbor": {
              "ipv4": [
                {
                  "address": "192.0.2.1",
                  "dynamic": "true"
                }
              ]
            }
          }
        ]
      },
      {
        "name": "ifp-0/0/1",
        "host-if": "S1-2-SN"
      },
      {
        "name": "ifp-0/0/2",
        "host-if": "S1-3-L1"
      },
      {
        "name": "ifp-0/0/3",
        "host-if": "S1-4-L1"
      }
    ]
  }
}
To access the RESTCONF API that corresponds to this CLI, click
here.
Breakout Interfaces
Using the breakout configuration, the high-speed interfaces(100G) on the UfiSpace S9600-32X platform can be divided into multiple lower-speed interfaces(10G or 25G), allowing them to connect with lower rate ports(10G or 25G) in other network devices.
RBFS supports the following breakout configuration options:
| Rate | Technology | Breakout Capable | Electric Lanes | Optical Lanes |
|---|---|---|---|---|
100G |
QSFP28 |
Yes |
4 x 25G |
4 x 25G |
100G |
QSFP28 |
Yes |
4 x 10G |
4 x 10G |
For example, to set up the individual peer-side (25G/10G) interfaces, we need to configure the breakout on the 100G port to 4x10G or 4x25G based on the peer-side speed.
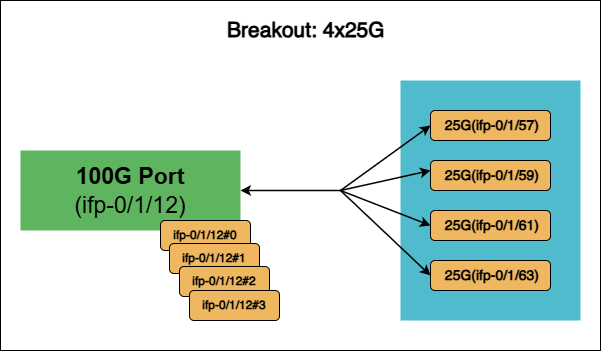
When a breakout is configured on a high-speed interface (for example, ifp-0/1/12), it is divided into four lower-speed interfaces: ifp-0/1/12#0, ifp-0/1/12#1, ifp-0/1/12#2, and ifp-0/1/12#3. As a result, the original high-speed interface will no longer be available.
The following diagram shows the breakout for the interface ifp-0/1/12 on the high-speed 100G to 4x25G ports (#0, #1, #2, #3).
Guidelines and Limitations
Currently, the following limitations exist.
-
Autonegotiation, speed configuration, and traffic sampling are not supported for breakout interfaces.
-
A breakout interface cannot be a member of a LAG.
-
Using breakout interfaces with routing protocols is not supported.
Configuring Breakout
To configure for the interface ifp-0/1/12 on the high-speed 100G to 4x25G ports., enter the following command:
Syntax:
Example:
set interface ifp-0/1/12 breakout map 4x25G
Viewing Breakout Configuration Details
To view the breakout configuration details, enter the following command:
show interface <interface-name> detail
Example of Breakout Configuration:
supervisor@rtbrick>SPINE01: cfg> show interface ifp-0/1/12#0 detail
Interface: ifp-0/1/12#0
  Admin/Link/Operational status: Up/Up/Up
  Damping Status: holddown
  Breakout: 4x25G
  Speed configured: 25G
  Speed maximum: 25G
  Duplex: Full
  Encapsulation mode: ieee
  MRU: 10000
  MTU: 9000
  Maximum frame size: 10000
  Interface type: ethernet
  Interface index: 100609
  MAC: e8:c5:7a:8f:56:c6
  Uptime:  Mon Nov 25 05:37:10 GMT +0000 2024, Holddown up/down delay: 10000ms/0ms
  Flap count:  1
  Holddown transitions:  1
  Description: Physical interface #12 from node 0, chip 1
  LED Status: Off, LED programmed value: 82
  Packet statistics:
    Rx packets: 3          Tx packets: 3
    Rx bytes: 381          Tx bytes: 387
supervisor@rtbrick>SPINE01: cfg> show interface ifp-0/1
/12#1 detail
Interface: ifp-0/1/12#1
  Admin/Link/Operational status: Up/Up/Up
  Damping Status: stable
  Breakout: 4x25G
  Speed configured: 25G
  Speed maximum: 25G
  Duplex: Full
  Encapsulation mode: ieee
  MRU: 10000
  MTU: 9000
  Maximum frame size: 10000
  Interface type: ethernet
  Interface index: 102657
  MAC: e8:c5:7a:8f:56:c7
  Uptime:  Mon Nov 25 05:37:10 GMT +0000 2024, Holddown up/down delay: 10000ms/0ms
  Flap count:  1
  Holddown transitions:  1
  Description: Physical interface #12 from node 0, chip 1
  LED Status: Off, LED programmed value: 4
  Packet statistics:
    Rx packets: 1          Tx packets: 1
    Rx bytes: 127          Tx bytes: 129
supervisor@rtbrick>SPINE01: cfg> show interface ifp-0/1
/12#2 detail
Interface: ifp-0/1/12#2
  Admin/Link/Operational status: Up/Up/Up
  Damping Status: stable
  Breakout: 4x25G
  Speed configured: 25G
  Speed maximum: 25G
  Duplex: Full
  Encapsulation mode: ieee
  MRU: 10000
  MTU: 9000
  Maximum frame size: 10000
  Interface type: ethernet
  Interface index: 104705
  MAC: e8:c5:7a:8f:56:c8
  Uptime:  Mon Nov 25 05:37:10 GMT +0000 2024, Holddown up/down delay: 10000ms/0ms
  Flap count:  1
  Holddown transitions:  1
  Description: Physical interface #12 from node 0, chip 1
  LED Status: Off, LED programmed value: 0
  Packet statistics:
    Rx packets: 1          Tx packets: 1
    Rx bytes: 127          Tx bytes: 129
supervisor@rtbrick>SPINE01: cfg> show interface ifp-0/1
/12#3 detail
Interface: ifp-0/1/12#3
  Admin/Link/Operational status: Up/Up/Up
  Damping Status: stable
  Breakout: 4x25G
  Speed configured: 25G
  Speed maximum: 25G
  Duplex: Full
  Encapsulation mode: ieee
  MRU: 10000
  MTU: 9000
  Maximum frame size: 10000
  Interface type: ethernet
  Interface index: 106753
  MAC: e8:c5:7a:8f:56:c9
  Uptime:  Mon Nov 25 05:37:10 GMT +0000 2024, Holddown up/down delay: 10000ms/0ms
  Flap count:  1
  Holddown transitions:  1
  Description: Physical interface #12 from node 0, chip 1
  LED Status: Off, LED programmed value: 0
  Packet statistics:
    Rx packets: 1          Tx packets: 1
    Rx bytes: 127          Tx bytes: 129
Split Horizon for P2MP Interface
Split Horizon for P2MP Interface improves security and traffic control by preventing direct communication between devices connected to the same Point-to-Multipoint (P2MP) interface. Currently, in a P2MP setup where multiple devices (like OLTs) are connected to a single interface, these devices can communicate directly with each other. This is often undesirable for security and network management.
Therefore, a no-local-routing configuration knob for P2MP interfaces is made available. When enabled, this feature will block direct communication between hosts connected to the same P2MP interface.
When no-local-routing true is configured on an interface (e.g., a loopback interface associated with the P2MP interface), the system will automatically create Access Control Lists (ACLs) to:
-
Block: Traffic originating from the P2MP subnet and destined for the same P2MP subnet. This prevents communication between devices on that P2MP interface.
-
Allow: Traffic from the P2MP subnet to the interface’s own IP address, allowing traffic to the gateway from the client.
Enabling split horizon provides these key advantages:
-
Improved Security: Prevents unauthorized communication between devices within the same P2MP segment, isolating them from each other.
-
Enhanced Network Control: Gives administrators granular control over traffic flow on P2MP interfaces.
-
Compliance: Helps meet security requirements that mandate isolation between network segments or connected devices.
-
Simplified Configuration: A single configuration knob,
no-local-routing true, simplifies the process of implementing split horizon, as the system automatically manages the underlying ACLs.
| This feature is supported on all platforms except the QAX platform. |
Configuring Split Horizon
The Split Horizon for P2MP Interface feature enhances network security and control for Point-to-Multipoint (P2MP) interfaces.
Syntax:
| Attribute | Description |
|---|---|
|
The name of the interface to configure (e.g., |
|
The unit number of the interface (e.g., |
|
The IP address to assign to the interface (e.g., |
|
Enables split horizon by preventing local routing on the interface, blocking traffic between devices on the same P2MP interface. |
The example below configures a loopback interface (lo-0/0/6 unit 4) with an IPv4 address and enables no-local-routing true for split horizon. It also configures a VLAN interface (ifp-0/1/14 unit 4) as unnumbered, inheriting its IP from the loopback, to separate management and in-band traffic and prevent routing loops.
set interface lo-0/0/6 unit 4 description "lo0.4 dhcp_relay"
set interface lo-0/0/6 unit 4 instance dpu_mgmt
set interface lo-0/0/6 unit 4 address ipv4 198.51.100.1/24 no-local-routing true
set interface ifp-0/1/14 unit 4 description "VLAN4 dpu_inband"
set interface ifp-0/1/14 unit 4 instance dpu_mgmt
set interface ifp-0/1/14 unit 4 vlan 4
set interface ifp-0/1/14 unit 4 unnumbered interface lo-0/0/6/4
set interface ifp-0/1/14 unit 4 garp-disable true
{
  "rtbrick-config:interface": [
    {
      "name": "ifp-0/1/14",
      "unit": [
        {
          "unit-id": 4,
          "description": "VLAN4 dpu_inband",
          "instance": "dpu_mgmt",
          "vlan": 4,
          "unnumbered": {
            "interface": "lo-0/0/6/4"
          },
          "garp-disable": "true"
        }
      ]
    },
    {
      "name": "lo-0/0/6",
      "unit": [
        {
          "unit-id": 4,
          "description": "lo0.4 dhcp_relay",
          "instance": "dpu_mgmt",
          "address": {
            "ipv4": [
              {
                "prefix4": "198.51.100.1/24",
                "no-local-routing": "true"
              }
            ]
          }
        }
      ]
    }
  ]
}