1. Introduction to LLDP
Link Layer Discovery Protocol (LLDP) is a media-independent link layer protocol used by network devices for advertising their identity, capabilities to neighbors on a LAN segment. LLDP runs over the data-link layer only, allowing two systems running different network layer protocols to learn about each other.
LLDP supports a set of attributes that it uses to discover neighbor devices. These attributes contain type, length, and value descriptions and are referred to as TLVs. LLDP supported devices can use TLVs to receive and send information to their neighbors. Details such as configuration information, device capabilities, and device identity can be advertised using this protocol.
1.1. Guidelines
-
All LLDP packets are sent to the CPU for further processing.
-
LLDP packets will be lower priority packets when compared with the routing protocol packets. In case of a congestion, the LLDP packets may be policed.
1.2. Limitations
-
The LLDP currently does not intend to work on bundle interfaces.
1.3. Interactions with other features
RBFS provides various daemons that run as background processes. LLDP interacts with these daemons for accessing necessary configurations.
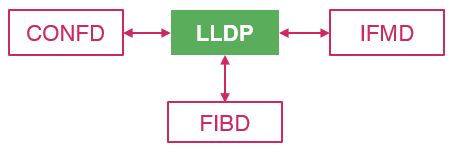
The table below shows the interactions of LLDP with the other daemons of RBFS.
| Daemon Name | Daemon Description | Interaction Details |
|---|---|---|
Confd |
Configuration |
Confd stores all the LLDP configuration information. LLDP subscribes for the following tables of Confd:
|
IFMD |
Interface Monitoring |
LLDP is enabled on the physical interface. LLDP subscribes to the IFP table to find the status of the physical link. An LLDP message can be sent only to those interfaces whose link state is UP. |
FIBD |
Forwarding Information Base |
FIBD subscribes for the LLDP interface table which has all the information required for enabling LLDP on the interface. This is used to program in VPP. Any neighbor detected, VPP will notify and this detection is stored in the FIBD table for tracking purpose. Each time a message is received from the neighbor, it will be updated in this table. Thus, the history of the messages received from the neighbor is tracked. This information is stored in one of the FIBD tables. LLDP subscribes to this table to find its neighbor. |
2. LLDP Configuration
This section describes how to enable and configure LLDP.
2.1. Default LLDP Configuration
The table below shows the default LLDP configuration. To change the default settings, use the LLDP global configuration and LLDP interface-level configuration commands.
| Feature | Default Setting |
|---|---|
LLDP global state |
Enabled |
LLDP holdtime (before discarding) |
120 seconds |
LLDP transmission interval (packet update frequency) |
30 seconds |
LLDP interface state |
Enabled |
2.2. LLDP Global Configuration Commands
You need to configure all the LLDP configuration commands under the config mode (default mode) in CLI.
Config Mode
To enter into the configuration mode, enter the following command:
root@rtbrick:~$ cli
root@rtbrick: cfg>
2.2.1. Enabling or Disabling LLDP
LLDP is enabled by default. The command "set lldp admin-status disable" is used to disable it. If you want to re-enable it, run the "set lldp admin-status enable" command.
To disable or enable LLDP globally, enter the following command:
set lldp admin-status [disable|enable]
Command arguments
Disable |
Disables LLDP. |
Enable |
Enables LLDP. |
Example
root@rtbrick: cfg> set lldp admin-status enable
root@rtbrick: cfg> commit
root@rtbrick: cfg> show config
{
  "data": {
    "rtbrick-config:lldp": {
      "admin-status": "enable"
    }
  }
}
2.2.1.1. Deleting LLDP Configuration
You can delete the LLDP configuration so that default configuration will be restored, that means, LLDP will be enabled in the system.
To delete the LLDP configuration, enter the following command:
delete lldp admin-status [disable|enable]
Example
root@rtbrick: cfg> delete lldp admin-status disable
root@rtbrick: cfg> commit
root@rtbrick: cfg> show config
{
  "data": {
    "rtbrick-config:lldp": {
    }
  }
}
2.2.2. Configuring System Name
To configure a system name that is sent to the neighbors in the system name TLV, enter the following command.
set lldp system-name <system name>
|
|
If the system name is not configured, it is fetched from BDS. |
Command arguments
system-name |
LLDP global system name to be sent to the neighbor |
Example
root@rtbrick: cfg> set lldp system-name rtbrick
root@rtbrick: cfg> commit
root@rtbrick: cfg> show config
{
  "data": {
    "rtbrick-config:lldp": {
      "system-name": "rtbrick"
    }
  }
}
2.2.2.1. Deleting System Name
The delete command allows you to delete the system-name configuration and set the default system name fetched from BDS.
Example
root@rtbrick: cfg> delete lldp system-name rtbrick
root@rtbrick: cfg> commit
root@rtbrick: cfg> show config
{
  "data": {
    "rtbrick-config:lldp": {
    }
  }
}
2.2.3. Configuring System Description
To configure a system description that can be sent to the neighbor, enter the following command.
set lldp system-description <system-description>
Command arguments
system-name |
LLDP global system description to be sent to the neighbor |
Example
root@rtbrick: cfg> set lldp system-description "this is rtbrick system"
root@rtbrick: cfg> commit
root@rtbrick: cfg> show config
{
  "data": {
    "rtbrick-config:lldp": {
      "system-description": "this is rtbrick system"
    }
  }
}
2.2.3.1. Deleting the System Description Configuration
The delete command allows you to delete the system-description configuration from LLDP.
Example
root@rtbrick: cfg> delete lldp system-description "this is rtbrick system"
root@rtbrick: cfg> commit
root@rtbrick: cfg> show config
{
  "data": {
    "rtbrick-config:lldp": {
    }
  }
}
2.2.4. Configuring the Packet Transmission Interval
This interval specifies how often interfaces retransmit advertisements to their neighbors. To configure the interval (in seconds) at which LLDP packets are sent from the interfaces on which LLDP is configured, enter the following command.
set lldp tx-interval <advertisement-interval>
Command arguments
advertisement-interval |
interval(in seconds) at which LLDP packets are sent to neighbors. Default interval value is 30 seconds. The transmission interval range is 1 through 3600 seconds. |
Example
root@rtbrick: cfg> set lldp tx-interval 40
root@rtbrick: cfg> commit
root@rtbrick: cfg> show config
{
  "data": {
    "rtbrick-config:lldp": {
      "tx-interval": 40
    }
  }
}
2.2.4.1. Deleting the Packet Transmission Interval Configuration
The delete command allows you to delete Packet Transmission Interval Configuration and set it to the default (30 sec).
Example
root@rtbrick: cfg> delete lldp tx-interval 40
root@rtbrick: cfg> commit
root@rtbrick: cfg> show config
{
  "data": {
    "rtbrick-config:lldp": {
    }
  }
}
2.2.5. Configuring the LLDP Transmission Holdtime
Specifies the amount of time (in seconds) a receiving device maintains the neighbor information before aging your device. If the timer expires and no LLPD packet was received, the neighbor will be marked as DOWN. The following command is used to configure the holdtime.
set lldp tx-hold <transmit-hold-time>
Command arguments
transmit-hold-time |
Specifies the amount of time (in seconds) a receiving device maintains the neighbor information before aging your device. If the timer expires and no LLPD packet was received, the neighbor will be marked as DOWN. Default value is 120 seconds. The hold-time range is 1 through 360000. |
Example
root@rtbrick: cfg> set lldp tx-hold 150
root@rtbrick: cfg> commit

root@rtbrick: cfg> show config
{
  "data": {
    "rtbrick-config:lldp": {
      "tx-hold": 150
    }
  }
}
2.2.5.1. Deleting the LLDP Transmission Holdtime Configuration
The delete command allows you to delete the transmission Holdtime configuration and set it to the default (120 sec).
Example
root@rtbrick: cfg> delete lldp tx-hold 150
root@rtbrick: cfg> commit
root@rtbrick: cfg> show config
{
  "data": {
    "rtbrick-config:lldp": {
    }
  }
}
2.3. Interface level LLDP Configuration Commands
2.3.1. Enabling and Disabling LLDP on an Interface
By default, LLDP is enabled on all supported interfaces. You can disable it on an individual interface using the "set lldp interface ifp-name disable" command. If you want to re-enable it, run the "set lldp interface ifp-name enable" command.
To disable/enable LLDP on an interface, enter the following command:
set lldp interface <interface-name> admin-status [disable|enable]
Command arguments
interface-name |
Name of the interface on which you are enabling/disabling LLDP |
|
|
|
Example
root@rtbrick: cfg> set lldp interface ifp-0/0/1 admin-status enable
root@rtbrick: cfg> commit
root@rtbrick: cfg> show config
{
  "data": {
    "rtbrick-config:lldp": {
      "interface": [
        {
          "interface-name": "ifp-0/0/1",
          "admin-status": "enable"
        }
      ]
    }
  }
}

root@rtbrick: cfg> set lldp interface ifp-0/0/1 admin-status disable
root@rtbrick: cfg> commit
root@rtbrick: cfg> show config
{
  "data": {
    "rtbrick-config:lldp": {
      "interface": [
        {
          "interface-name": "ifp-0/0/1",
          "admin-status": "disable"
        }
      ]
    }
  }
}
2.3.1.1. Deleting the LLDP Enable/Disable Configuration on an Interface
The delete command allows you to delete the LLDP Enable/Disable Configuration on an Interface and enable the global lldp enable/disable configuration
Example
root@rtbrick: cfg> delete lldp interface ifp-0/0/1 admin-status disable
root@rtbrick: cfg> commit
root@rtbrick: cfg> show config
{
  "data": {
    "rtbrick-config:lldp": {
      "interface": [
        {
          "interface-name": "ifp-0/0/1",
        }
      ]
    }
  }
}
2.3.2. Configuring the Port Description
To configure the port description that is sent to the neighbor, enter the following command.
set lldp interface <interface-name> port-desc <port-desc>
|
|
If the port description is not configured, the description configured under interface from IFMD is taken as LLDP port description. |
Command arguments
interface-name |
Name of the interface |
port-desc |
LLDP port description to be sent to the neighbor |
Example
root@rtbrick: cfg> set lldp interface ifp-0/0/1 port-description "this is port ifp-0/0/1"
root@rtbrick: cfg> commit
root@rtbrick: cfg> show config
{
  "data": {
    "rtbrick-config:lldp": {
      "interface": [
        {
          "interface-name": "ifp-0/0/1",
          "port-description": "this is port ifp-0/0/1"
        }
      ]
    }
  }
}
2.3.2.1. Deleting the Port Description Configuration
The delete command allows you to port description configuration.
Example
root@rtbrick: cfg> delete lldp interface ifp-0/0/1 port-description "this is port ifp-0/0/1"
root@rtbrick: cfg> commit
root@rtbrick: cfg> show config
{
  "data": {
    "rtbrick-config:lldp": {
      "interface": [
        {
          "interface-name": "ifp-0/0/1",
        }
      ]
    }
  }
}
3. LLDP Show Commands
3.1. Displaying LLDP System Summary
To display the summary information such as system name, frequency of transmissions, the holdtime for packets being sent, TLVs, and and the disabled TLVs, enter the following command:
show lldp summary
Command Modes
rtb lldpd
Example
root@leaf:lldpd> show lldp summary

LLDP Summary:
LLDP Config : Disabled
System Name : leaf
System Description : leaf router connected to host1
Tx-Interval(sec) : 30
Tx-Hold(sec) : 120
3.2. Displaying LLDP Interface Summary
To display the information about interfaces where LLDP is enabled, enter the following command:
show lldp interface summary
Command Modes
rtb lldpd
Example
root@leaf:lldpd> show lldp interface summary
+---------+----------------+---------------------+-------------+-------------+-------------+
 Interface     Peer Port-ID     Peer System Name     Last Heard     Last Sent    Status
+---------+----------------+---------------------+-------------+-------------+-------------+
 ifp-0/0/1                                           Never        1 secs ago     Down
 ifp-0/0/2                                           Never       29 secs ago     Down
 memif-0/1/1   memif-0/1/1         spine           25 secs ago   25 secs ago      Up
               memif-0/1/2         leaf           126 secs ago   15 secs ago     Down
+---------+----------------+---------------------+-------------+-------------+-------------+
3.3. Displaying LLDP Interface Details
To display the information of an interface, enter the following command:
show lldp interface <ifp-name>
Command arguments
ifp-name |
Name of the interface |
Command Modes
rtb lldpd
Example
root@leaf:lldpd> show lldp interface memif-0/0/0
memif-0/0/0
LLDP Config : Enabled
Port Description : Physical interface #0 from node 0, chip 0
Chassis ID : 02:dc:5c:30:00:00
System Name : vpp-lac
System Description : NA
TTL Sent : 121
Other TLVs : END-OF-LLDPDU
Peer MAC Address : 02:dc:5c:30:00:00
Peer Port ID : memif11/11
Peer Port Description : Physical interface #0 from node 0, chip 0
Peer System Name : vpp-lac
Peer TTL : 121
Last Sent : 26 secs ago
Last Heard : 26 secs ago
LLDP Status : UP
4. Monitoring and Maintaining LLDP
This section explains the commands that help you monitor and maintain LLDP on your device.
4.1. Clearing LLDP Neighbor
To reset the neighbor and clear the LLDP counters, enter the following command:
clear lldp neighbor all
Command Modes
rtb lldpd
Example to reset all the neighbors
leaf:lldpd> clear lldp neighbor all
Example to reset a specific neighbor
leaf:lldpd> clear lldp neighbor memif-0/1/1
©Copyright 2020 RtBrick, Inc. All rights reserved. The information contained herein is subject to change without notice. The trademarks, logos and service marks ("Marks") displayed in this documentation are the property of RtBrick in the United States and other countries. Use of the Marks are subject to RtBrick’s Term of Use Policy, available at https://www.rtbrick.com/privacy. Use of marks belonging to other parties is for informational purposes only.