1. Introduction
This document describes how to configure and operate PPPoE access services with PPP tunneling using the Layer Two Tunneling Protocol version 2 (L2TPv2) on RtBRick FullStack (RBFS).
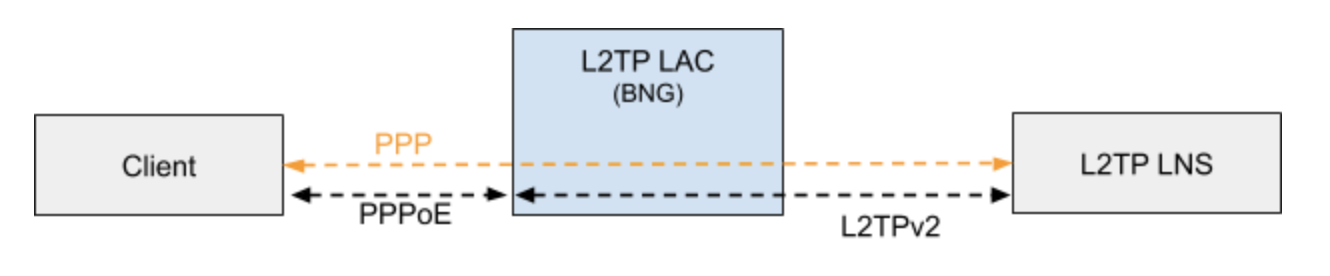
Typically, a user obtains a Layer 2 (L2) point-to-point connection to a Broadband Network Gateway (BNG) using the PPPoE protocol as described in RFC 2516 and runs PPP over that connection. In the most common case, the L2 termination point and PPP session endpoint reside on the same physical device. Tunneling protocols, such as L2TPv2 provide a dynamic mechanism for extending PPP by allowing the L2 and PPP endpoints to reside on different devices that are interconnected by an IP network. This separation allows the actual processing of PPP packets to be divorced from the termination of the L2 circuit. The L2TP access concentrator (LAC) physically terminates the L2 connection and tunnels the PPP packets across an IP network to the L2TP network server (LNS). The LNS then terminates the logical PPP connection.
1.1. Supported Standards (RFCs)
1.1.1. RFC 2661 - Layer Two Tunneling Protocol "L2TPv2"
RFC compliant L2TPv2 Access Concentrator (LAC) with the following protocol limitations:
-
No support for LNS initiated outbound calls (OCRQ, OCRP and OCCN)
-
No support for WAN-Error-Notify (WEN) Messages send by LAC to LNS
-
No support for Set-Link-Info (SLI) Messages send by LNS to LAC
-
No support for L2TP over IPv6
-
No support for L2TP offset values other than 0.
1.1.2. RFC 5515 - L2TP Access Line Information AVP Extensions
-
Support for access line AVP send (LAC) and received (LNS) as part of the L2TP Incoming-Call- Request (ICRQ) message.
-
Connect-Speed-Update-Notification (CSUN) or Connect-Speed-Update-Request (CSURQ) L2TP messages are currently not supported.
1.1.3. RFC 2868 - RADIUS Attributes for Tunnel Protocol Support
RADIUS support for L2TP with the following limitations:
-
No support of FQDN format for IP addresses
-
No support Tunnel-Medium-Type other than IPv4
1.2. Supported Hardware
-
Edgecore AS5916-XKS, based on Broadcom BCM 88670 (Qumran)
-
Virtual Platform (VPP)
2. L2TP Configuration
PPPoE tunneling using L2TPv2 requires to configure PPPoE access services as described in the RtBrick Subscriber Management Configuration Guide extended by L2TP configurations described below.
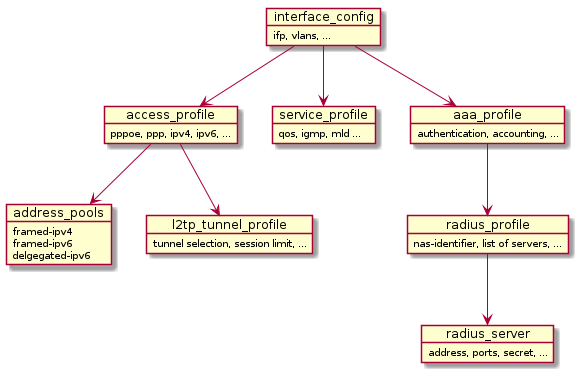
- Access Interface Configuration
-
The access configuration is based on multiple interface configuration objects with each referencing different profiles defining the actual service offered on the matching interface and VLAN range defined in this configuration object.
-
Defines matching physical interface (ifp) and VLANs
-
Assigns the access, service, and AAA profiles
-
Supports multiple interface configurations for each IFP and also disjoint VLAN ID ranges
-
For more information see, Interface Configuration.
- Access Profile Configuration
-
-
Defines access protocols configuration
-
Assigns L2TP configuration profile
-
For more information see, Access Profile Configuration.
- AAA Profile Configuration
-
-
Holds profile for Authentication, Authorization, and Accounting
-
Controls selection of AAA type and order
-
Assigns a RADIUS profile to the AAA profile
-
For more information see, AAA Profile Configuration.
- RADIUS Profile Configuration
-
-
Holds RADIUS server address and ports
-
Holds RADIUS secret and more
-
For more information see, RADIUS Profile Configuration.
- L2TP Profile Configuration
-
-
Controls L2TP protocol configurations like retransmit-interval receive-window, session-limit, hello-interval, idle-timeout-interval.
-
Controls L2TP tunnel configurations
-
Assigns the optional L2TP tunnel pool
-
For more information see, L2TP Profile Configuration.
- User Profile Configuration
-
The user profile configuration defines the users for local authentication.
-
User profiles for local authentication
-
User information including tunnel-type and pool name.
-
For more information see, User Profile Configuration.
- L2TP Tunnel Pool Configuration
-
Defines the local defined L2TP tunnel endpoints.
For more information see, L2TP Tunnel Pool Configuration.
2.1. Interface Configuration
Configuring interface involves the following tasks:
-
Defining matching IFP and VLANs
-
Assigning the access, service, and AAA profiles
-
Supporting multiple interface configurations for each IFP and also disjoint VLAN ID ranges
Syntax
user@r1:confd> set access interface-name <interface name>
  aaa-profile-name            AAA profile name associated with interface
  access-profile-name         Access profile name associated with interface
  max-subscribers-per-mac     Restrict maximum subscribers per mac
  max-subscribers-per-vlan    Restrict maximum subscribers per vlan
  outer-vlan                  Outer VLAN Range (Minimum Value)
  service-profile-name        Service profile name associated with interface
  vlan-profile-enable         Enable VLAN profiles
  [<Enter>]                   Execute the command
[ ]
If you want to enable access on interface ifp-0/0/3, where you can expect a range of VLAN’s, see the example below.
Example
rtb confd set access interface-name ifp-0/0/3 outer-vlan 1 - 2000 inner-vlan 1 - 2000 access-profile-name access-profile1
rtb confd set access interface-name ifp-0/0/3 outer-vlan 1 - 2000 inner-vlan 1 - 2000 aaa-profile-name aaa-profile1n
The example below shows the running-config of interface configuration:
   "interface-name:ifp-0/0/3 1 2000 1 2000": {
        "aaa-profile-name": "aaa-profile1",
        "access-profile-name": "access-profile1"
    },
2.2. Access Profile Configuration
-
Defines access protocols configuration
-
Assigns L2TP configuration profile
Example
rtb confd set access access-profile access-profile1
rtb confd set access access-profile access-profile1 access-type PPPoE
rtb confd set access access-profile access-profile1 protocol ppp lcp authentication-protocol PAP
rtb confd set access access-profile access-profile1 protocol pppoe enable
rtb confd set access access-profile access-profile1 protocol l2tp tunnel-profile l2tp_config
The example below shows the running-config of access profile configuration:
        "access-profile:access-profile1": {
          "access-type": "PPPoE",
          "address-family ipv4": {
            "enable": true,
            "framed-instance": "public"
          },
          "address-family ipv6": {
            "enable": true,
            "framed-instance": "public"
          },
          "protocol ppp": {
            "ip6cp": {
              "enable": true
            },
            "ipcp": {
              "ipcp-enable": true,
              "source-ifl": "lo-0/0/4/1"
            },
            "lcp": {
              "authentication-protocol": "PAP"
            }
          },
          "protocol pppoe": {
            "enable": true
          },
          "protocol l2tp": {
            "tunnel-profile": "l2tp_config"
          },
          "protocol ipv6-router-advertisement": {
            "enable": true
          },
          "protocol dhcpv6": {
            "enable": true
          }
        },
2.3. AAA Profile Configuration
-
Holds profile for Authentication, Authorization, and Accounting
-
Controls selection of AAA type and order
-
Assigns a RADIUS profile to the AAA profile
Example
rtb confd set access aaa-profile aaa-profile1 aaa-radius-profile aaa-radius1
rtb confd set access aaa-profile aaa-profile1 accounting order RADIUS
rtb confd set access aaa-profile aaa-profile1 authentication order RADIUS
rtb confd set access aaa-profile aaa-profile1 accounting interim-interval 60
The example below shows the running-config of AAA profile configuration:
        "aaa-profile:aaa-profile1": {
          "aaa-radius-profile": "aaa-radius1",
          "accounting": {
            "order": "RADIUS",
            "interim-interval": 60
          },
          "authentication": {
            "order": "RADIUS"
          }
        },
2.4. RADIUS Profile Configuration
RADIUS profile configuration involves the following:
-
Holds the RADIUS server address and ports
-
Holds the RADIUS secret and more
Example
rtb confd set access radius-profile aaa-radius1 nas-identifier 10.0.0.2
rtb confd set access radius-profile aaa-radius1 nas-port-type Ethernet
rtb confd set access radius-profile aaa-radius1 authentication radius-server-profile-name radius-srv1
rtb confd set access radius-profile aaa-radius1 accounting radius-server-profile-name radius-srv1
The example below shows the running-config of RADIUS profile configuration:
        "radius-profile:aaa-radius1": {
          "nas-identifier": "10.0.0.2",
          "nas-port-type": "Ethernet",
          "authentication": {
            "radius-server-profile-name": [
              "radius-srv1"
            ]
          },
          "accounting": {
            "radius-server-profile-name": [
              "radius-srv1"
            ]
          }
        },
2.5. RADIUS Server Configuration
The first step is to give the RADIUS server a name. This name must match the name of the RADIUS server configured in the RADIUS profile if the RADIUS server is used for that profile. That is, the name forms the link between the RADIUS profile and a particular server.
Example
rtb confd set access radius-server radius-srv1 address 10.0.0.1
rtb confd set access radius-server radius-srv1 source-address 10.0.0.2
rtb confd set access radius-server radius-srv1 secret rtbrick
rtb confd set access radius-server radius-srv1 routing-instance public
rtb confd set access radius-server radius-srv1 accounting enable
rtb confd set access radius-server radius-srv1 accounting retry 10
rtb confd set access radius-server radius-srv1 accounting timeout 10
rtb confd set access radius-server radius-srv1 authentication enable
rtb confd set access radius-server radius-srv1 authentication retry 10
rtb confd set access radius-server radius-srv1 authentication timeout 10
2.6. User Profile Configuration
User profile captures the access user information including tunnel-type and pool name. The user profile configure is only needed for local authentication.
Syntax
user@r1:confd> set access user-profile <name>
  l2tp-pool-name                  	L2TP pool name
  password                        	Secret password
  tunnel-type                     	Tunnel type
  [<Enter>]                       	Execute the command
Example
rtb confd set access user-profile l2tp-user@rtbrick.com password test
rtb confd set access user-profile l2tp-user@rtbrick.com tunnel-type L2TP
rtb confd set access user-profile l2tp-user@rtbrick.com l2tp-pool-name l2tp_pool
The example below shows the running-config of user profile configuration:
     "user-profile:l2tp-user@rtbrick.com": {
          "password": "test",
          "l2tp-pool-name": "l2tp_pool",
          "tunnel-type": "L2TP"
        },
2.7. L2TP Profile Configuration
L2TP Profile holds the configuration related to L2TP protocol, tunnel and session parameters.
Syntax
user@r1:confd> set access l2tp-profile <profile-name>
  client-ipv4                     	Optional default value for L2TP tunnel ipv4 address
  client-name                     	Optional default value for L2TP tunnel client name
  congestion-window               	L2TP tunnel congestion window
  dead-timeout-interval           	L2TP tunnel dead timeout interval (ms)
  hello-interval                  	L2TP tunnel hello interval
  hide-authentication             	Hide L2TP tunnel authentication
  idle-timeout-interval           	L2TP tunnel idle timeout interval (ms)
  inactive-timeout-interval       	L2TP tunnel inactive timeout interval (ms)
  instance                        	Instance name
  pool-name                       	L2TP tunnel pool name
  receive-window                  	L2TP tunnel receive window
  request-retries                 	L2TP session request retries
  request-timeout-interval        	L2TP session request timeout interval (ms)
  retransmit-interval             	L2TP tunnel retransmission interval
  selection-algorithm             	L2TP tunnel selection algorithm`
  service-label                   	MPLS service label
  session-limit                   	L2TP tunnel session limit
  [<Enter>]                       	Execute the command
[ ]
Example
rtb confd set access l2tp-profile l2tp_config receive-window 8
rtb confd set access l2tp-profile l2tp_config session-limit 64000
rtb confd set access l2tp-profile l2tp_config retransmit-interval 1000
rtb confd set access l2tp-profile l2tp_config hello-interval 30000
rtb confd set access l2tp-profile l2tp_config inactive-timeout-interval 900000
rtb confd set access l2tp-profile l2tp_config idle-timeout-interval 600000
rtb confd set access l2tp-profile l2tp_config pool-name l2tp_pool
The example below shows the running-config of L2TP profile configuration:
        "l2tp-profile:l2tp_config": {
          "receive-window": 8,
          "session-limit": 64000,
          "retransmit-interval": "1000",
          "hello-interval": "30000",
          "idle-timeout-interval": "600000",
          "inactive-timeout-interval": "900000",
          "pool-name": "l2tp_pool",
          "instance": "public",
          "service-label": 12345
        }
      }
2.8. L2TP Pool Configuration
L2TP pool holds the configuration related to tunnel endpoints.
Syntax
user@r1:confd> set access l2tp-pool
  <pool-name>       L2tp pool name
[ ]
Example
rtb confd set access l2tp-pool l2tp_pool client-name BNG server-name LNS1
rtb confd set access l2tp-pool l2tp_pool client-name BNG server-name LNS1 client-ipv4 10.0.0.1
rtb confd set access l2tp-pool l2tp_pool client-name BNG server-name LNS1 server-ipv4 10.0.0.2
rtb confd set access l2tp-pool l2tp_pool client-name BNG server-name LNS1 secret rtbrick
The example below shows the running-config of L2TP pool configuration:
        "l2tp-pool:l2tp_pool BNG LNS1": {
          "client-ipv4": "10.0.0.1",
          "server-ipv4": "10.0.0.2",
          "secret": "rtbrick"
        }
2.9. L2TP Tunnel Pool Configuration
The L2TP tunnel pool configuration is an optional step in subscriber management configuration allowing local defined L2TP tunnel endpoints.
Generally, the L2TP tunnel pool configuration involves the following:
-
Holding the L2TP LAC and LNS configuration
-
Providing the shared secret
-
Controlling the session limit, tunnel preference and more
2.9.1. Configuring the L2TP Pool Client and Server Names
The first step is to give the L2TP pool, client and server a name. This example assigns the the client lac1 and server server1 to the pool l2tp_pool.
Each pool supports up to 32 tunnel endpoints.
#
# Setting the L2TP pool configuration of client and server
# Option 1: Setting L2TP pool configuration of client and server from global mode
#
[ ]
user@rtbrick:confd> set access l2tp-pool l2tp_pool client-name lac1 server-name server1
[ ]
user@rtbrick:confd> commit
Commit succeed

# Option 2: Setting l2tp pool configuration of client and server from global access mode
user@rtbrick:confd> edit access
[ access ]
user@rtbrick:confd> set l2tp-pool l2tp_pool client-name lac1 server-name server1
[ access ]
user@rtbrick:confd> end
[ ]
user@rtbrick:confd> commit
Commit succeed

# Running Configurations:
[ ]
user@rtbrick:confd> show running-configuration
{
    "running-configuration": {
        "access": [
            {
                "l2tp-pool:l2tp_pool lac1 server1": {
                }
            }
        ]
    }
}
2.9.2. Configuring the L2TP Pool Client IPv4 Address
This example assigns the IPv4 address 10.0.0.1.
#
# Setting the L2TP pool client ipv4 address configuration
# Option 1: Setting L2TP pool client ipv4 address configuration from global mode#
[ ]
user@rtbrick:confd> set access l2tp-pool l2tp_pool client-name lac1 server-name server1 client-ipv4 10.0.0.1
[ ]
user@rtbrick:confd> commit
Commit succeed

# Option 2: Setting l2tp pool client ipv4 address configuration from global access mode
user@rtbrick:confd> edit access
[ access ]
user@rtbrick:confd> set l2tp-pool l2tp_pool client-name lac1 server-name server1 client-ipv4 10.0.0.1
[ access ]
user@rtbrick:confd> end
[ ]
user@rtbrick:confd> commit
Commit succeed

# Option 3: Setting l2tp pool client ipv4 address configuration from l2tp-pool mode user@rtbrick:confd> edit access
[ access ]
user@rtbrick:confd> edit l2tp-pool l2tp_pool client-name lac1 server-name server1
[ access l2tp-pool l2tp_pool client-name lac1 server-name server1 ] user@rtbrick:confd> set client-ipv4 10.0.0.1
[ access l2tp-pool l2tp_pool client-name lac1 server-name server1 ]
user@rtbrick:confd> end
[ ]
user@rtbrick:confd> commit
Commit succeed

# Running Configurations:
[ ]
user@rtbrick:confd> show running-configuration
{
    "running-configuration": {
        "access": [
            {
                "l2tp-pool:l2tp_pool lac1 server1": {
                    "client-ipv4": "10.0.0.1"
                }
            }
        ]
    }
}
2.9.3. Configuring the L2TP Pool Preference
Do the following to assign a pool preference value to the L2TP pool. This example assigns the preference of the pool entry/tunnel endpoint within the pool.
#
# Setting the L2TP pool preference value configuration
# Option 1: Setting L2TP pool preference value configuration from global mode
#
[ ]
user@rtbrick:confd> set access l2tp-pool l2tp_pool client-name lac1 server-name server1 preference 7
[ ]
user@rtbrick:confd> commit
Commit succeed

# Option 2: Setting l2tp pool preference value configuration from global access mode user@rtbrick:confd> edit access
[ access ]
user@rtbrick:confd> set l2tp-pool l2tp_pool client-name lac1 server-name server1 preference 7
[ access ]
user@rtbrick:confd> end
[ ]
user@rtbrick:confd> commit
Commit succeed

# Option 3: Setting l2tp pool preference value configuration from l2tp-pool mode user@rtbrick:confd> edit access
[ access ]
user@rtbrick:confd> edit l2tp-pool l2tp_pool client-name lac1 server-name server1
[ access l2tp-pool l2tp_pool client-name lac1 server-name server1 ] user@rtbrick:confd> set preference 7
[ access l2tp-pool l2tp_pool client-name lac1 server-name server1 ]
user@rtbrick:confd> end
[ ]
user@rtbrick:confd> commit
Commit succeed

# Running Configurations:
[ ]
user@rtbrick:confd> show running-configuration
{
    "running-configuration": {
        "access": [
            {
                "l2tp-pool:l2tp_pool lac1 server1": {
                    "preference": 7
                }
            }
        ]
    }
}
2.9.4. Configuring the L2TP Pool Shared Secret
Do the following to assign the shared secret of the tunnel endpoint.
#
# Setting the L2TP pool secret password configuration
# Option 1: Setting L2TP pool secret password configuration from global mode
#
[ ]
user@rtbrick:confd> set access l2tp-pool l2tp_pool client-name lac1 server-name server1 secret lac1
[ ]
user@rtbrick:confd> commit
Commit succeed

# Option 2: Setting l2tp pool secret password configuration from global access mode user@rtbrick:confd> edit access
[ access ]
user@rtbrick:confd> set l2tp-pool l2tp_pool client-name lac1 server-name server1 secret lac1
[ access ]
user@rtbrick:confd> end
[ ]
user@rtbrick:confd> commit
Commit succeed

# Option 3: Setting l2tp pool secret password configuration from l2tp-pool mode user@rtbrick:confd> edit access
[ access ]
user@rtbrick:confd> edit l2tp-pool l2tp_pool client-name lac1 server-name server1
[ access l2tp-pool l2tp_pool client-name lac1 server-name server1 ] user@rtbrick:confd> set secret lac1
[ access l2tp-pool l2tp_pool client-name lac1 server-name server1 ]
user@rtbrick:confd> end
[ ]
user@rtbrick:confd> commit
Commit succeed

# Running Configurations:
[ ]
user@rtbrick:confd> show running-configuration
{
    "running-configuration": {
        "access": [
            {
                "l2tp-pool:l2tp_pool lac1 server1": {
                    "secret": "lac1"
                }
            }
        ]
    }
}
2.9.5. Configuring the L2TP Pool Server IPv4 Address
Do the following to assign the L2TP LNS IPv4 address of the endpoint.
#
# Setting the L2TP pool server ipv4 address configuration
# Option 1: Setting L2TP pool server ipv4 address configuration from global mode
#
[ ]
user@rtbrick:confd> set access l2tp-pool l2tp_pool client-name lac1 server-name server1 server-ipv4 10.0.0.3
[ ]
user@rtbrick:confd> commit
Commit succeed

# Option 2: Setting l2tp pool server ipv4 address configuration from global access mode
user@rtbrick:confd> edit access
[ access ]
user@rtbrick:confd> set l2tp-pool l2tp_pool client-name lac1 server-name server1 server-ipv4 10.0.0.3
[ access ]
user@rtbrick:confd> end
[ ]
user@rtbrick:confd> commit
Commit succeed

# Option 3: Setting l2tp pool server ipv4 address configuration from l2tp-pool mode user@rtbrick:confd> edit access
[ access ]
user@rtbrick:confd> edit l2tp-pool l2tp_pool client-name lac1 server-name server1
[ access l2tp-pool l2tp_pool client-name lac1 server-name server1 ] user@rtbrick:confd> set server-ipv4 10.0.0.3
[ access l2tp-pool l2tp_pool client-name lac1 server-name server1 ]
user@rtbrick:confd> end
[ ]
user@rtbrick:confd> commit
Commit succeed

# Running Configurations:
[ ]
user@rtbrick:confd> show running-configuration
{
    "running-configuration": {
        "access": [
            {
                "l2tp-pool:l2tp_pool lac1 server1": {
                    "server-ipv4": "10.0.0.3"
                }
            }
        ]
    }
}
2.9.6. Configuring the Tunnel Session Limit
Do the following to configure the tunnel session limit. This example sets the session limit number to 10.
#
# Setting the L2TP pool session limit value configuration
# Option 1: Setting L2TP pool session limit value configuration from global mode
#
[ ]
user@rtbrick:confd> set access l2tp-pool l2tp_pool client-name lac1 server-name server1 session-limit 1000
[ ]
user@rtbrick:confd> commit
Commit succeed

# Option 2: Setting l2tp pool session limit value configuration from global access mode
user@rtbrick:confd> edit access
[ access ]
user@rtbrick:confd> set l2tp-pool l2tp_pool client-name lac1 server-name server1 session-limit 1000
[ access ]
user@rtbrick:confd> end
[ ]
user@rtbrick:confd> commit
Commit succeed

# Option 3: Setting l2tp pool session limit value configuration from l2tp-pool mode user@rtbrick:confd> edit access
[ access ]
user@rtbrick:confd> edit l2tp-pool l2tp_pool client-name lac1 server-name server1
[ access l2tp-pool l2tp_pool client-name lac1 server-name server1 ] user@rtbrick:confd> set session-limit 1000
[ access l2tp-pool l2tp_pool client-name lac1 server-name server1 ]
user@rtbrick:confd> end
[ ]
user@rtbrick:confd> commit
Commit succeed

# Running Configurations:
[ ]
user@rtbrick:confd> show running-configuration
{
    "running-configuration": {
        "access": [
            {
                "l2tp-pool:l2tp_pool lac1 server1": {
                    "session-limit": 1000
                }
            }
        ]
    }
}
2.10. L2TP Tunnel Profile Configuration
The L2TP profile configuration is an optional step in subscriber management configuration but mandatory to use L2TP.
Generally, the L2TP profile configuration involves the following:
-
Holding the L2TP protocol configuration
-
Providing the tunnel selection algorithm
-
Controlling the default session limit
-
Establishing other parameters
2.10.1. Configuring the L2TP Profile Name
The first step is to give the L2TP profile a name. This example assigns the name l2tp-profile1.
#
# Setting the L2TP profile name
# Option 1: Setting L2TP profile name from global mode
#
[ ]
user@rtbrick:confd> set access l2tp-profile l2tp-profile1
[ ]
user@rtbrick:confd> commit
Commit succeed

# Option 2: Setting l2tp-profile name from global access mode user@rtbrick:confd> edit access
[ access ]
user@rtbrick:confd> set l2tp-profile l2tp-profile1
[ access ]
user@rtbrick:confd> end
[ ]
user@rtbrick:confd> commit
Commit succeed

# Running Configurations:
[ ]
user@rtbrick:confd> show running-configuration

{
    "running-configuration": {
        "access": [
            {
                "l2tp-profile:l2tp-profile1": {
                }
            }
        ]
    }
}
2.10.2. Configuring the L2TP VRF Instance Profile
The L2TP profile allows to define the VRF instance used to lookup the
tunnel endpoints. Do the following to configure the VRF instance for the L2TP tunnel profile.
This example sets the VRF instance to public.
#
# Setting the L2TP vrf instance of the profile
# Option 1: Setting L2TP vrf instance of the profile from global mode
#
[ ]
user@rtbrick:confd> set access l2tp-profile l2tp-profile1 instance public
[ ]
user@rtbrick:confd> commit
Commit succeed

# Option 2: Setting l2tp vrf instance of the profile from global access mode user@rtbrick:confd> edit access
[ access ]
user@rtbrick:confd> set l2tp-profile l2tp-profile1 instance public
[ access ]
user@rtbrick:confd> end
[ ]
user@rtbrick:confd> commit
Commit succeed
# Option 3: Setting l2tp vrf instance of the profile from l2tp-profile mode user@rtbrick:confd> edit access
[ access ]
user@rtbrick:confd> edit l2tp-profile l2tp-profile1
[ access l2tp-profile l2tp-profile1 ]
user@rtbrick:confd> set instance public
[ access l2tp-profile l2tp-profile1 ]
user@rtbrick:confd> end
[ ]
user@rtbrick:confd> commit
Commit succeed

# Running Configurations:
[ ]
user@rtbrick:confd> show running-configuration
{
    "running-configuration": {
        "access": [
            {
                "l2tp-profile:l2tp-profile1": {
                    "instance": "public"
                }
            }
        ]
    }
}
2.10.3. Configuring the L2TP Profile Address Pool Name
This configuration allows to assign a default local L2TP pool name which can be overwritten by user defined pool names such as local profile or RADIUS. This example sets the pool name to l2tp-pool.
#
# Setting the L2TP pool name of the profile
# Option 1: Setting L2TP pool name of the profile from global mode
#
[ ]
user@rtbrick:confd> set access l2tp-profile l2tp-profile1 pool-name l2tp_pool
[ ]
user@rtbrick:confd> commit
Commit succeed

# Option 2: Setting l2tp pool name of the profile from global access mode user@rtbrick:confd> edit access
[ access ]
user@rtbrick:confd> set l2tp-profile l2tp-profile1 pool-name l2tp_pool
[ access ]
user@rtbrick:confd> end
[ ]
user@rtbrick:confd> commit
Commit succeed

# Option 3: Setting l2tp pool name of the profile from l2tp-profile mode user@rtbrick:confd> edit access
[ access ]
user@rtbrick:confd> edit l2tp-profile l2tp-profile1
[ access l2tp-profile l2tp-profile1 ]
user@rtbrick:confd> set pool-name l2tp_pool
[ access l2tp-profile l2tp-profile1 ]
user@rtbrick:confd> end
[ ]
user@rtbrick:confd> commit
Commit succeed

# Running Configurations:
[ ]
user@rtbrick:confd> show running-configuration
{
    "running-configuration": {
        "access": [
            {
                "l2tp-profile:l2tp-profile1": {
                    "pool-name": "l2tp_pool"
                }
            }
        ]
    }
}
2.10.4. Configuring the L2TP Profile Hello Timer
This option configures the L2TP tunnel hello interval in milliseconds for all tunnels associated with this profile.
#
# Setting the L2TP hello timer of the profile
# Option 1: Setting L2TP hello timer of the profile from global mode
#
[ ]
user@rtbrick:confd> set access l2tp-profile l2tp-profile1 hello-interval 30000
[ ]
user@rtbrick:confd> commit
Commit succeed

# Option 2: Setting l2tp hello timer of the profile from global access mode user@rtbrick:confd> edit access
[ access ]
user@rtbrick:confd> set l2tp-profile l2tp-profile1 hello-interval 30000
[ access ]
user@rtbrick:confd> end
[ ]
user@rtbrick:confd> commit
Commit succeed

# Option 3: Setting l2tp hello timer of the profile from l2tp-profile mode user@rtbrick:confd> edit access
[ access ]
user@rtbrick:confd> edit l2tp-profile l2tp-profile1
[ access l2tp-profile l2tp-profile1 ]
user@rtbrick:confd> set hello-interval 30000
[ access l2tp-profile l2tp-profile1 ]
user@rtbrick:confd> end
[ ]
user@rtbrick:confd> commit
Commit succeed

# Running Configurations:
[ ]
user@rtbrick:confd> show running-configuration
{
    "running-configuration": {
        "access": [
            {
                "l2tp-profile:l2tp-profile1": {
                    "hello-interval": "30000"
                }
            }
        ]
    }
}
2.10.5. Configuring the L2TP Profile Hide Authentication Indicator
This option enables to hide all authentication related L2TP AVP as defined in section 4.3 of RFC2661.
#
# Setting the L2TP hide authentication of the profile
# Option 1: Setting L2TP hide authentication of the profile from global mode
#
[ ]
user@rtbrick:confd> set access l2tp-profile l2tp-profile1 hide-authentication
[ ]
user@rtbrick:confd> commit
Commit succeed

# Option 2: Setting l2tp hide authentication of the profile from global access mode user@rtbrick:confd> edit access
[ access ]
user@rtbrick:confd> set l2tp-profile l2tp-profile1 hide-authentication
[ access ]
user@rtbrick:confd> end
[ ]
user@rtbrick:confd> commit
Commit succeed

# Option 3: Setting l2tp hide authentication of the profile from l2tp-profile mode user@rtbrick:confd> edit access
[ access ]
user@rtbrick:confd> edit l2tp-profile l2tp-profile1
[ access l2tp-profile l2tp-profile1 ]
user@rtbrick:confd> set hide-authentication
[ access l2tp-profile l2tp-profile1 ]
user@rtbrick:confd> end
[ ]
user@rtbrick:confd> commit
Commit succeed

# Running Configurations:
[ ]
user@rtbrick:confd> show running-configuration
{
    "running-configuration": {
        "access": [
            {
                "l2tp-profile:l2tp-profile1": {
                    "hide-authentication": true
                }
            }
        ]
    }
}
2.10.6. Configuring the L2TP Profile Idle Timeout Interval
This option defines how long to keep a tunnel established which has no sessions (is idle) in milliseconds.
#
# Setting the L2TP idle timeout of the profile
# Option 1: Setting L2TP idle timeout of the profile from global mode
#
[ ]
user@rtbrick:confd> set access l2tp-profile l2tp-profile1 idle-timeout-interval 600000
[ ]
user@rtbrick:confd> commit
Commit succeed

# Option 2: Setting l2tp idle timeout of the profile from global access mode user@rtbrick:confd> edit access
[ access ]
user@rtbrick:confd> set l2tp-profile l2tp-profile1 idle-timeout-interval 600000
[ access ]
user@rtbrick:confd> end
[ ]
user@rtbrick:confd> commit
Commit succeed
# Option 3: Setting l2tp idle timeout of the profile from l2tp-profile mode user@rtbrick:confd> edit access
[ access ]
user@rtbrick:confd> edit l2tp-profile l2tp-profile1
[ access l2tp-profile l2tp-profile1 ]
user@rtbrick:confd> set idle-timeout-interval 600000
[ access l2tp-profile l2tp-profile1 ]
user@rtbrick:confd> end
[ ]
user@rtbrick:confd> commit
Commit succeed

# Running Configurations:
[ ]
user@rtbrick:confd> show running-configuration
{
    "running-configuration": {
        "access": [
            {
                "l2tp-profile:l2tp-profile1": {
                    "idle-timeout-interval": "600000"
                }
            }
        ]
    }
}
2.10.7. Configuring the L2TP Profile Receive Window Size
This option refers to the reliable delivery of L2TP control messages as defined in section 5.8 of RFC2661.
#
# Setting the L2TP receive window of the profile
# Option 1: Setting L2TP receive window of the profile from global mode
#
[ ]
user@rtbrick:confd> set access l2tp-profile l2tp-profile1 receive-window 8
[ ]
user@rtbrick:confd> commit
Commit succeed

# Option 2: Setting l2tp receive window of the profile from global access mode user@rtbrick:confd> edit access
[ access ]
user@rtbrick:confd> set l2tp-profile l2tp-profile1 receive-window 8
[ access ]
user@rtbrick:confd> end
[ ]
user@rtbrick:confd> commit
Commit succeed

# Option 3: Setting l2tp receive window of the profile from l2tp-profile mode user@rtbrick:confd> edit access
[ access ]
user@rtbrick:confd> edit l2tp-profile l2tp-profile1
[ access l2tp-profile l2tp-profile1 ]
user@rtbrick:confd> set receive-window 8
[ access l2tp-profile l2tp-profile1 ]
user@rtbrick:confd> end
[ ]
user@rtbrick:confd> commit
Commit succeed

# Running Configurations:
[ ]
user@rtbrick:confd> show running-configuration
{
    "running-configuration": {
        "access": [
            {
            "l2tp-profile:l2tp-profile1": {
                "receive-window": 8
             }
          }
      ]
   }
}
2.10.8. Configuring the L2TP Profile Retransmit Interval
The L2TP profile is associated with a retransmit interval. Do the following to configure the retransmit interval for the L2TP tunnel profile. This example sets the retransmit interval to 1 second.
#
# Setting the L2TP retransmit interval of the profile
# Option 1: Setting L2TP retransmit interval of the profile from global mode
#
[ ]
user@rtbrick:confd> set access l2tp-profile l2tp-profile1 retransmit-interval 1000
[ ]
user@rtbrick:confd> commit
Commit succeed

# Option 2: Setting l2tp retransmit interval of the profile from global access mode user@rtbrick:confd> edit access
[ access ]
user@rtbrick:confd> set l2tp-profile l2tp-profile1 retransmit-interval 1000
[ access ]
user@rtbrick:confd> end
[ ]
user@rtbrick:confd> commit
Commit succeed

# Option 3: Setting l2tp retransmit interval of the profile from l2tp-profile mode user@rtbrick:confd> edit access
[ access ]
user@rtbrick:confd> edit l2tp-profile l2tp-profile1
[ access l2tp-profile l2tp-profile1 ]
user@rtbrick:confd> set retransmit-interval 1000
[ access l2tp-profile l2tp-profile1 ]
user@rtbrick:confd> end
[ ]
user@rtbrick:confd> commit
Commit succeed

# Running Configurations:
[ ]
user@rtbrick:confd> show running-configuration
{
    "running-configuration": {
        "access": [
            {
                "l2tp-profile:l2tp-profile1": {
                    "retransmit-interval": "1000"
                }
            }
        ]
    }
}
2.10.9. Configuring the L2TP Profile Session Limit
The L2TP profile is associated with a default tunnel session limit. Do the following to configure the session limit number for the L2TP profile. This example sets the session limit number to 1000.
#
# Setting the L2TP session limit of the profile
# Option 1: Setting L2TP session limit of the profile from global mode
#
[ ]
user@rtbrick:confd> set access l2tp-profile l2tp-profile1 session-limit 1000
[ ]
user@rtbrick:confd> commit
Commit succeed
# Option 2: Setting l2tp session limit of the profile from global access mode user@rtbrick:confd> edit access
[ access ]
user@rtbrick:confd> set l2tp-profile l2tp-profile1 session-limit 1000
[ access ]
user@rtbrick:confd> end
[ ]
user@rtbrick:confd> commit
Commit succeed
# Option 3: Setting l2tp session limit of the profile from l2tp-profile mode user@rtbrick:confd> edit access
[ access ]
user@rtbrick:confd> edit l2tp-profile l2tp-profile1
[ access l2tp-profile l2tp-profile1 ]
user@rtbrick:confd> set session-limit 1000
[ access l2tp-profile l2tp-profile1 ]
user@rtbrick:confd> end
[ ]
user@rtbrick:confd> commit
Commit succeed

# Running Configurations:
[ ]
user@rtbrick:confd> show running-configuration
{
    "running-configuration": {
        "access": [
            {
                "l2tp-profile:l2tp-profile1": {
                    "session-limit": 1000
                }
            }
        ]
    }
}
2.10.10. Configuring the L2TP Profile Selection Algorithm
The L2TP profile is associated with an algorithm used to select L2TP tunnels. This algorithm can be configured as BALANCED (choose tunnels in order to balance the sessions) or RANDOM (choose tunnels at random regardless of active sessions). This section shows how to configure both algorithms.
2.10.10.1. Configuring the BALANCED L2TP Profile Selection Algorithm
The L2TP profile is associated with an algorithm used to select L2TP tunnels. Do the following to configure the BALANCED selection algorithm for the L2TP tunnel profile.
#
# Setting the L2TP selection algorithm type balanced of the profile
# Option 1: Setting L2TP selection algorithm type balanced of the profile from global mode

#
[ ]
user@rtbrick:confd> set access l2tp-profile l2tp-profile1 selection-algorithm BALANCED
[ ]
user@rtbrick:confd> commit
Commit succeed

# Option 2: Setting l2tp selection algorithm type balanced of the profile from global access mode
user@rtbrick:confd> edit access
[ access ]
user@rtbrick:confd> set l2tp-profile l2tp-profile1 selection-algorithm BALANCED
[ access ]
user@rtbrick:confd> end
[ ]
user@rtbrick:confd> commit
Commit succeed

# Option 3: Setting l2tp selection algorithm type balanced of the profile from
l2tp-profile mode
user@rtbrick:confd> edit access
[ access ]
user@rtbrick:confd> edit l2tp-profile l2tp-profile1
[ access l2tp-profile l2tp-profile1 ]
user@rtbrick:confd> set selection-algorithm BALANCED
[ access l2tp-profile l2tp-profile1 ]
user@rtbrick:confd> end
[ ]
user@rtbrick:confd> commit
Commit succeed

# Running Configurations:
[ ]
user@rtbrick:confd> show running-configuration
{
    "running-configuration": {
        "access": [
            {
                "l2tp-profile:l2tp-profile1": {
                    "selection-algorithm": "BALANCED"
                }
            }
        ]
    }
}
2.10.10.2. Configuring the RANDOM L2TP Profile Selection Algorithm
The L2TP profile is associated with an algorithm used to select L2TP tunnels. Do the following to configure the RANDOM selection algorithm for the L2TP tunnel profile.
#
# Setting the L2TP selection algorithm type random of the profile
# Option 1: Setting L2TP selection algorithm type random of the profile from global mode
#
[ ]
user@rtbrick:confd> set access l2tp-profile l2tp-profile1 selection-algorithm RANDOM
[ ]
user@rtbrick:confd> commit
Commit succeed

# Option 2: Setting l2tp selection algorithm type random of the profile from global access mode
user@rtbrick:confd> edit access
[ access ]
user@rtbrick:confd> set l2tp-profile l2tp-profile1 selection-algorithm RANDOM
[ access ]
user@rtbrick:confd> end
[ ]
user@rtbrick:confd> commit
Commit succeed

# Option 3: Setting l2tp selection algorithm type random of the profile from
l2tp-profile mode
user@rtbrick:confd> edit access
[ access ]
user@rtbrick:confd> edit l2tp-profile l2tp-profile1
[ access l2tp-profile l2tp-profile1 ]
user@rtbrick:confd> set selection-algorithm RANDOM
[ access l2tp-profile l2tp-profile1 ]
user@rtbrick:confd> end
[ ]
user@rtbrick:confd> commit
Commit succeed

# Running Configurations:
[ ]
user@rtbrick:confd> show running-configuration
{
    "running-configuration": {
        "access": [
            {
                "l2tp-profile:l2tp-profile1": {
                    "selection-algorithm": "RANDOM"
                }
            }
        ]
    }
}
2.10.10.3. Configuring the L2TP MPLS Service Label
The service-label parameter is mandatory to support L2TP encapsulated traffic over MPLS and defines the label which must be used for L2TP encapsulated traffic. This label is automatically used and advertised by BGP application.
#
# Setting the L2TP MPLS service label
# Option 1: Setting L2TP service label 1000 of the profile from global mode
#
[ ]
user@rtbrick:confd> set access l2tp-profile l2tp-profile1 service-label 1000
[ ]
user@rtbrick:confd> commit
Commit succeed

# Option 2: Setting L2TP service label 1000of the profile from global access mode
user@rtbrick:confd> edit access
[ access ]
user@rtbrick:confd> set l2tp-profile l2tp-profile1 service-label 1000
[ access ]
user@rtbrick:confd> end
[ ]
user@rtbrick:confd> commit
Commit succeed

# Option 3: Setting L2TP service label 1000 of the profile from
l2tp-profile mode
user@rtbrick:confd> edit access
[ access ]
user@rtbrick:confd> edit l2tp-profile l2tp-profile1
[ access l2tp-profile l2tp-profile1 ]
user@rtbrick:confd> set service-label 1000
[ access l2tp-profile l2tp-profile1 ]
user@rtbrick:confd> end
[ ]
user@rtbrick:confd> commit
Commit succeed

# Running Configurations:
[ ]
user@rtbrick:confd> show running-configuration
{
    "running-configuration": {
        "access": [
            {
                "l2tp-profile:l2tp-profile1": {
                    "service-label": 1000
                }
            }
        ]
    }
}
3. L2TP Show Commands
3.1. show l2tp session all
This command lists all L2TP sessions.
ubuntu@rtbrick:~$ rtb l2tpd.1  show  l2tp  session all
+----------+----------+----------+----------------+----------------------+
  Local TID  Local SID  Peer SID        State           Subscriber ID
+----------+----------+----------+----------------+----------------------+
    35478      60391        1        ESTABLISHED      72339069014638595
+----------+----------+----------+----------------+----------------------+
ubuntu@rtbrick:~$ rtb l2tpd.1  show  l2tp  tunnel  all
+------+---------+---------+----------------+--------------------+--------------------+----------+-----------+-----------+
  Role  Local TID  Peer TID       State           Local Name            Peer Name      Preference   Sessions  Established
+------+---------+---------+----------------+--------------------+--------------------+----------+-----------+-----------+
   LAC    35478       1        ESTABLISHED            BNG                 LNS1            10000         1           1
+------+---------+---------+----------------+--------------------+--------------------+----------+-----------+-----------+
ubuntu@rtbrick:~$ rtb pppoed.1  show  ppp session  all
+----------------------+----------------------+------+------------+------------+------------+------------+
 User Name              Subscriber ID          Type   LCP State    Auth State   IPCP State   IP6CP State
+----------------------+----------------------+------+------------+------------+------------+------------+
 l2tp10server@rtbrick.c 72339069014638595      PPPOE  TUNNELLED    TUNNELLED    N/A          N/A

ubuntu@rtbrick:~$
3.2. show l2tp tunnel detail
This command provides detailed information about L2TP tunnels.
ubuntu@rtbrick:~$ rtb l2tpd.1  show  l2tp  tunnel  detail

Local TID: 35478, Peer TID: 1, State: ESTABLISHED, Role: LAC
  Local Name: BNG, Client Auth Id: BNG
  Peer Name: LNS1, Server Auth Id: LNS1
  Instance: default, Local IP: 192.168.0.3, Peer IP: 10.0.0.2
  Local Parameters:
    Receive Window: 32
    Preference: 10000
    Session Limit: 4000
  Peer Parameters:
    Receive Window: 10
    Framing: SYNC, Bearer: DIGITAL,ANALOG
    Firmware: 256, Vendor: IXIA
ubuntu@rtbrick:~$
3.3. show l2tp tunnel packet statistics
This command provides detailed information about all L2TP tunnel packets.
ubuntu@rtbrick:~$ rtb l2tpd.1  show  l2tp  tunnel  packet  statistics

Packets Received:
    sccrq                     : 0
    sccrp                     : 2
    scccn                     : 0
    hello                     : 0
    zlb                       : 13
    stopccn                   : 0

Packets Queued:
    sccrq                     : 2
    sccrp                     : 0
    scccn                     : 2
    hello                     : 0
    zlb                       : 0
    stopccn                   : 0

Packets Send:
    sccrq                     : 2
    sccrp                     : 0
    scccn                     : 2
    hello                     : 10
    zlb                       : 0
    stopccn                   : 0

Packets Retransmitted:
    sccrq                     : 0
    sccrp                     : 0
    scccn                     : 0
    hello                     : 6
    stopccn                   : 0
3.4. show l2tp session packet statistics
This command provides information about the l2tp session packets.
ubuntu@rtbrick:~$ rtb l2tpd.1  show  l2tp  session packet  statistics

Packets Received:
    icrq                      : 0
    icrp                      : 2
    iccn                      : 0
    cdn                       : 0

Packets Queued:
    icrq                      : 2
    icrp                      : 0
    iccn                      : 2
    cdn                       : 0

Packets Send:
    icrq                      : 2
    icrp                      : 0
    iccn                      : 2
    cdn                       : 0

Packets Retransmitted:
    icrq                      : 0
    icrp                      : 0
    iccn                      : 0
    cdn                       : 0

ubuntu@rtbrick:~$
3.5. show ppp session statistics
This command provides information about the PPP session.
ubuntu@rtbrick:~$ rtb pppoed.1  show  ppp session  statistics  subscriber-id 72339069014638595
 LCP configure-request received                        : 1
 LCP configure-ack received                            : 1
 LCP configure-request sent                            : 1
 LCP configure-ack sent                                : 1
 LCP MRU negotiation failed                            : 1
 LCP magic number negotiation successful               : 1
 PAP authentication-request received                   : 1
ubuntu@rtbrick:~$
3.6. show ppp statistics
This command provides information about PPP.
ubuntu@rtbrick:~$ rtb pppoed.1  show  ppp statistics
 LCP configure-request received                        : 2
 LCP configure-ack received                            : 2
 LCP echo-reply received                               : 2
 LCP configure-request sent                            : 2
 LCP configure-ack sent                                : 2
 LCP echo-request sent                                 : 2
 LCP MRU negotiation failed                            : 2
 LCP magic number negotiation successful               : 2
 PAP authentication-request received                   : 7
 PAP in wrong state received                           : 1
ubuntu@rtbrick:~$
©Copyright 2020 RtBrick, Inc. All rights reserved. The information contained herein is subject to change without notice. The trademarks, logos and service marks ("Marks") displayed in this documentation are the property of RtBrick in the United States and other countries. Use of the Marks are subject to RtBrick’s Term of Use Policy, available at https://www.rtbrick.com/privacy. Use of marks belonging to other parties is for informational purposes only.