1. IGMP Overview
Internet Group Management (IGMP) protocol allows a host to advertise its multicast group membership to neighbouring switches and routers. IGMP is a standard protocol used by the TCP/IP protocol suite to achieve dynamic multicasting.
There are two components in the IGMP solution:
-
IGMPv2/v3 Client: It sends Join or Leave messages to a multicast group. Typical example of a client is a SET-TOP box. The IGMP client can respond to any IGMP general queries or group-specific queries that are received.
-
Multicast Router: The recipient of IGMP Join/Leave message. After receiving the message, it determines whether the corresponding message needs to be processed or not. After processing the IGMP messages, it sends this information to its multicast upstream router. Along with this, it can program certain entries in its routers which results in forwarding specific multicast packets on that interface.
1.1. IGMPv3 Lite
IGMP version 3 adds support for "source filtering", that is, the ability for a system to report interest in receiving packets only from specific source addresses, or from all but specific source addresses, sent to a particular multicast address. That information may be used by multicast routing protocols to avoid delivering multicast packets from specific sources to networks where there are no interested receivers.
The RtBrick IGMP v3lite solution adds support for source filtering. Source filtering enables a multicast receiver host to signal from which groups it wants to receive multicast traffic, and from which sources this traffic is expected. That information may be used by multicast routing protocols to avoid delivering multicast packets from specific sources to networks where there are no interested receivers.
IGMP Version 3 will help conserve bandwidth by allowing a host to select the specific sources from which it wants to receive traffic.Also, multicast routing protocols will be able to make use of this information to conserve bandwidth when constructing the branches of their multicast delivery trees.
2. Configuring IGMP
2.1. Configuring Global Instance
To configure the global instance, enter the following command:
Syntax
Command Parameters
<instance> |
Name of the IGMP instance |
Example
admin@rtbrick: cfg> set instance default address-family ipv4 unicast

admin@rtbrick: cfg> set instance default address-family ipv4 multicast
2.2. Configuring IGMP Protocol on an Instance
To configure an IGMP on an instance, the same instance should be enabled globally with AFI IPv4 and SAFI as both unicast and multicast.
Syntax
|
|
If no instance is specified, IGMP will be enabled on the default instance. |
Command Parameters
<instance> |
Name of the IGMP instance. |
<source-address> |
Source address of the IGMP query at the instance-level. |
<count> |
The number of times that the device sends each IGMP message. Default value: 3. Range: 0-255. |
<tos_value> |
Specifies the type-of-service. Default value: 0. Range: 0-255. |
Example
admin@rtbrick: cfg> set instance ip2vrf protocol igmp

admin@rtbrick: cfg> set instance ip2vrf protocol igmp source-address 192.168.9.1

admin@rtbrick: cfg> set instance ip2vrf protocol igmp robustness-variable 5

admin@rtbrick: cfg> set instance ip2vrf protocol igmp tos 10
2.2.1. Deleting IGMP Protocol on an Instance
|
|
When you delete an IGMP instance, it will delete the IGMP instance-specific configuration tables. |
Syntax
Example
admin@rtbrick: cfg> delete instance default protocol igmp
2.3. Configuring IGMP Robustness Value
To configure the IGMP robustness value, enter the following command:
Syntax
Command Parameters
<instance> |
Name of the instance |
<count> |
The robustness value is used by IGMP to determine the number of times to send messages. Default value: 3. Range: 0-255. |
Example
admin@rtbrick: cfg> set instance ip2vrf protocol igmp robustness-variable 5
2.3.1. Deleting IGMP Robustness Value
To delete the IGMP robustness value, enter the following command:
Syntax
Example
admin@leaf: cfg> delete instance default protocol igmp robustness-variable 5
2.4. Configuring IGMP TOS Value
To configure the IGMP type-of-service (TOS) value, enter the following command:
Syntax
Command Parameters
<instance> |
Name of the instance |
<tos_value> |
Specifies the type-of-service. Default value: 0. Range: 0-255. |
Example
admin@leaf: cfg> set instance ip2vrf protocol igmp tos 10
2.4.1. Deleting IGMP TOS Value
To delete the IGMP type-of-service (TOS) value, enter the following command:
Syntax
Example
admin@rtbrick: cfg> delete instance ip2vrf protocol igmp tos 10
2.5. Enabling IGMP Service on an Interface
|
|
When you start IGMP on an interface, it operates with the default settings. |
To enable IGMP service on an interface, enter the following command:
Syntax
Command Parameters
<instance> |
Name of the instance |
<interface> |
Name of the IP multicast interface |
<count> |
Specifies the maximum count of multicast group memberships |
<version> |
Specifies the IGMP version, that is, IGMPv2 or IGMPv3 |
<profile> |
Name of the interface configuration profile |
Example
admin@rtbrick: cfg> set instance ip2vrf protocol igmp interfaces interface hostif-0/0/0/1 max-groups 30

admin@rtbrick: cfg> set instance ip2vrf protocol igmp interfaces interface hostif-0/0/0/1 version IGMPv3

admin@rtbrick: cfg> set instance ip2vrf protocol igmp interfaces interface hostif-0/0/0/1 interface-profile profile
2.5.1. Deleting IGMP Service on an Interface
To delete IGMP service on an interface, enter the following command:
Syntax
To delete the interface options, enter the following commands:
Command Parameters
<instance> |
Name of the instance |
<interface> |
Name of the logical interface |
Example
admin@rtbrick: cfg> delete instance default protocol igmp interfaces interface ifl-0/0/1/1
admin@rtbrick: cfg> delete instance default protocol igmp interfaces interface ifl-0/0/1/1 max-groups 10
admin@rtbrick: cfg> delete instance default protocol igmp interfaces interface ifl-0/0/1/1 version IGMPv3
admin@rtbrick: cfg> delete instance default protocol igmp interfaces interface ifl-0/0/1/1 interface-profile iprofile
2.6. Configuring IGMP Version
The version command sets the IGMP version on the interface.
|
|
The default IGMP version is IGMPv3. |
Syntax
Command Parameters
<instance> |
Name of the instance |
<interface> |
Name of the logical interface |
<IGMPv2 | IGMPv3> |
Specifies the IGMP version |
Example
admin@rtbrick: cfg> set instance ip2vrf protocol igmp interfaces interface hostif-0/0/0/1 version IGMPv3
2.6.1. Deleting IGMP Version
To delete the IGMP version, enter the following command:
Syntax
Example
admin@rtbrick: cfg> delete instance ip2vrf protocol igmp interfaces interface hostif-0/0/0/1 version IGMPv3
2.7. Configuring IGMP Maximum Members
To configure the IGMP maximum members count, enter the following command:
Syntax
Command Parameters
<instance> |
Name of the instance |
<interface> |
Name of the logical interface |
<count> |
Specifies max-members count. The range is 1-100000. The default is 8192. |
Example
admin@rtbrick: cfg> set instance ip2vrf protocol igmp interfaces interface hostif-0/0/0/1 max-groups 9000
2.7.1. Deleting IGMP Maximum Members
To delete the IGMP maximum members count, enter the following command:
Syntax
Example
admin@rtbrick: cfg> delete instance ip2vrf protocol igmp interfaces interface hostif-0/0/0/1 max-groups 9000
2.8. Configuring IGMP Interface Profile
To configure IGMP interface profile, enter the following commands:
Syntax
Command Parameters
<profile> |
Name of the interface configuration profile |
Example
admin@rtbrick: cfg> set multicast-options igmp interface-profile profile
2.8.1. Configuring IGMP Interface Profile Attributes
You can configure the following interface profile attributes:
-
filter-policy
-
immediate-leave
-
query-max-response-time
-
query-interval
-
querier-timeout-interval
-
ssm-map-policy
-
start-query-count
-
start-query-interval
2.8.2. Deleting IGMP Interface Profile Attributes
To delete IGMP interface profile and interface profile options, enter the following commands:
Syntax
Command Parameters
<profile> |
Name of the interface configuration profile |
Example
admin@rtbrick: cfg> delete multicast-options igmp interface-profile iprofile start-query-interval 1
2.8.3. Configuring Maximum Query Response Interval
The Maximum Query Response Interval specifies the time that a host can take to reply to a query (maximum response time).
To configure Maximum Query Response Interval, enter the following command:
Syntax
Command Parameters
<profile> |
Name of the interface configuration profile |
<interval> |
Maximum query response interval in seconds. The maximum query response interval ranges from 1 to 1024 seconds. The default value is 100 seconds. |
Example
admin@leaf: cfg> multicast-options igmp interface-profile iprofile query-max-response-time 10
2.8.4. Deleting Maximum Query Response Interval
To delete Maximum Query Response Interval, enter the following command:
Syntax
Example
admin@leaf: cfg> delete multicast-options igmp interface-profile profile maximum-query-response-interval 10
2.8.5. Configuring Query Interval
The Query Interval specifies the time interval at which IGMP query is sent.
To configure query interval, enter the following command:
Syntax
Command Parameters
<interval> |
IGMP query interval in seconds. The query interval ranges from 1 to 1024 seconds. The default value is 125 seconds. |
Example
admin@leaf: cfg> set multicast-options igmp interface-profile profile query-interval 30
2.8.6. Configuring Start Query Count
The Start Query Count specifies the number of queries sent out on startup, separated by the Start Query Interval.
To configure the start query count, enter the following command:
Syntax
Command Parameters
<count> |
Specifies the number of queries sent out on startup, separated by the Start Query Interval. The start query count ranges from 1 to 1024. The default value is 3. |
Example
admin@leaf: cfg> set multicast-options igmp interface-profile profile start-query-count 10
2.8.7. Configuring Start Query Interval
To configure the start query interval, enter the following command:
Syntax
Command Parameters
<interval> |
Specifies the start query interval. The start-query-interval ranges from 1 to 1024 seconds. The default value is 31 seconds (query-interval/4). |
Example
supervisor@leaf: cfg> set multicast-options igmp interface-profile profile start-query-interval 10
2.8.8. Configuring Querier Timeout Interval
This command specifies the length of time that must pass before a multicast router decides that there is no longer another multicast router which should be the querier.
To configure the querier timeout interval, enter the following command:
Syntax
Command Parameters
<interval> |
Specifies the querier timeout interval in seconds. The querier-timeout-interval ranges from 1 to 1024 seconds. The default value is 425 seconds robustness*query-interval)+(maximum-query-response-interval/2 |
Example
admin@leaf: cfg> set multicast-options igmp interface-profile profile querier-timeout-interval 10
2.8.9. Enabling or Disabling Immediate Leave
The immediate-leave attribute removes group membership immediately upon receiving a group leave membership report.
Syntax
Command Parameters
<enable | disable> |
Enable or disable the immediate leave option |
Example
admin@leaf: cfg> set multicast-options igmp interface-profile profile immediate-leave enable
2.8.10. Configuring SSM Mapping
SSM mapping takes IGMPv2 reports and converts them to IGMPv3. In case of legacy devices, there could be a possibility that BNG might receive IGMPv2 membership reports. If BNG receives an IGMPv2 membership for a specific group G1, BNG uses the SSM mapping configuration to determine one or more Source (S) addresses for a given group. This SSM mappings are translated to the IGMPv3 joins like IGMPV3 JOIN INCLUDE (G, [S1, G1], [S2, G1] and so on) and BNG continues to process as if it has received from the subscriber.
To configure an SSM mapping policy, enter the following command:.
Syntax
Command Parameters
<profile> |
Specifies the interface profile |
||
<policy> |
Specifies SSM mapping policy
|
Example
admin@leaf: cfg> set multicast-options igmp interface-profile profile ssm-map-policy ssm_policy
2.8.11. Configuring Filter Policy
To configure a filter list, enter the following command:
Syntax
Command Parameters
<profile> |
Specifies the name of the configuration profile list |
<policy> |
Specifies the filter policy. The policy should be defined under policy statement. |
Example
admin@leaf: cfg> set multicast-options igmp interface-profile profile filter-policy filter_policy
2.9. Configuring SSM Mapping Policy
SSM mapping takes IGMPv2 reports and converts them to IGMPv3. In case of legacy devices, there could be a possibility that BNG might receive IGMPv2 membership reports. If BNG receives an IGMPv2 membership for a specific group G1, BNG uses the SSM mapping configuration to determine one or more Source (S) addresses for a given group. This SSM mappings are translated to the IGMPv3 joins like IGMPV3 JOIN INCLUDE (G, [S1, G1], [S2, G1] and so on) and BNG continues to process as if it has received from the subscriber.
The example below shows a sample configuration of the ssm-policy.
admin@rtbrck: cfg> set policy statement ssm ordinal 1 match rule 1 type mcast-route-ipv4-group
admin@rtbrck: cfg> set policy statement ssm ordinal 1 match rule 1 value-type complete
admin@rtbrck: cfg> set policy statement ssm ordinal 1 match rule 1 match-type or-longer
admin@rtbrck: cfg> set policy statement ssm ordinal 1 match rule 1 value 233.1.1.0/24
admin@rtbrck: cfg> set policy statement ssm ordinal 1 action rule 1 type mcast-route-ipv4-source
admin@rtbrck: cfg> set policy statement ssm ordinal 1 action rule 1 operation overwrite
admin@rtbrck: cfg> set policy statement ssm ordinal 1 action rule 1 value 100.1.1.1/32
2.10. Configuring Filter Policy
The example below shows how to configure the filter policy.
admin@rtbrck: cfg> set policy statement filter ordinal 1 match rule 1 type mcast-route-ipv4-group
admin@rtbrck: cfg> set policy statement filter ordinal 1 match rule 1 value-type complete
admin@rtbrck: cfg> set policy statement filter ordinal 1 match rule 1 match-type or-longer
admin@rtbrck: cfg> set policy statement filter ordinal 1 match rule 1 value 232.1.1.0/24
admin@rtbrck: cfg> set policy statement filter ordinal 1 action rule 1 operation return-deny
2.11. Configuring the IGMP Static Joins on an Instance
After an interface on a multicast device is configured to statically join an IGMP group, the multicast device considers that the interface has static multicast group members and sends multicast packets to this interface, regardless of whether hosts connected to this interface request the multicast packets.
To configure an IGMP static join on the default instance, enter the following command:
Syntax
Command Parameters
<instance> |
Specifies the instance name |
<group> |
Specifies the multicast address |
<source> |
Specifies the source from which the multicast traffic is received |
<interface> |
Name of the outbound interface |
<interval> |
specifies the refresh interval in seconds. It sends igmpv3 membership report at the specified refresh interval. |
Example
admin@rtbrick: cfg> set instance default protocol igmp static-group 232.2.2.2 1.1.1.1 null0 refresh-interval 10
|
|
|
2.11.1. Deleting IGMP Static Joins
To delete an IGMP static join, enter the following command:.
Syntax
Command Parameters
<instance> |
Specifies the instance name |
<group> |
Specifies the multicast multicast group address |
<source> |
Specifies the source from which the multicast traffic is received |
<interface> |
Name of the IP multicast interface |
Example
admin@leaf: cfg> delete instance default protocol igmp static-group 232.2.2.2 1.1.1.1 null0
3. IGMP Show Commands
3.1. show igmp interface
This command displays the IGMP interface on the default instance.

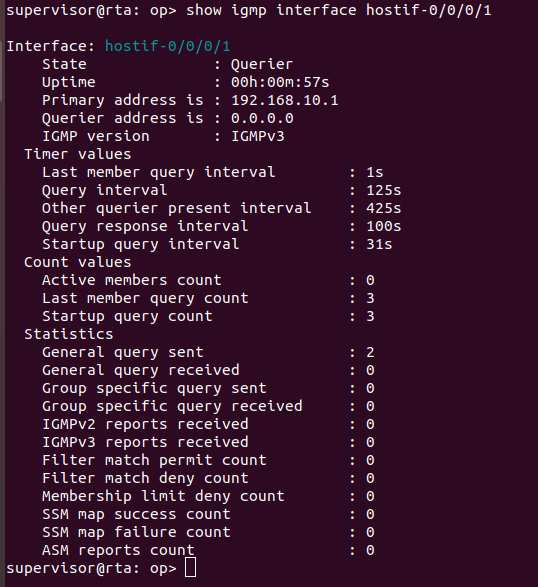
3.2. show igmp interface <logical-interface-name>
This command displays information for the specified IGMP interface.
3.3. show igmp instance <instance-name> interface
This command displays interface summary for the specified instance.

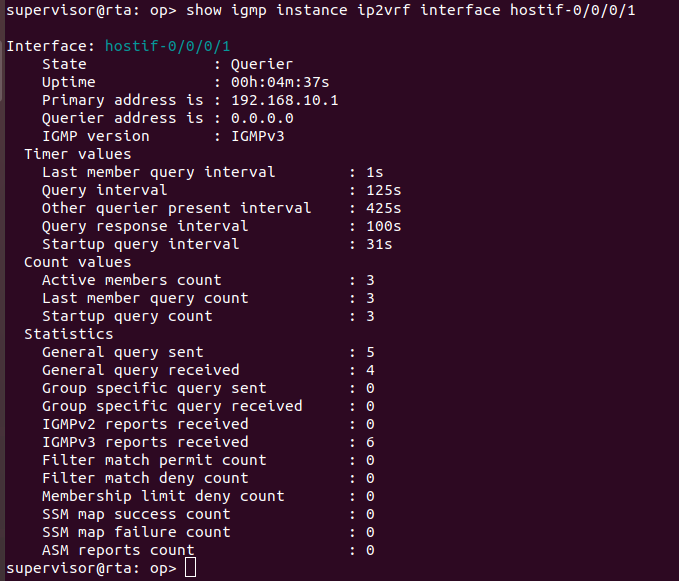
3.4. show igmp instance <instance> interface <logical-interface-name>
This command displays specified interface details for the the specified instance.
3.5. show igmp group
This command displays IGMP groups summary on default instance.

The following command displays the IGMP group details on the specified group address.
show igmp group <group-address>
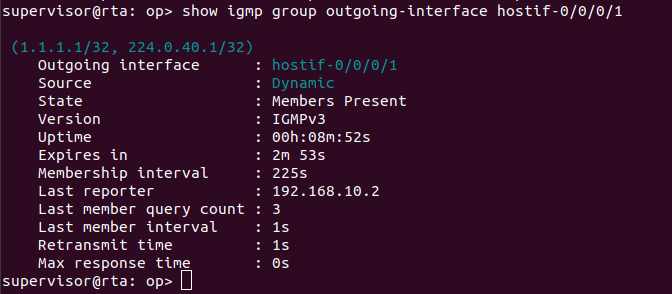
The following command displays the IGMP group details on the specified outgoing interface.
show igmp group outgoing-interface <interface-name>
The following command displays the IGMP group details on the specified multicast source-address.
show igmp group source <source-address>
3.6. show igmp instance <instance-name> group
This command displays IGMP groups summary on specific instance.

The following command displays IGMP groups detailed information on the specified instance with the specified group-address.
show igmp instance <instance-name> group <group-address>
The following command displays IGMP groups detailed information on the specified instance with the specified outgoing-interface.
show igmp instance <instance-name> group outgoing-interface <logical-interface>
The following command displays IGMP groups detailed information on the specified instance with the specified multicast source-address.
show igmp instance <instance-name> group source <source-address>
3.7. IGMP Clear Commands
3.7.1. clear igmp groups all
This command clears IGMP groups on all instance.
Syntax
Example

3.7.2. clear igmp groups instance <instance-name>
This command clears igmp groups on specific instance.
Syntax
Example

3.7.3. clear igmp groups interface <logical-interface-name>
This command clears igmp groups on specific interface.
Syntax
Example

3.7.4. clear igmp interface <logical-interface-name> statistics
This command clears the IGMP interface statistics.
Syntax
Example

3.7.5. clear igmp interface instance <instance-name> statistics
This command clears the IGMP interface statistics for the specified instance.
Syntax
Example

4. IGMP for Subscribers
IGMP can be configured as a service for subscribers in two ways:
-
Local Configuration
-
Using RADIUS Attributes
For more information about these, see the Subscriber Management Configuration Guide.
5. Multicast VPN
5.1. Introduction
The Multicast VPN (MVPN) feature provides the ability to support multicast over a Layer 3 VPN. Multicast allows the efficient distribution of information between a single multicast source and multiple receivers. IP multicast is used to stream video, voice, and data to an MPLS VPN network core.
RBFS operates on the LEAF and SPINE devices. The Leaf layer delivers access services to subscribers or assets, and the spine provides connectivity to the network. The leaf is fully meshed into the Spine and this arrangement is usually referred to as an IP CLOS architecture. The framework provides the network operators with methods to configure and manage a network brick by brick, and provides full control of the network so the focus can be on the deployment of the new services and without any dependencies on hardware. The two tier CLOS architecture allows future extensibility through the leafs that can be added without disturbing the existing topology, so long as they are fully meshed with the spines. Leafs and spines are connected via 100G ports.
LEAF and SPINES are Edge Core devices with Broadcom BCM 88375 (Qumran) with KBP running RBFS stack. Each of these devices are configured with BGP to bring up the fabric. BGP neighbors are in the default instance and the following address families are enabled by default in the peer-group template:
-
IPv6 Unicast (to resolve the next hops)
-
IPv6 Labeled Unicast (to resolve the next hops)
-
VPNv4 (to transport subscriber IPv4 routes, LI End point, LAC endpoint, RADIUS endpoint)
-
VPNv6 (to transport subscriber IPv6 routes, RADIUS endpoint)
-
MVPN (to carry subscriber multicast routes)
5.2. Enabling Multicast Address Family in Fabric
To advertise the subscriber multicast routes, you need to enable MVPN address family in the fabric. RBFS MVPN implementation is based on RFC 6513, “Multicast in MPLS/BGP IP VPNs” and RFC 6514, “BGP Encodings and Procedures for Multicast in MPLS/BGP IP VPNs”.
Before you can enable IPTV service to subscribers, Multicast/MVPN can be enabled in the fabric to achieve this.
-
Enable Multicast address family under global instance
-
Enable the Multicast address family under BGP for the instance
5.2.1. Enabling Multicast Address Family Under Global Instance
The address-family command places the switch in address family mode to configure the address family activity level of individual BGP neighbor addresses. The switch supports these address families:
-
ipv4
-
ipv6
-
mpls
To configure multicast IPV4 address family under the global instance, enter the following command:
5.2.2. Enabling Route-Target Address Family in the Fabric
Similar to the unicast address family, MVPN address family defined under VRF instance needs an import and export route target. The below example shows defining the MVPN address family and corresponding attributes under IP2VRF.
admin@leaf: cfg> set instance ip2vrf address-family ipv4 multicast route-target export target:192.1.4.0:14
admin@leaf: cfg> set instance ip2vrf address-family ipv4 multicast route-target export target:192.1.4.0:14
5.2.3. Enabling Multicast address family under BGP for an instance
To define the multicast address family under BGP for the instance, enter the following commands:
admin@leaf: cfg> set instance ip2vrf protocol bgp address-family ipv4 vpn-multicast
|
|
When the address family IPv4 multicast is enabled, all the VPNv4 routes which are exported from this instance will have a new extended community (rt-import) added.
|
5.3. Enabling MVPN Address Family and Peer Group
5.3.1. Enabling the MVPN address family under default BGP
To define the MVPN address family under default BGP, enter the following command:
admin@leaf: cfg> set instance default protocol bgp address-family ipv4 vpn-multicast
5.3.2. Enabling the MVPN address family under default peer group
To define the MVPN address family under default peer group, enter the following commands:
admin@leaf: cfg> set instance ip2vrf protocol bgp address-family ipv4 multicast
5.3.3. Enabling Extended Nexthop
You can enable extended nexthop capability so that peers in the group do not have to be directly connected.
5.3.4. Enabling Update Nexthop
You can update the nexthop for routes advertised to this peer group.
5.4. Enabling Multicast Redistribution
5.4.1. Enabling Multicast Redistribution from the IGMP Source
To enable Multicast Redistribution from the IGMP source, enter the following command:
5.4.2. Enabling Multicast Redistribution from the PIM Source
To enable Multicast Redistribution from the PIM source, enter the following command:
5.5. The list of CLI commands for the configuration of MVPN
admin@leaf: cfg> set instance ip2vrf address-family ipv4 multicast
admin@leaf: cfg> set instance ip2vrfprotocol bgp address-family ipv4 vpn-multicast
admin@leaf: cfg> set instance ip2vrf protocol bgp peer-group spine address-family ipv4 vpn-multicast extended-nexthop
admin@leaf: cfg> set instance ip2vrf protocol bgp peer-group spine address-family ipv4 vpn-multicast update-nexthop ipv6-address 192:1::3
admin@leaf: cfg> set instance ip2vrf address-family ipv4 multicast rt import target:192.1.4.0:13
admin@leaf: cfg> set instance ip2vrf address-family ipv4 multicast rt export target:192.1.4.0:13
admin@leaf: cfg> set instance ip2vrf protocol bgp address-family ipv4 multicast
admin@leaf: cfg> set instance ip2vrf protocol bgp address-family ipv4 multicast redistribute igmp
6. Configuring PIM
Routing devices can translate Protocol Independent Multicast (PIM) join and prune messages into corresponding Internet Group Management Protocol (IGMP) or Multicast Listener Discovery (MLD) reports or leave messages.
6.1. PIM operational modes
PIM can operate in the following mode:
-
Sparse mode (PIM-SM): PIM-SM uses a shared distribution tree built rooted at an RP to determine paths from source to receiver groups. The RP must be administratively configured on the network.
6.2. Enable Multicast Globally
To enable multicast globally, enter the following command:
Syntax
|
|
Currently multicast is supported on IPv4 address family only. |
Command Parameters
<instance> |
Name of the instance |
<ipv4 |ipv6> |
Specifies the multicast address family |
Example
admin@leaf: cfg> set instance ip2vrf address-family ipv4 multicast
6.2.1. Deleting Multicast Configuration
The example below shows how to delete the mutlicast configuration.
Syntax
Example
6.3. Enabling PIM on a Specific Instance
To enable PIM on a specific instance, enter the following command.
Syntax
|
|
If no instance is specified, PIM will be enabled on the default instance. RBFS supports only IPV4 address family. |
Command Parameters
<instance> |
Name of the instance <ipv4> |
Example
admin@leaf: cfg> set instance ip2vrf protocol pim afi ipv4
6.3.1. Deleting the PIM Configuration on an Instance
The example below shows how to delete the PIM configuration on an instance.
Syntax
Example
6.3.2. Configuring PIM ToS Value
To configure PIM type-of-service (TOS) value, enter the following command:
Command Parameters
<tos value> |
Specifies the type-of-service. Default value: 0. Range: 0-255. |
Example
admin@leaf: cfg> set instance ip2vrf protocol pim tos 10
6.3.3. Configuring the PIM Join-Prune Interval
To configure the the Join-Prune interval, enter the following command:
Syntax
Command Parameters
<timer-value> |
The join/prune interval value, in seconds. The timer ranges from 1 to 65535. The default timer is 210. |
Example
6.3.4. Deleting PIM ToS Value or Join-Prune Interval
To delete PIM ToS Value or Join-Prune Interval, enter the following commands:
Syntax
Example
6.4. Configuring PIM Static Join
To configure PIM static join, enter the following command:
Syntax
Command Parameters
<instance> |
Name of the instance |
<group> |
Specifies the multicast group address |
<interface> |
Specifies the name of the logical interface |
Example
admin@leaf: cfg> set instance ip2vrf protocol pim sparse-mode static-join hostif-0/0/0/1 232.1.1.2 192.0.1.2 hostif-0/0/0/1

admin@leaf: cfg> set instance ip2vrf protocol pim sparse-mode static-join null0 232.1.1.3 192.0.1.3
|
|
The null0 is a discard or sink interface for PIM static join configuration.
|
6.4.1. Deleting PIM Static Join
To delete PIM static join, enter the following command:
Syntax
Example
admin@leaf: cfg> delete instance ip2vrf protocol pim sparse-mode static-join hostif-0/0/0/1 232.1.1.2 192.0.1.2

admin@leaf: cfg> delete instance ip2vrf protocol pim sparse-mode static-join null0 232.1.1.3 192.0.1.3
6.5. Enabling PIM on an Interface
To enable PIM on an interface, enter the following command:
Syntax
Command Parameters
<instance> |
Specifies the name of the instance. |
<logical-interface> |
Specifies the name of the logical interface. |
Example
admin@leaf: cfg> set instance ip2vrf protocol pim sparse-mode interface hostif-0/0/1/2
6.5.1. Deleting PIM on an Interface
To delete PIM on an interface, enter the following command:
Syntax
Command Parameters
<instance> |
Specifies the name of the instance. |
<logical-interface> |
Specifies the name of the logical interface. |
Example
admin@leaf: cfg> delete instance ip2vrf protocol pim sparse-mode interface hostif-0/0/1/2
6.5.2. Configuring PIM Redistribution
To configure PIM redistribution, enter the following command:
Syntax
Command Parameters
<instance> |
Specifies the name of the instance. |
<ipv4 |ipv6> |
Specifies the address family identifier such as IPv4 or IPv6. Currently only IPv4 is supported. |
<multicast> |
Specifies the subsequent address family identifier such as multicast. |
<source> |
Source protocol from which routes are being redistributed such as BGP or static. |
Example
admin@leaf: cfg> set instance red protocol pim sparse-mode redistribute ipv4 multicast bgp
6.5.3. Deleting PIM Redistribution
To delete PIM redistribution, enter the following command:
Syntax
Command Parameters
<instance> |
Specifies the name of the instance. |
<ipv4 |ipv6> |
Specifies the address family identifier such as IPv4 or IPv6. |
<multicast> |
Specifies the subsequent address family identifier such as multicast. |
<source> |
Source protocol from which routes are being redistributed such as BGP or static. |
Example
admin@leaf: cfg> delete instance red protocol pim sparse-mode redistribute ipv4 multicast bgp
6.5.4. Configuring hello-timer
To configure the hello interval, enter the following command:
Syntax
Command Parameters
<instance> |
Specifies the name of the instance. |
<interface> |
Specifies the name of the logical interface. |
<value> |
Specifies the hello timer in seconds. |
Example
admin@leaf: cfg> set instance ip2vrf protocol pim sparse-mode interface hostif-0/0/0/1 hello-interval 100
6.5.5. Deleting hello-timer
To delete the hello interval, enter the following command:
Syntax
Example
admin@leaf: cfg> delete instance ip2vrf protocol pim sparse-mode interface hostif-0/0/0/1 hello-interval 100
6.5.6. Configuring dr-priority
To configure the designated router (DR) priority, enter the following command:
Syntax
Command Parameters
<instance> |
Specifies the name of the instance. |
<interface> |
Specifies the name of the logical interface. |
<value> |
Specifies the Specifies the designated router (DR) priority value. |
Example
admin@leaf: cfg> set instance ip2vrf protocol pim sparse-mode interface hostif-0/0/0/1 dr-priority 101
6.5.7. Deleting dr-priority
To delete the designated router (DR) priority, enter the following command:
Syntax
Example
admin@leaf: cfg> delete instance ip2vrf protocol pim sparse-mode interface hostif-0/0/0/1 dr-priority
6.5.8. Configuring Override Interval
To configure the override interval, enter the following command:
Syntax
Command Parameters
<instance> |
Specifies the name of the instance. |
<interface> |
Specifies the name of the logical interface. |
<interval> |
Specifies the override interval in milliseconds. |
Example
6.5.9. Deleting Override Interval
To delete the override interval, enter the following command:
Syntax
Example
6.5.10. Configuring PIM Propagation Delay
To configure the propagation delay for PIM on an interface, enter the following command:
Syntax
Command Parameters
<instance> |
Specifies the name of the instance. |
<interface> |
Specifies the name of the logical interface. |
<value> |
Specifies the propagation delay in milliseconds. |
Example
6.5.11. Deleting PIM Propagation Delay
To delete the propagation delay for PIM on an interface, enter the following command:
Syntax
Example
6.6. PIM Show commands
6.6.1. PIM logical interface show commands
6.6.1.1. show pim interface
This command displays the PIM logical interface summary default instance.
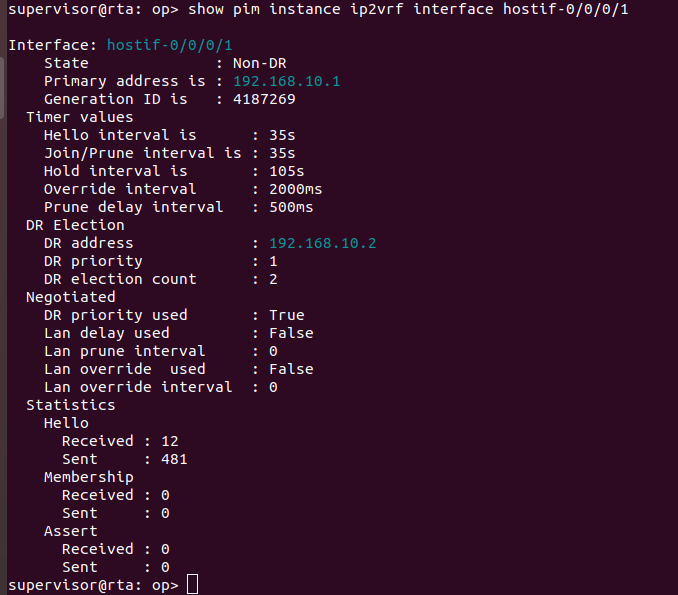
6.6.1.2. show pim instance <instance-name> interface
This command displays the PIM logical interface detail on default instance.
Example

6.6.1.3. show pim interface <logical-interface>
This command displays the PIM logical interface detail default instance.
6.6.1.4. show pim instance <instance-name> interface <logical-interface
This command displays the PIM logical interface summary on specific instance.
6.6.2. PIM neighbor show command
6.6.2.1. show pim neighbor
This command displays the PIM neighbor summary default instance.
6.6.2.2. show pim instance <instance-name> neighbor
This command displays the PIM neighbor summary specific instance.

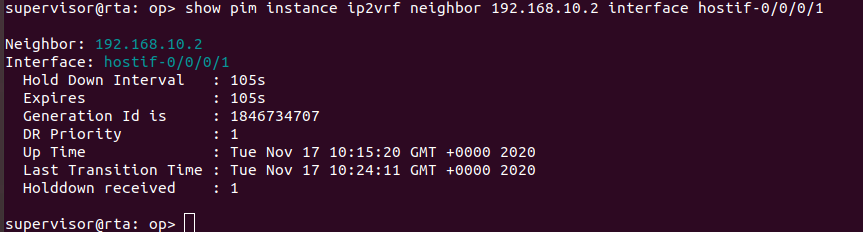
6.6.2.3. show pim neighbor <neighbor-address> interface <interface>
This command displays detailed information from the specified and neighbor and interface.
6.6.2.4. show pim instance <instance-name> neighbor <neighbor-address> interface <interface>
This command displays detailed information from the specified and neighbor and interface on the spcified instance.
6.6.3. PIM mroute show command
6.6.3.1. show pim mroute
This command displays PIM multicast route summary on all instance.
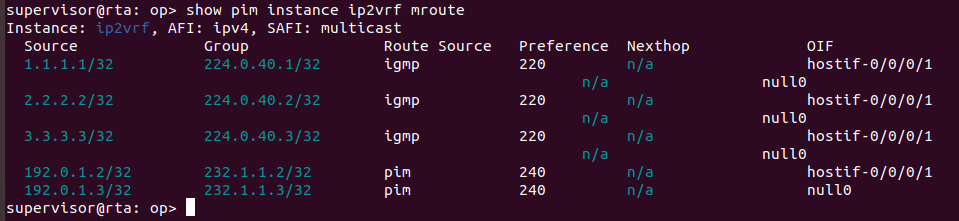
6.6.3.2. show pim instance <instance-name> mroute
This command displays PIM multicast-route summary on specific instance.
6.6.3.3. show pim mroute detail
This command displays detailed information for the PIM multicast route detail on all instance.
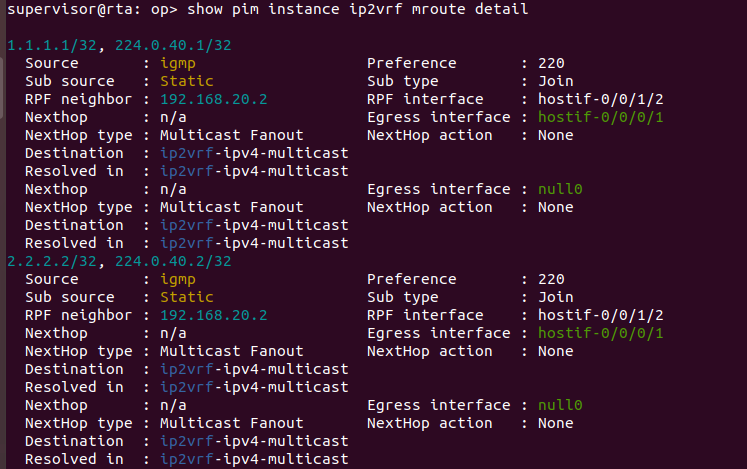
6.6.3.4. show pim instance <instance-name> mroute detail
This command displays PIM multicast route detail on specific instance.
6.6.4. PIM rpf show command
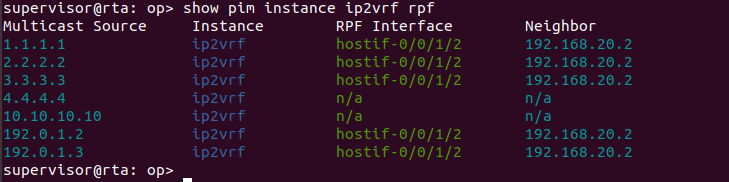
6.6.4.1. show pim instance <instance-name> rpf
This command displays PIM RPF summary.
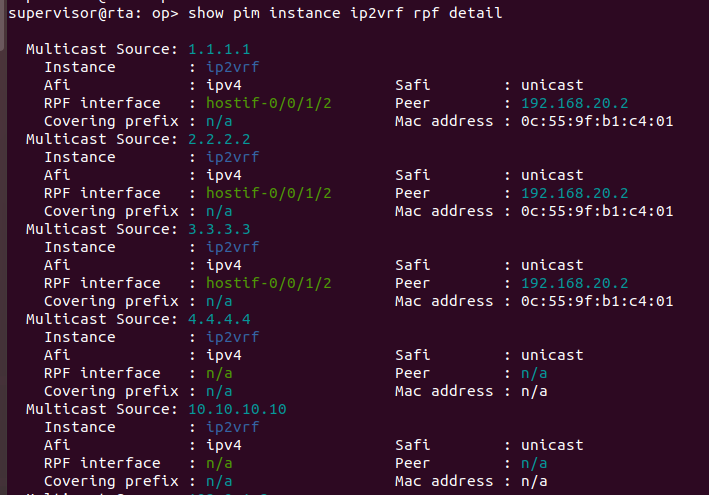
6.6.4.2. show pim instance <instance-name> rpf detail
This command displays PIM RPF detail information.
7. Multicast Show Commands
7.1. show mroute
This command displays all multicast routes in summary format.
supervisor@rtbrick: op> show mroute
Instance: default, AFI: ipv4, SAFI: multicast
Source                   Group                Route Source  Pref     Outgoing Intf
10.1.1.1/32              232.1.1.1/32         static        2        memif-8/8/8/8
20.1.1.1/32              232.1.1.2/32         static        2        memif-4/4/4/1
30.1.1.1/32              232.1.1.1/32         static        2        memif-8/8/8/8
                                                                     memif-8/8/8/8
== show mroute detail
This command displays all multicast routes in detailed format.
supervisor@rtbrick: op> show mroute detail
Instance: default, AFI: ipv4, SAFI: multicast
10.1.1.1/32, 232.1.1.1/32
  Source: static, Preference: 2
      Next Hop type: Multicast Fanout, Next Hop action: MPLS Replicate
      Resolved in: default-ipv4-unicast
      Egress interface: memif-8/8/8/8, NextHop MAC: 7a:41:7e:60:00:08
      MPLS-Label: 10010,bos:1
20.1.1.1/32, 232.1.1.2/32
  Source: static, Preference: 2
      Next Hop type: Multicast Fanout, Next Hop action: IP Replicate
      Egress interface: memif-4/4/4/1
30.1.1.1/32, 232.1.1.1/32
  Source: static, Preference: 2
      Next Hop type: Multicast Fanout, Next Hop action: MPLS Replicate
      Resolved in: default-ipv4-unicast
      Egress interface: memif-8/8/8/8, NextHop MAC: 7a:41:7e:60:00:08
      MPLS-Label: 10010,bos:1
      Next Hop type: Multicast Fanout, Next Hop action: MPLS Replicate
      Resolved in: default-ipv4-unicast
      Egress interface: memif-8/8/8/8, NextHop MAC: 7a:41:7e:60:00:08
      MPLS-Label: 20010,bos:1
7.2. show mroute instance <instance-name>
This command displays all multicast routes with given <instance-name> in summary format
supervisor@rtbrick: op> show mroute instance default
Instance: default, AFI: ipv4, SAFI: multicast
Source                   Group                Route Source  Pref     Outgoing Intf
10.1.1.1/32              232.1.1.1/32         static        2        memif-8/8/8/8
20.1.1.1/32              232.1.1.2/32         static        2        memif-4/4/4/1
30.1.1.1/32              232.1.1.1/32         static        2        memif-8/8/8/8
7.3. show mroute instance <instance-name> detail
This command displays all multicast routes with given <instance-name> in detailed format
supervisor@rtbrick: op> show mroute instance default detail
Instance: default, AFI: ipv4, SAFI: multicast
10.1.1.1/32, 232.1.1.1/32
  Source: static, Preference: 2
      Next Hop type: Multicast Fanout, Next Hop action: MPLS Replicate
      Resolved in: default-ipv4-unicast
      Egress interface: memif-8/8/8/8, NextHop MAC: 7a:41:7e:60:00:08
      MPLS-Label: 10010,bos:1
20.1.1.1/32, 232.1.1.2/32
  Source: static, Preference: 2
      Next Hop type: Multicast Fanout, Next Hop action: IP Replicate
      Egress interface: memif-4/4/4/1
30.1.1.1/32, 232.1.1.1/32
  Source: static, Preference: 2
      Next Hop type: Multicast Fanout, Next Hop action: MPLS Replicate
      Resolved in: default-ipv4-unicast
      Egress interface: memif-8/8/8/8, NextHop MAC: 7a:41:7e:60:00:08
      MPLS-Label: 10010,bos:1
      Next Hop type: Multicast Fanout, Next Hop action: MPLS Replicate
      Resolved in: default-ipv4-unicast
      Egress interface: memif-8/8/8/8, NextHop MAC: 7a:41:7e:60:00:08
      MPLS-Label: 20010,bos:1
7.4. Displaying route using filters
You can display routes with filters like instance, source(multicast source address), group (multicast group address), route-source (source of this route like static, bgp) and address family.
This information can be displayed in summary format or detailed format.
supervisor@rtbrick: op> show mroute ipv4
Instance: default, AFI: ipv4, SAFI: multicast
Source                   Group                Route Source  Pref     Outgoing Intf
10.1.1.1/32              232.1.1.1/32         static        2        memif-8/8/8/8
20.1.1.1/32              232.1.1.2/32         static        2        memif-4/4/4/1
30.1.1.1/32              232.1.1.1/32         static        2        memif-8/8/8/8

supervisor@rtbrick: op> show mroute instance default
Instance: default, AFI: ipv4, SAFI: multicast
Source                   Group                Route Source  Pref     Outgoing Intf
10.1.1.1/32              232.1.1.1/32         static        2        memif-8/8/8/8
20.1.1.1/32              232.1.1.2/32         static        2        memif-4/4/4/1
30.1.1.1/32              232.1.1.1/32         static        2        memif-8/8/8/8
                                                                  memif-8/8/8/8
supervisor@rtbrick: op> show mroute source 30.1.1.1/32
Instance: default, AFI: ipv4, SAFI: multicast
Source                   Group                Route Source  Pref     Outgoing Intf
30.1.1.1/32              232.1.1.1/32         static        2        memif-8/8/8/8
                                                                     memif-8/8/8/8
supervisor@rtbrick: op> show mroute group 232.1.1.2/32
Instance: default, AFI: ipv4, SAFI: multicast
Source                   Group                Route Source  Pref     Outgoing Intf
20.1.1.1/32              232.1.1.2/32         static        2        memif-4/4/4/1

supervisor@rtbrick: op> show mroute route-source static
Instance: default, AFI: ipv4, SAFI: multicast
Source                   Group                Route Source  Pref     Outgoing Intf
10.1.1.1/32              232.1.1.1/32         static        2        memif-8/8/8/8
20.1.1.1/32              232.1.1.2/32         static        2        memif-4/4/4/1
30.1.1.1/32              232.1.1.1/32         static        2        memif-8/8/8/8
                                                                     memif-8/8/8/8
supervisor@rtbrick: op>
This information can be displayed in detailed format.
supervisor@cli1: op> show mroute ipv4 detail
Instance: default, AFI: ipv4, SAFI: multicast
10.1.1.1/32, 232.1.1.1/32
  Source: static, Preference: 2
      Next Hop type: Multicast Fanout, Next Hop action: MPLS Replicate
      Resolved in: default-ipv4-unicast
      Egress interface: memif-8/8/8/8, NextHop MAC: 7a:41:7e:60:00:08
      MPLS-Label: 10010,bos:1
20.1.1.1/32, 232.1.1.2/32
  Source: static, Preference: 2
      Next Hop type: Multicast Fanout, Next Hop action: IP Replicate
      Egress interface: memif-4/4/4/1
30.1.1.1/32, 232.1.1.1/32
  Source: static, Preference: 2
      Next Hop type: Multicast Fanout, Next Hop action: MPLS Replicate
      Resolved in: default-ipv4-unicast
      Egress interface: memif-8/8/8/8, NextHop MAC: 7a:41:7e:60:00:08
      MPLS-Label: 10010,bos:1
      Next Hop type: Multicast Fanout, Next Hop action: MPLS Replicate
      Resolved in: default-ipv4-unicast
      Egress interface: memif-8/8/8/8, NextHop MAC: 7a:41:7e:60:00:08
      MPLS-Label: 20010,bos:1

supervisor@cli1: op> show mroute instance default detail
Instance: default, AFI: ipv4, SAFI: multicast
10.1.1.1/32, 232.1.1.1/32
  Source: static, Preference: 2
      Next Hop type: Multicast Fanout, Next Hop action: MPLS Replicate
      Resolved in: default-ipv4-unicast
      Egress interface: memif-8/8/8/8, NextHop MAC: 7a:41:7e:60:00:08
      MPLS-Label: 10010,bos:1
20.1.1.1/32, 232.1.1.2/32
  Source: static, Preference: 2
      Next Hop type: Multicast Fanout, Next Hop action: IP Replicate
      Egress interface: memif-4/4/4/1
30.1.1.1/32, 232.1.1.1/32
  Source: static, Preference: 2
      Next Hop type: Multicast Fanout, Next Hop action: MPLS Replicate
      Resolved in: default-ipv4-unicast
      Egress interface: memif-8/8/8/8, NextHop MAC: 7a:41:7e:60:00:08
      MPLS-Label: 10010,bos:1
      Next Hop type: Multicast Fanout, Next Hop action: MPLS Replicate
      Resolved in: default-ipv4-unicast
      Egress interface: memif-8/8/8/8, NextHop MAC: 7a:41:7e:60:00:08
      MPLS-Label: 20010,bos:1

supervisor@cli1: op> show mroute source 30.1.1.1/32 detail
Instance: default, AFI: ipv4, SAFI: multicast
30.1.1.1/32, 232.1.1.1/32
  Source: static, Preference: 2
      Next Hop type: Multicast Fanout, Next Hop action: MPLS Replicate
      Resolved in: default-ipv4-unicast
      Egress interface: memif-8/8/8/8, NextHop MAC: 7a:41:7e:60:00:08
      MPLS-Label: 10010,bos:1
      Next Hop type: Multicast Fanout, Next Hop action: MPLS Replicate
      Resolved in: default-ipv4-unicast
      Egress interface: memif-8/8/8/8, NextHop MAC: 7a:41:7e:60:00:08
      MPLS-Label: 20010,bos:1

supervisor@cli1: op> show mroute group 232.1.1.2/32 detail
Instance: default, AFI: ipv4, SAFI: multicast
20.1.1.1/32, 232.1.1.2/32
  Source: static, Preference: 2
      Next Hop type: Multicast Fanout, Next Hop action: IP Replicate
      Egress interface: memif-4/4/4/1


supervisor@cli1: op> show mroute route-source static detail
Instance: default, AFI: ipv4, SAFI: multicast
10.1.1.1/32, 232.1.1.1/32
  Source: static, Preference: 2
      Next Hop type: Multicast Fanout, Next Hop action: MPLS Replicate
      Resolved in: default-ipv4-unicast
      Egress interface: memif-8/8/8/8, NextHop MAC: 7a:41:7e:60:00:08
      MPLS-Label: 10010,bos:1
20.1.1.1/32, 232.1.1.2/32
  Source: static, Preference: 2
      Next Hop type: Multicast Fanout, Next Hop action: IP Replicate
      Egress interface: memif-4/4/4/1
30.1.1.1/32, 232.1.1.1/32
  Source: static, Preference: 2
      Next Hop type: Multicast Fanout, Next Hop action: MPLS Replicate
      Resolved in: default-ipv4-unicast
      Egress interface: memif-8/8/8/8, NextHop MAC: 7a:41:7e:60:00:08
      MPLS-Label: 10010,bos:1
      Next Hop type: Multicast Fanout, Next Hop action: MPLS Replicate
      Resolved in: default-ipv4-unicast
      Egress interface: memif-8/8/8/8, NextHop MAC: 7a:41:7e:60:00:08
      MPLS-Label: 20010,bos:1
©Copyright 2020 RtBrick, Inc. All rights reserved. The information contained herein is subject to change without notice. The trademarks, logos and service marks ("Marks") displayed in this documentation are the property of RtBrick in the United States and other countries. Use of the Marks are subject to RtBrick’s Term of Use Policy, available at https://www.rtbrick.com/privacy. Use of marks belonging to other parties is for informational purposes only.